# Operation Instruction
[TOC]
# introduction
This document is intended to assist staff and customers in quickly understanding the basic functions of system. By following the procedures outlined in this document, users can configure the settings for users, meters, and bills. If you have any questions, please contact our sales or customer service representatives.
Prior to starting, please ensure the following:
Please use the Chrome browser to access .
The installer should have an Android phone with a version of 4.4 or above.
Confirm that the smart meter and communication module have been installed at the site by the engineer and are powered on.
Please verify that you have obtained an account and have logged in to system.
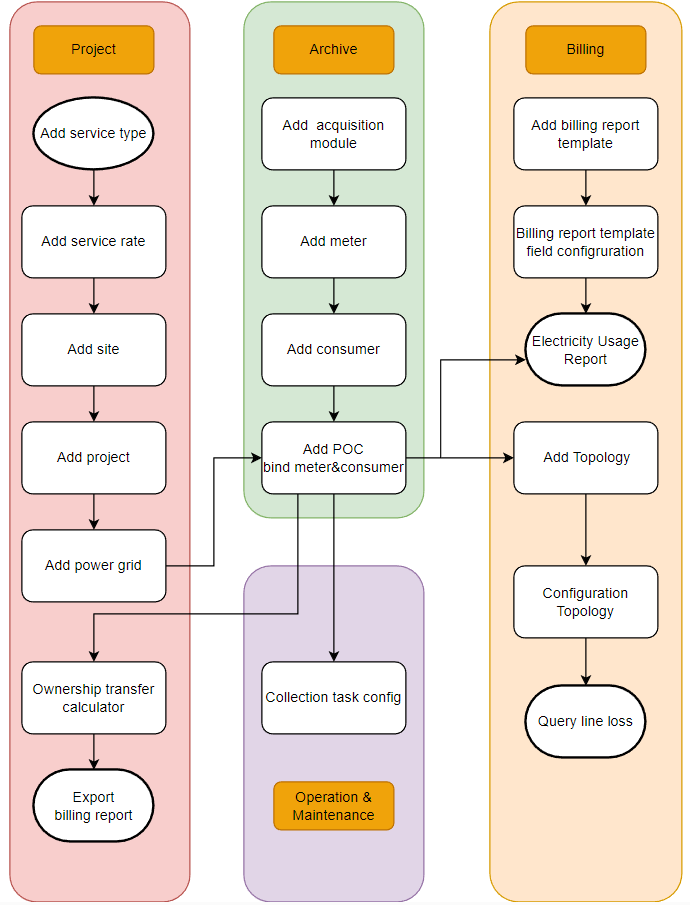
Please refer to the following flowchart for the entire process:
# Dashboard
After logging in, you will enter the dashboard page, which displays data such as projects, meters, meter reading success rate, etc., for the current tenant. You can click on the relevant charts to navigate to the corresponding detailed data pages. If no data has been created, the page will be empty.
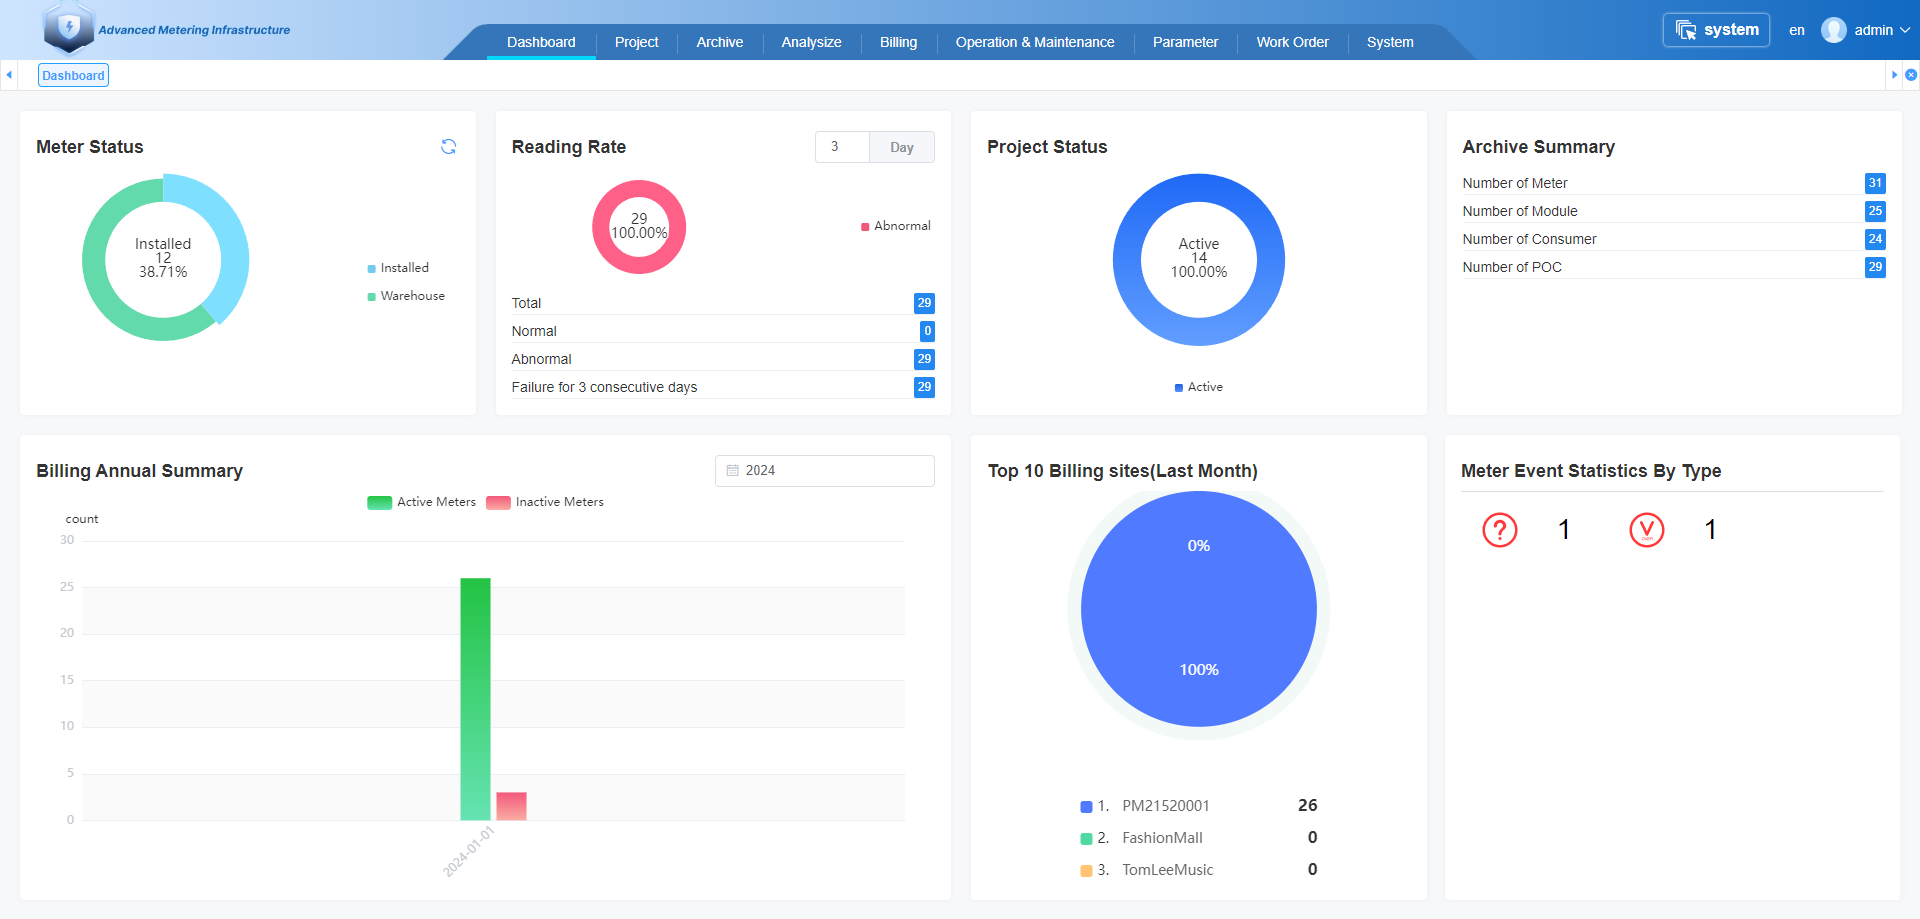
- Meter Status : Real-time statistics based on meter installation status. Clicking on different colors in the pie chart area will navigate to the corresponding meter Archive page for that status.
- Reading Rate : Meter reading success rate statistics. Clicking on the pie chart will navigate to the Meter Reading Statistics page. Click on the input box, scroll the mouse to select the number of days, then click 'Day' to query the meter reading success rate for the last few days.
- Project Status : Real-time statistics based on project status. Clicking on different colors in the pie chart area will navigate to the page for projects with the corresponding status.
- Archive Summary : Real-time statistics of the number of meters, communication modules, consumer, and POC under this tenant. Clicking on different text elements will navigate to the corresponding profile information pages.
- Billing Annual Summary : Statistically analyze the number of meters with generated bills and meters without generated bills by year and month. Clicking on the bar chart will navigate to the Billing Analysis page.
- Top 10 Billing Sites : Top 10 projects with the highest number of meters generating billing last month. Clicking on the pie chart will navigate to the Billing Analysis by Amount page.
- Meter Event Statistics By Type : Statistically analyze meter alarm events based on event types. Clicking on them will navigate to the Events Recording page to view the details of alarm records.
# 1.Maintenance of Service Rates
# 1.1 Add Service Types

①. Click on the " Project " menu button.
②. Click on the " Service Type " menu button.
③. Click on the " +Add " button.
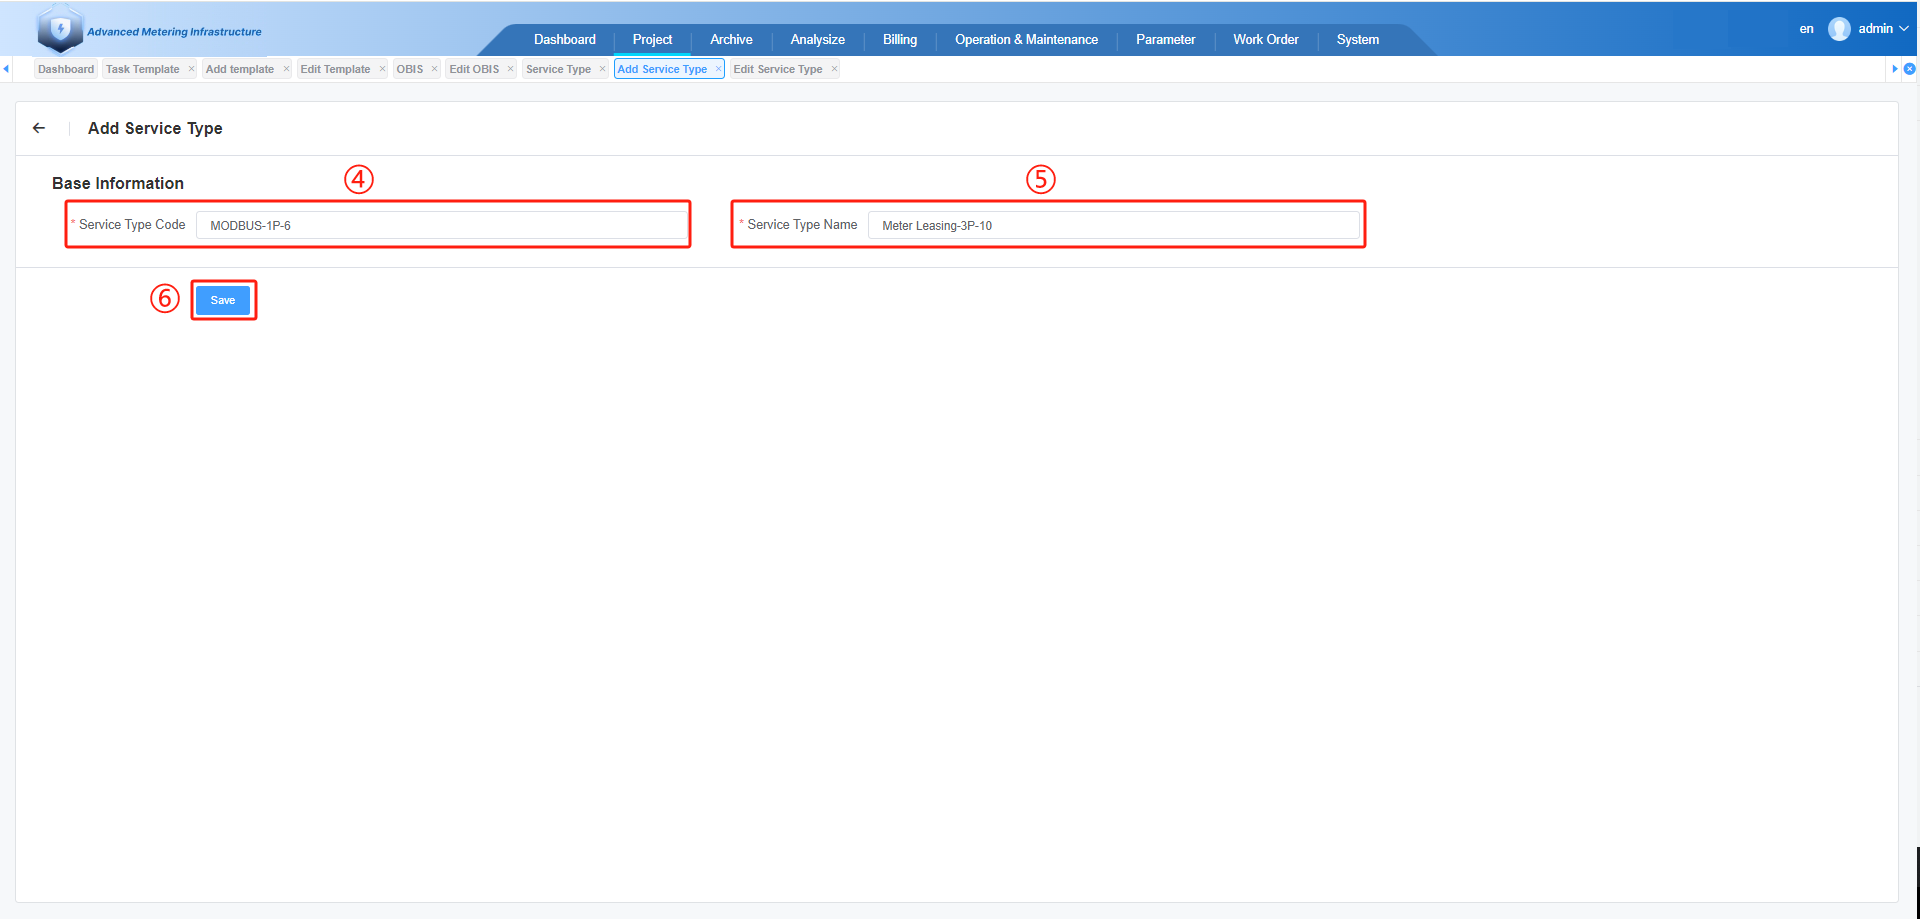
④. Please input the Service Type Code.
⑤. Please input the Service Type Name.
⑥.Click on the " Save " bottom.
# 1.2 Add Service Rates
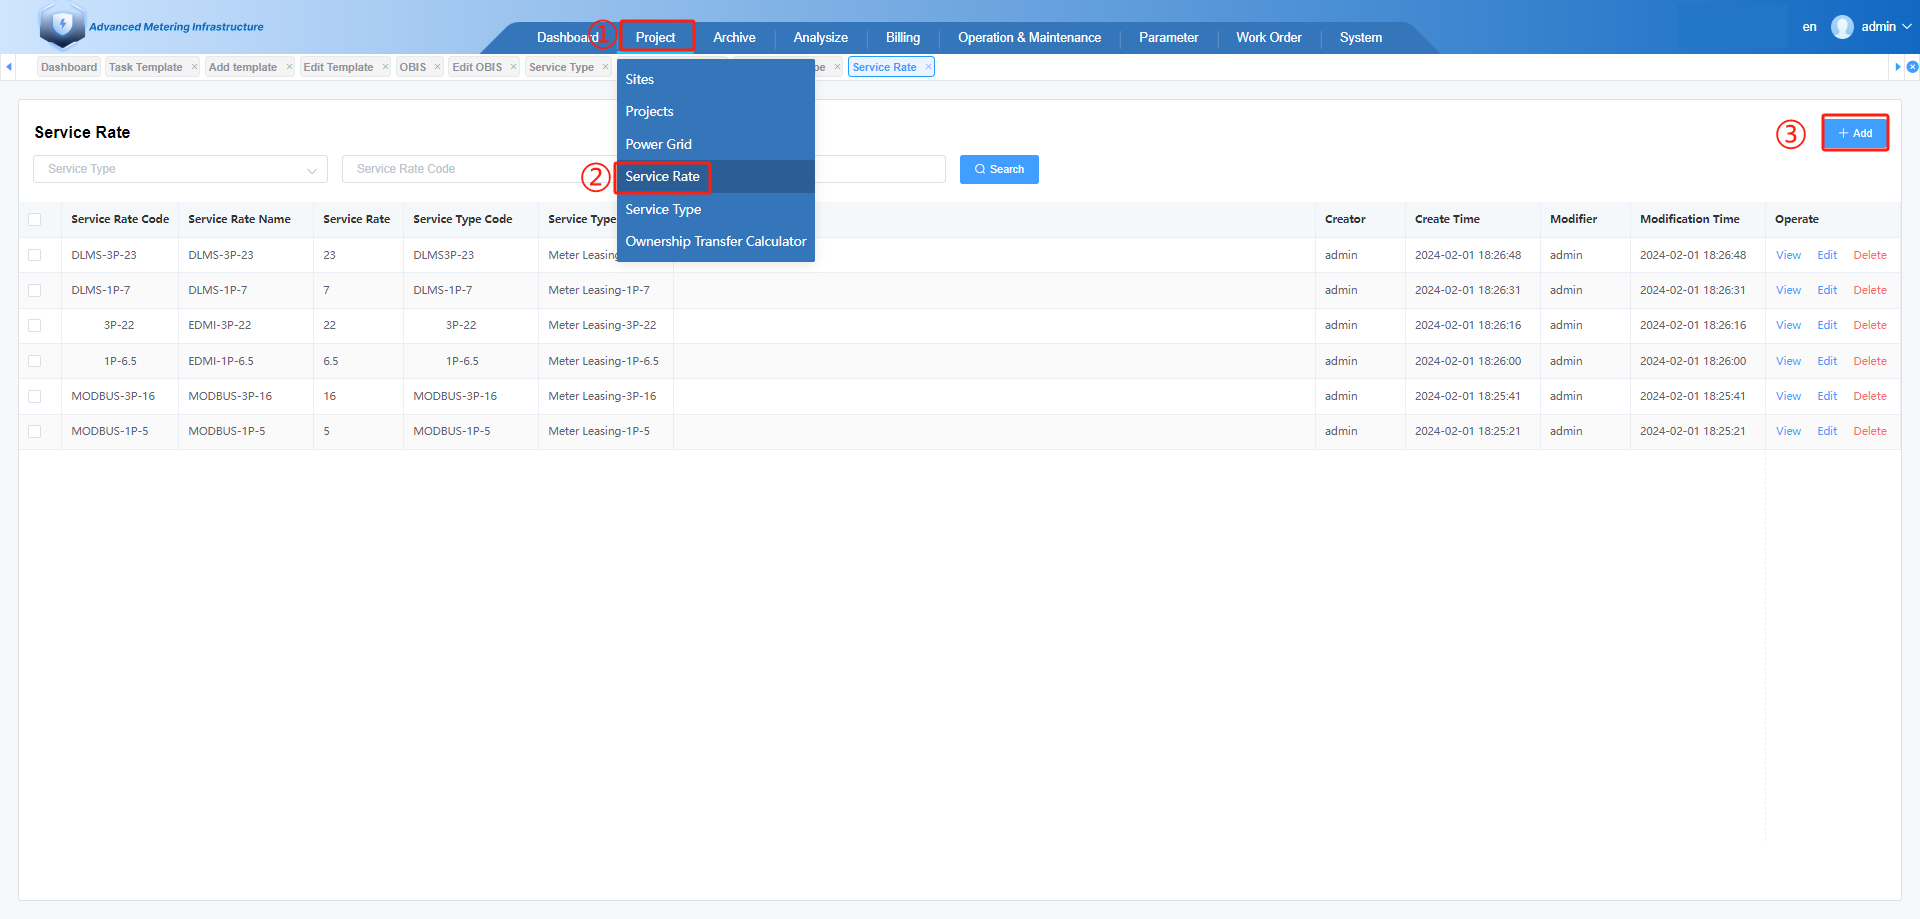
①. Click on the " Project " menu button.
②. Click on the " Service Rate " menu button.
③. Click on the " +Add " button.
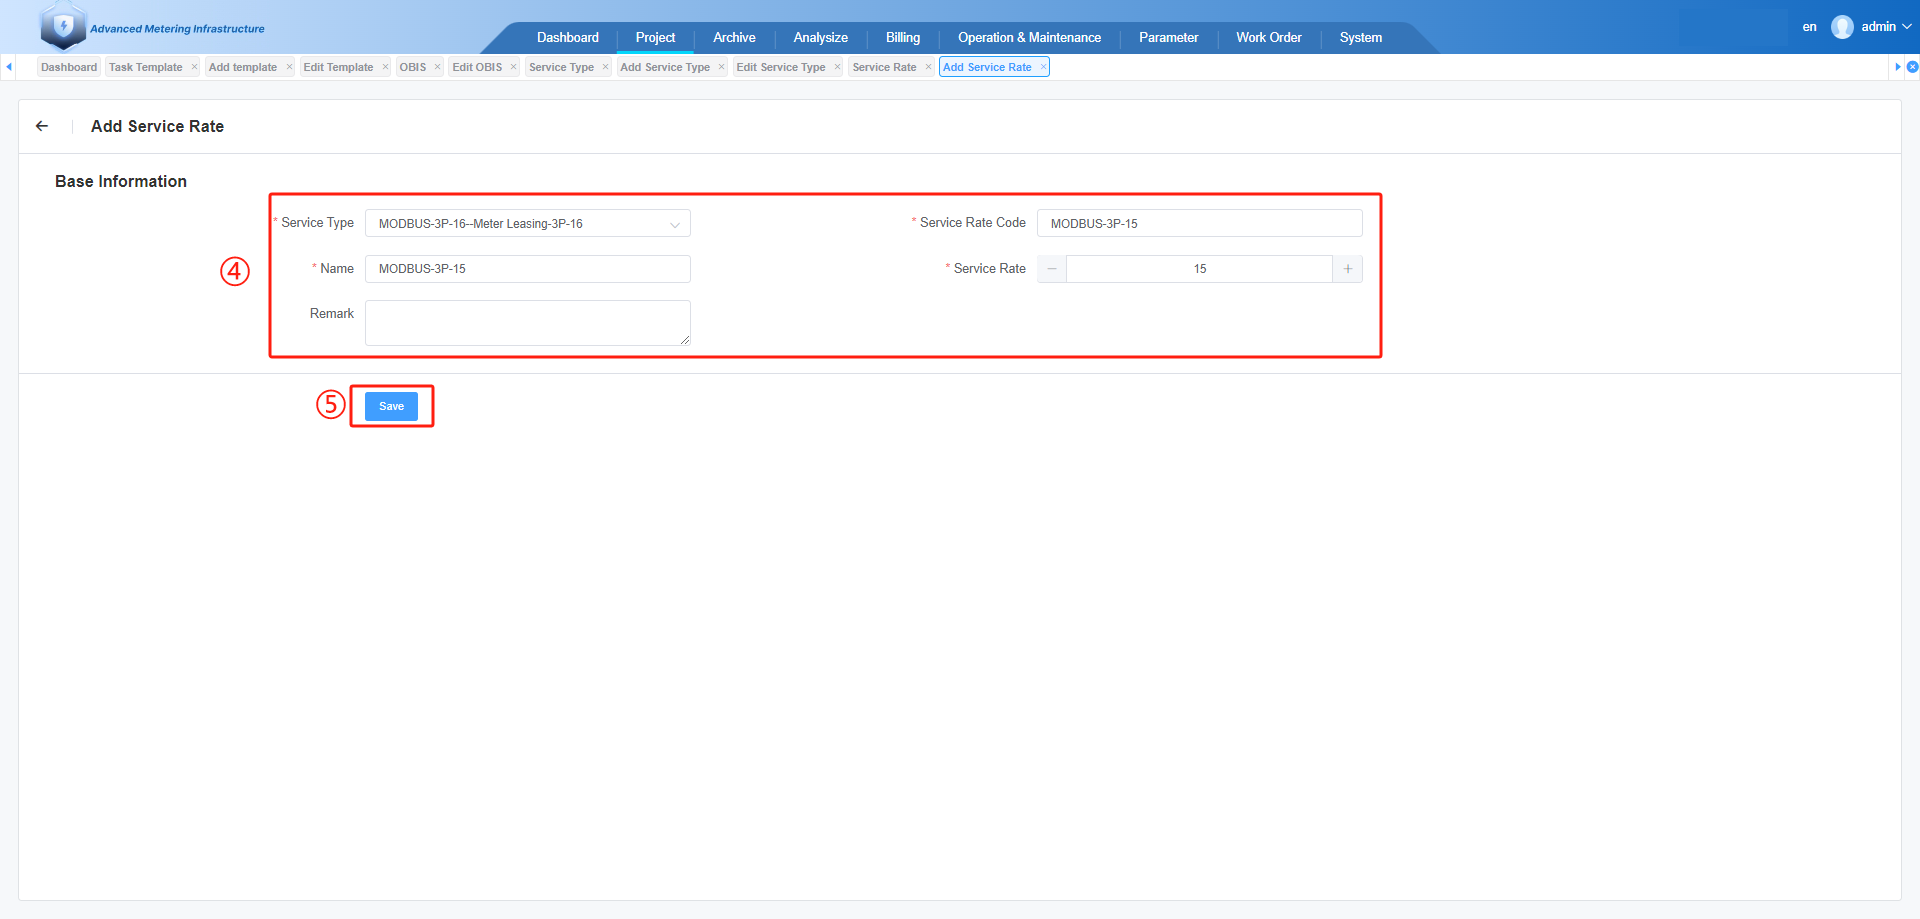
④.Select Service Type,
Input Service Rate Code,
Input Service Rate Name,
Set Service Rate Value.
⑤.Click on the " Save " button.
# 2.Grid information maintenance
# 2.1 Add Sites
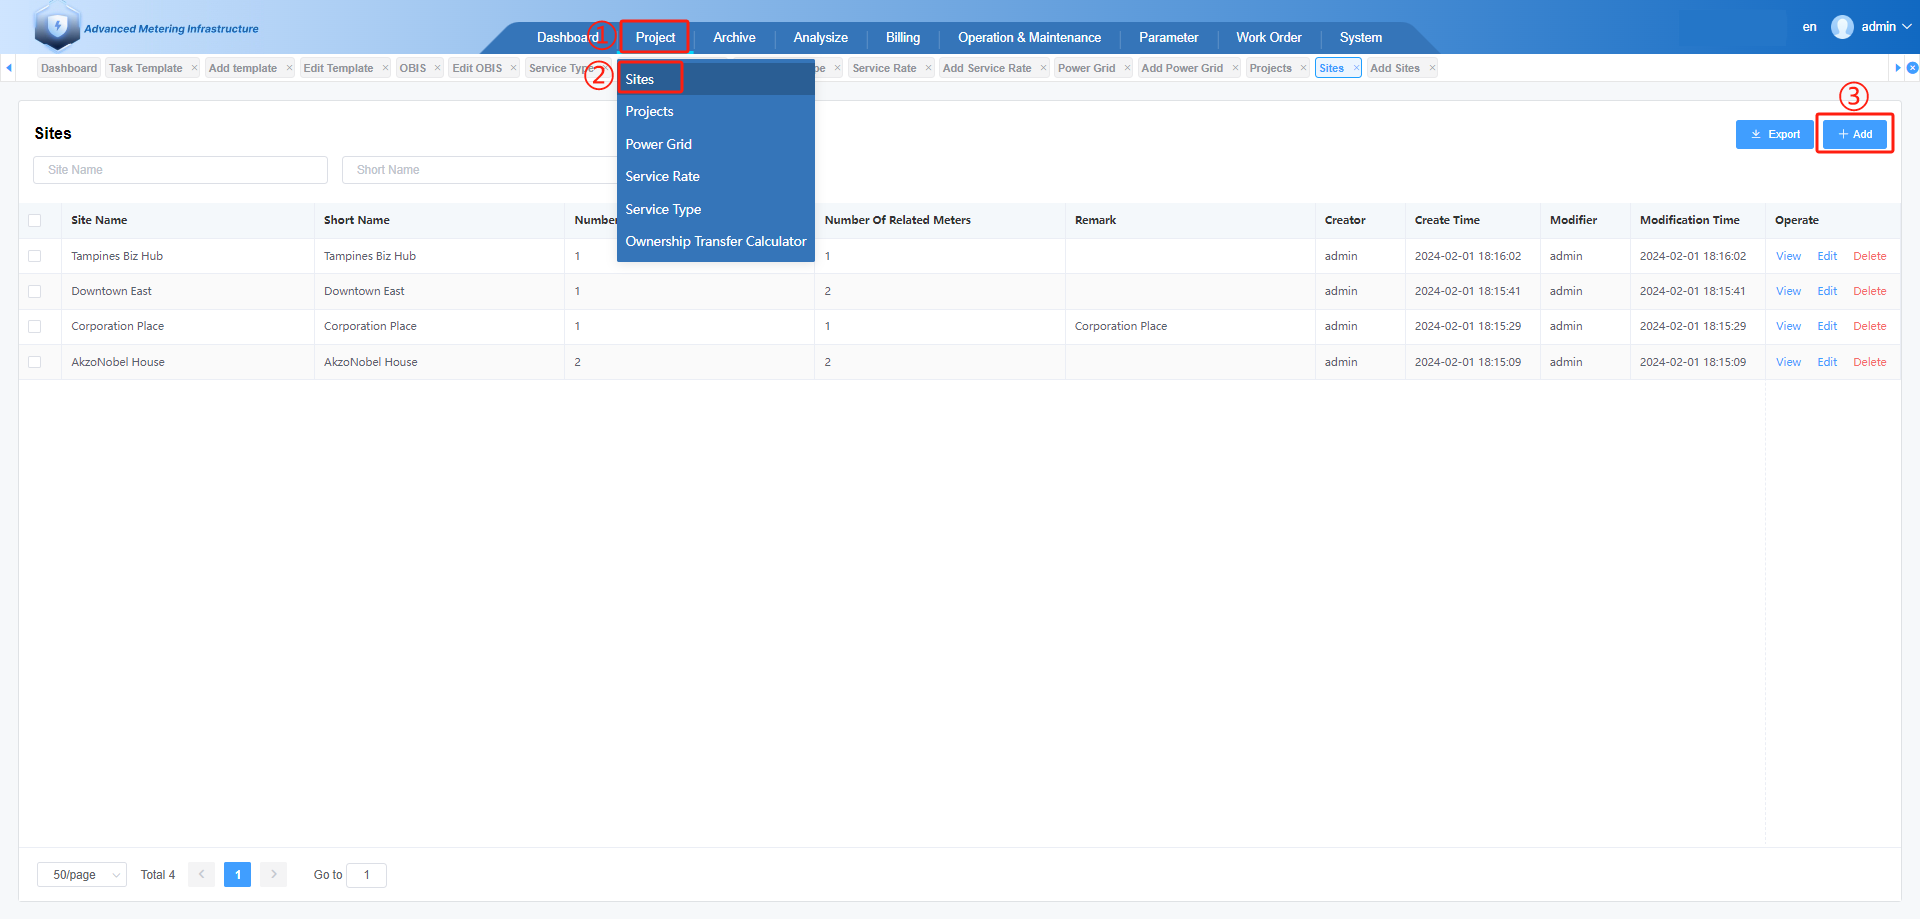
①.Click on the " Project " menu button.
②.Click on the " Sites " menu button.
③.Click on the " +Add " button.
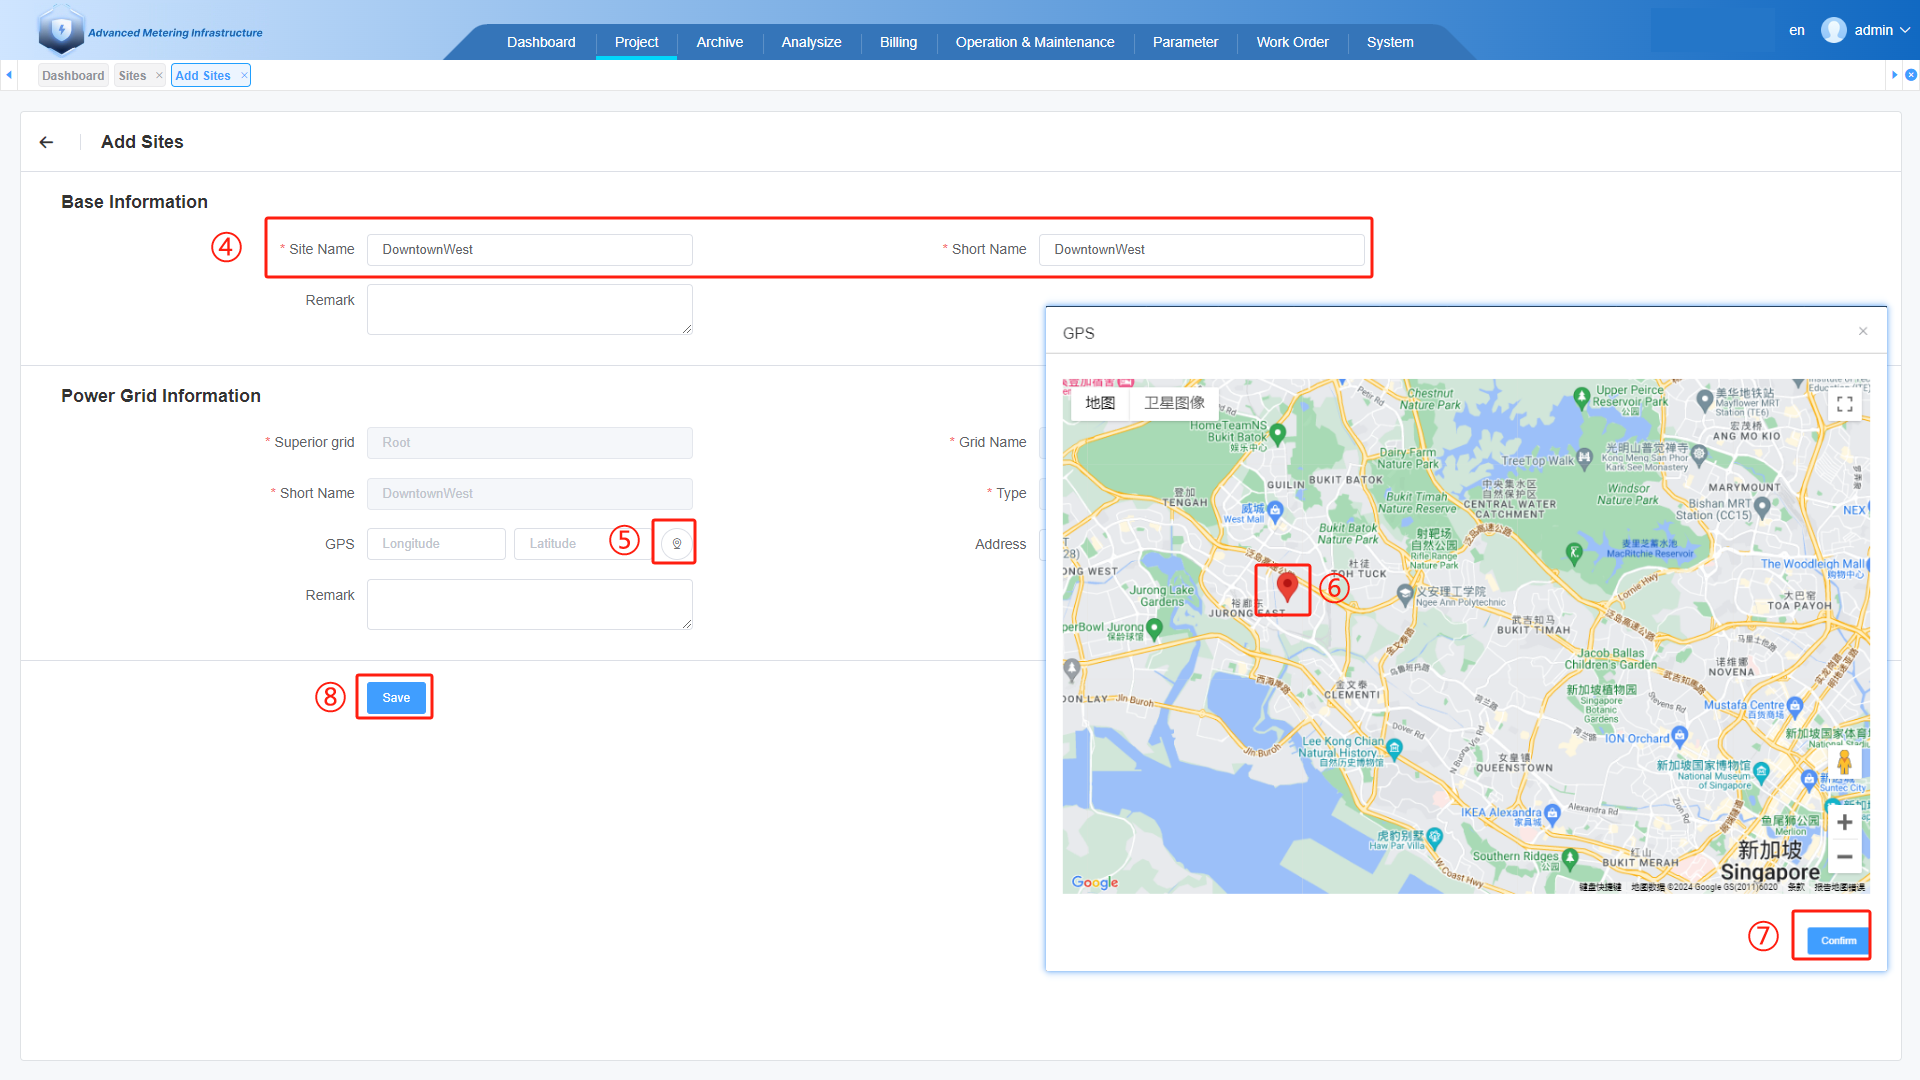
④. Input Site Name、Shot Name.
⑤. Click on the location icon to open the map positioning interface.
⑥. Click on the location of the site on the map.
⑦. Click on the " confirm " button.
⑧. Click on the " Save " button.
# 2.2 Add Project
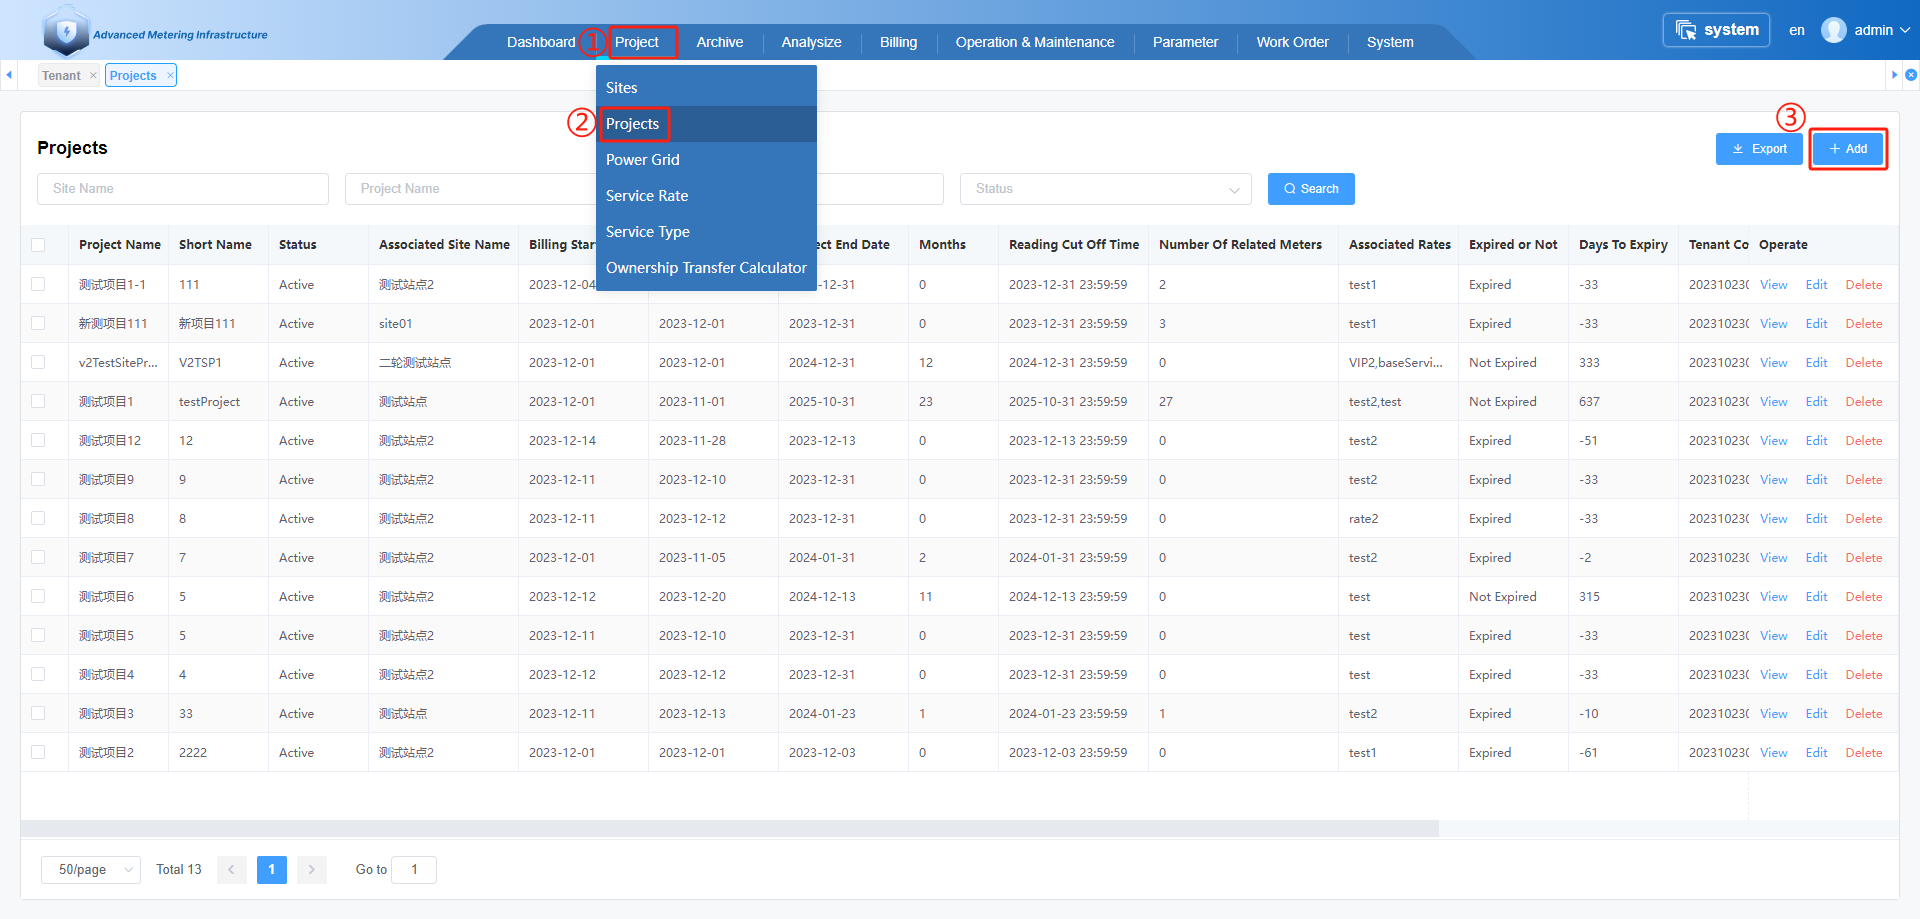
①.Click on the " Project " menu button.
②.Click on the " Projects " menu button.
③.Click on the " +Add " button.

④. Select Sites, input Project Name、Shot Name,
Select Associated Rates,
Select Billing Start Date 、 Project Start Date 、Project End Date
⑤. Click on the location icon to open the map positioning interface.
⑥. Click on the location of the site on the map.
⑦. Click on the " confirm " button.
⑧. Click on the " Save " button.
# 2.3 Add Power Grid
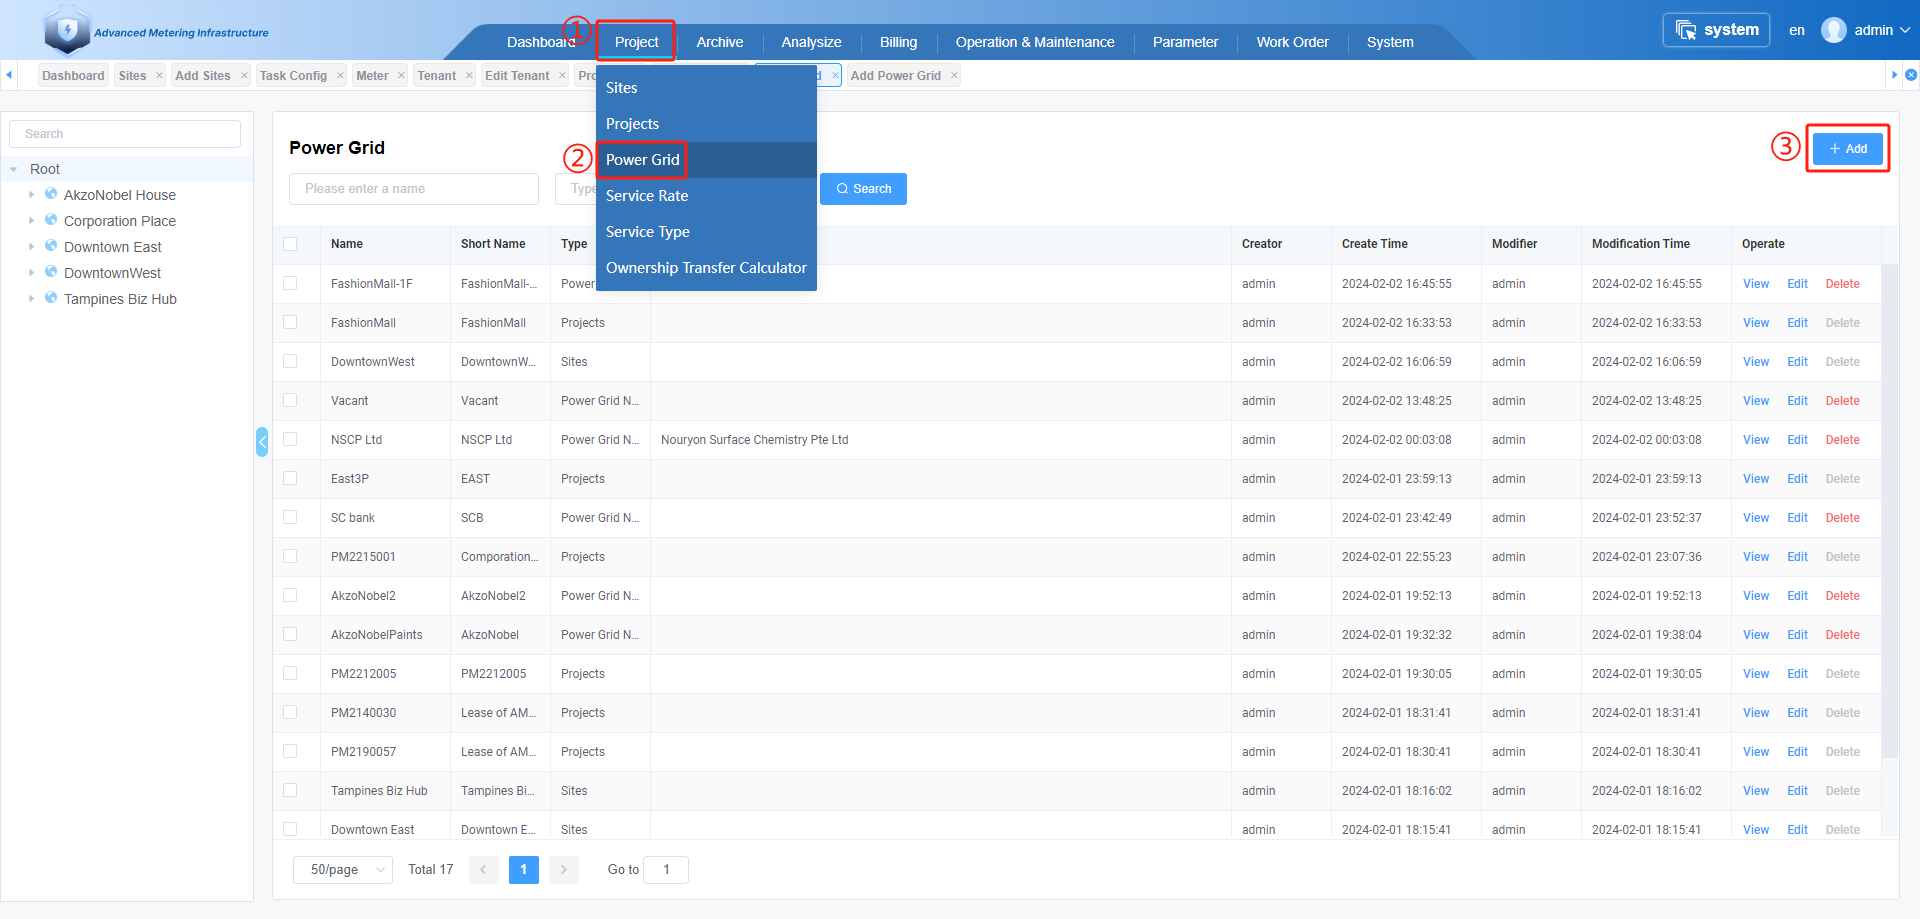
①.Click on the " Project " menu button.
②.Click on the " Power Grid " menu button.
③.Click on the " +Add " button.
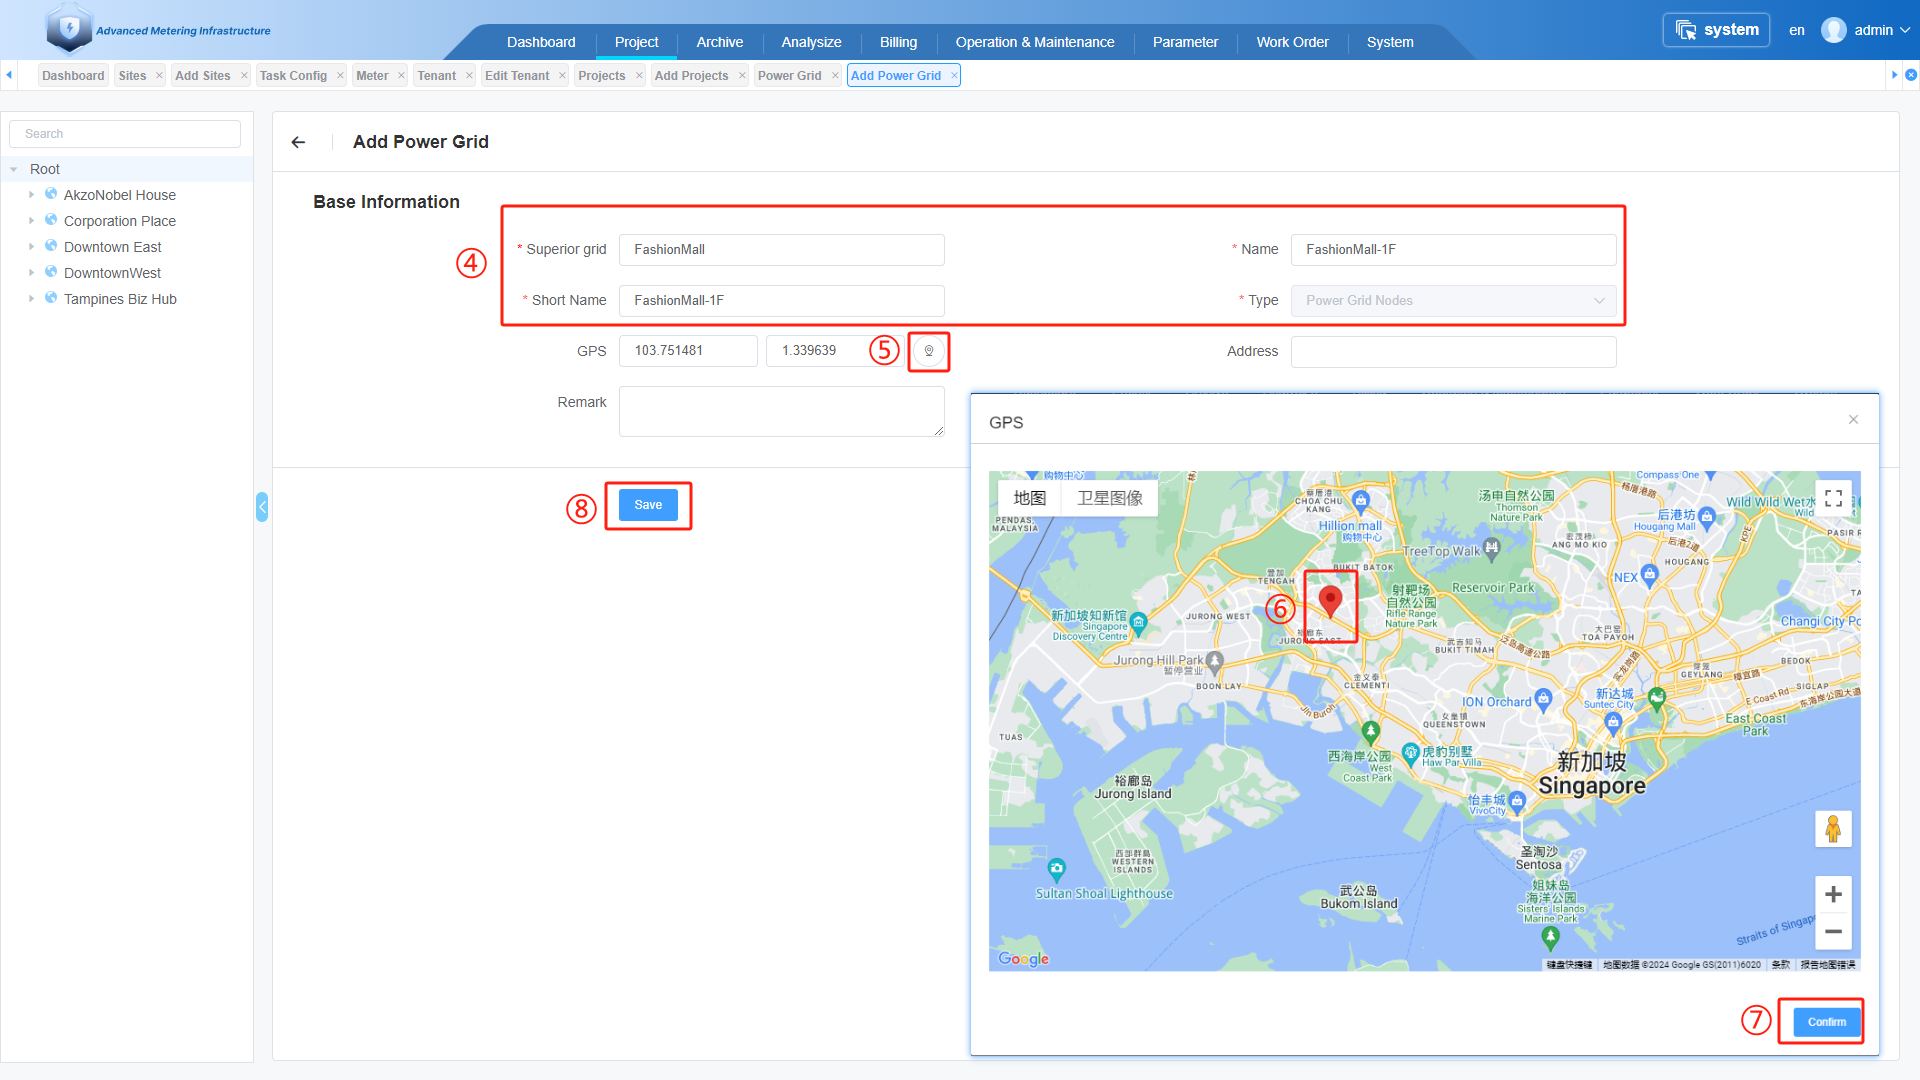
④. Select Superior grid,
input Name 、Short Name.
⑤. Click on the location icon to open the map positioning interface.
⑥. Click on the location of the site on the map.
⑦. Click on the " confirm " button.
⑧. Click on the " Save " button.
# 3. Add Acquisition Module and Meter
Note: Typically, the import of this data is handled by our company's operations and maintenance personnel. This section is for your information only, and you do not need to perform any actions.
# 3.1 Add Acquisition Module
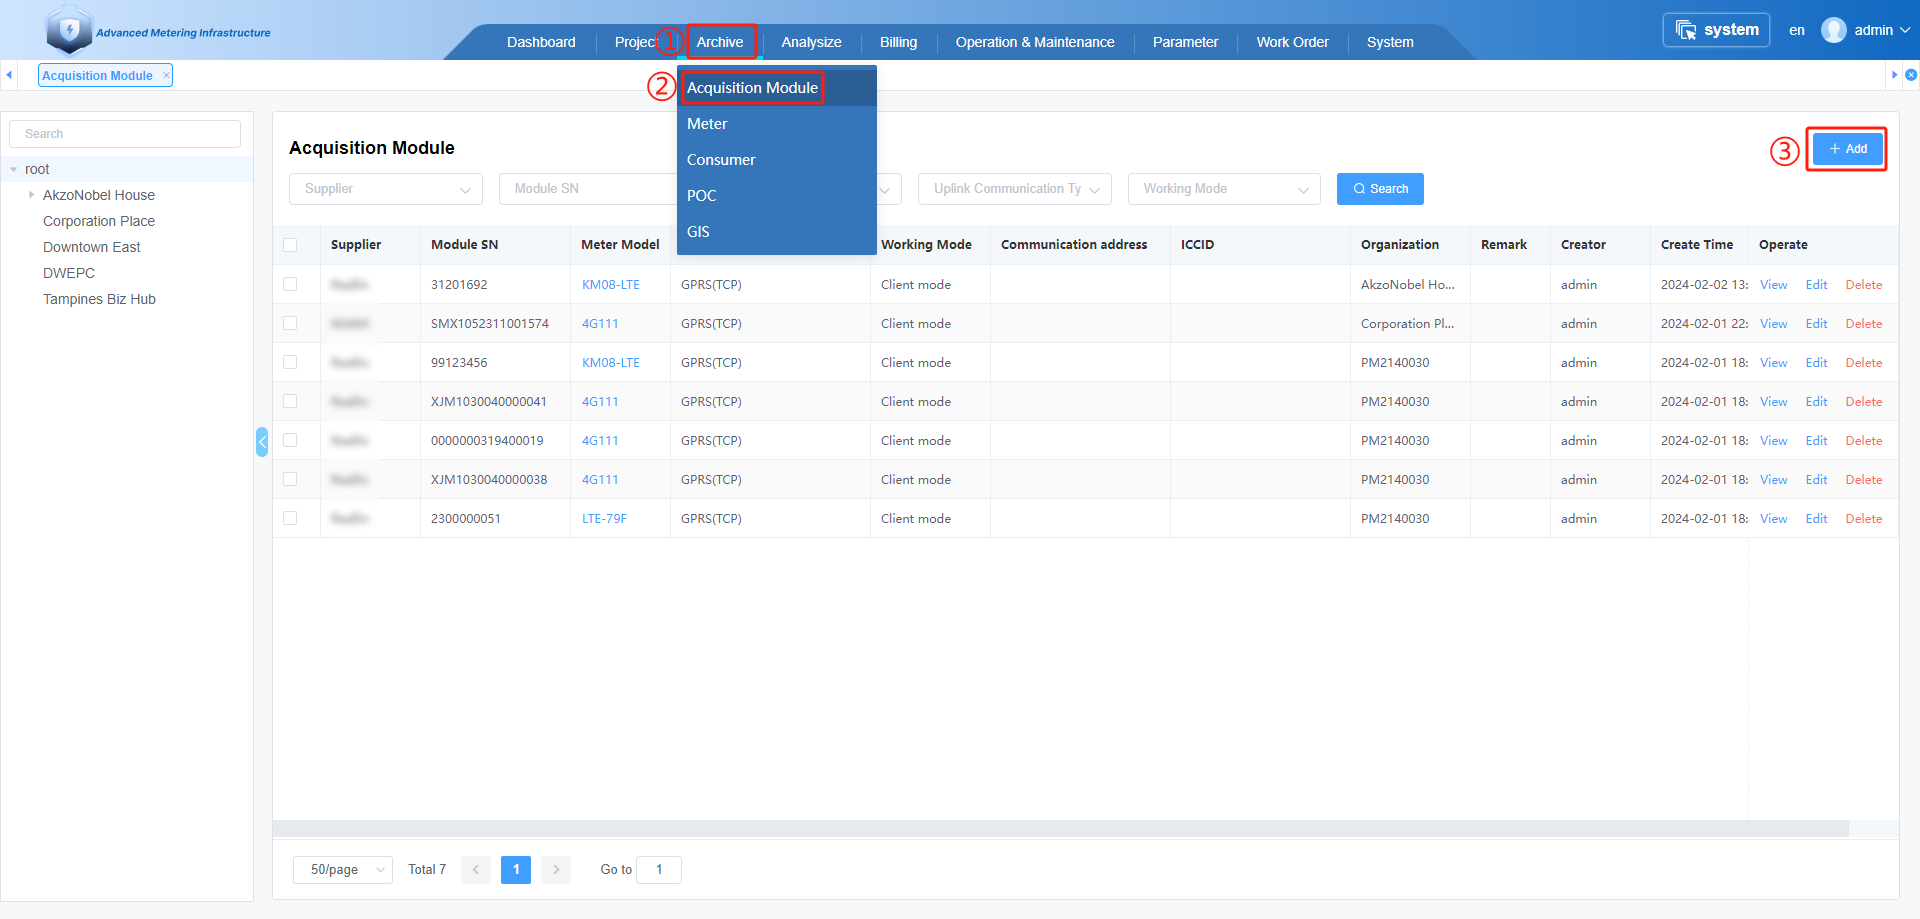
①.Click on the " Archive " menu button.
②.Click on the " Acquisition Module" menu button.
③.Click on the " +Add " button.
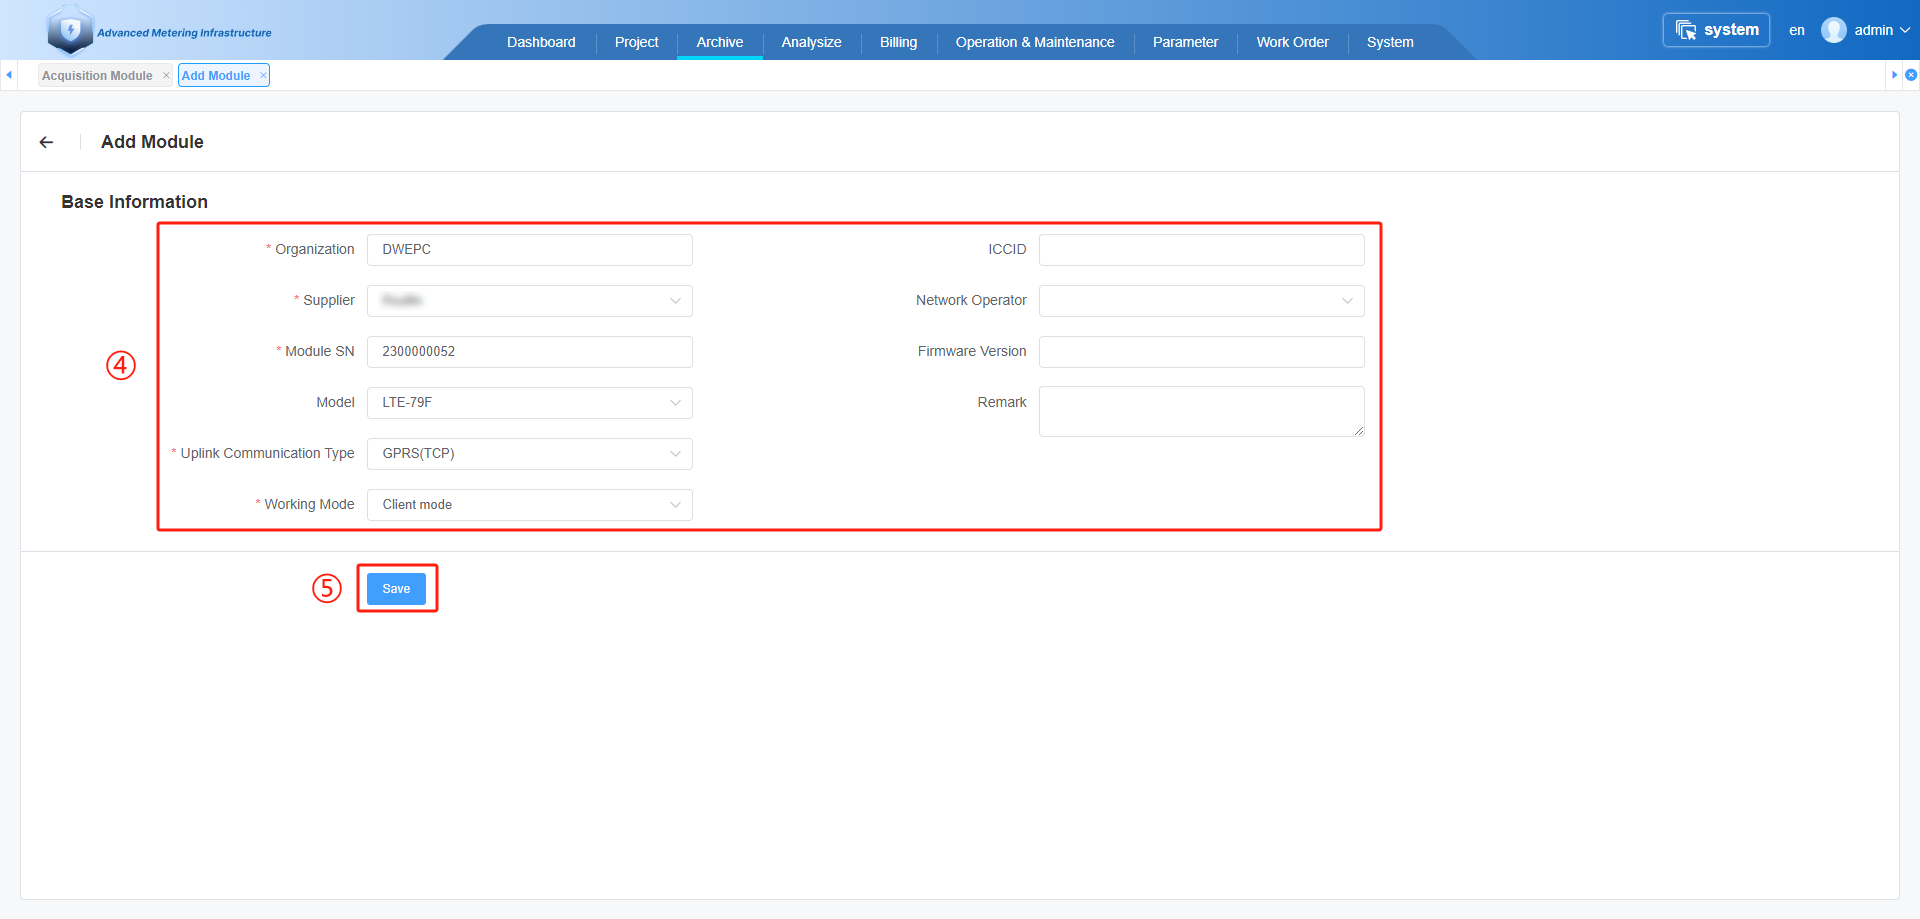
④.Input Acquisition Module parameters.
⑤.Click on the " Save " menu button.
# 3.2 Add Meter
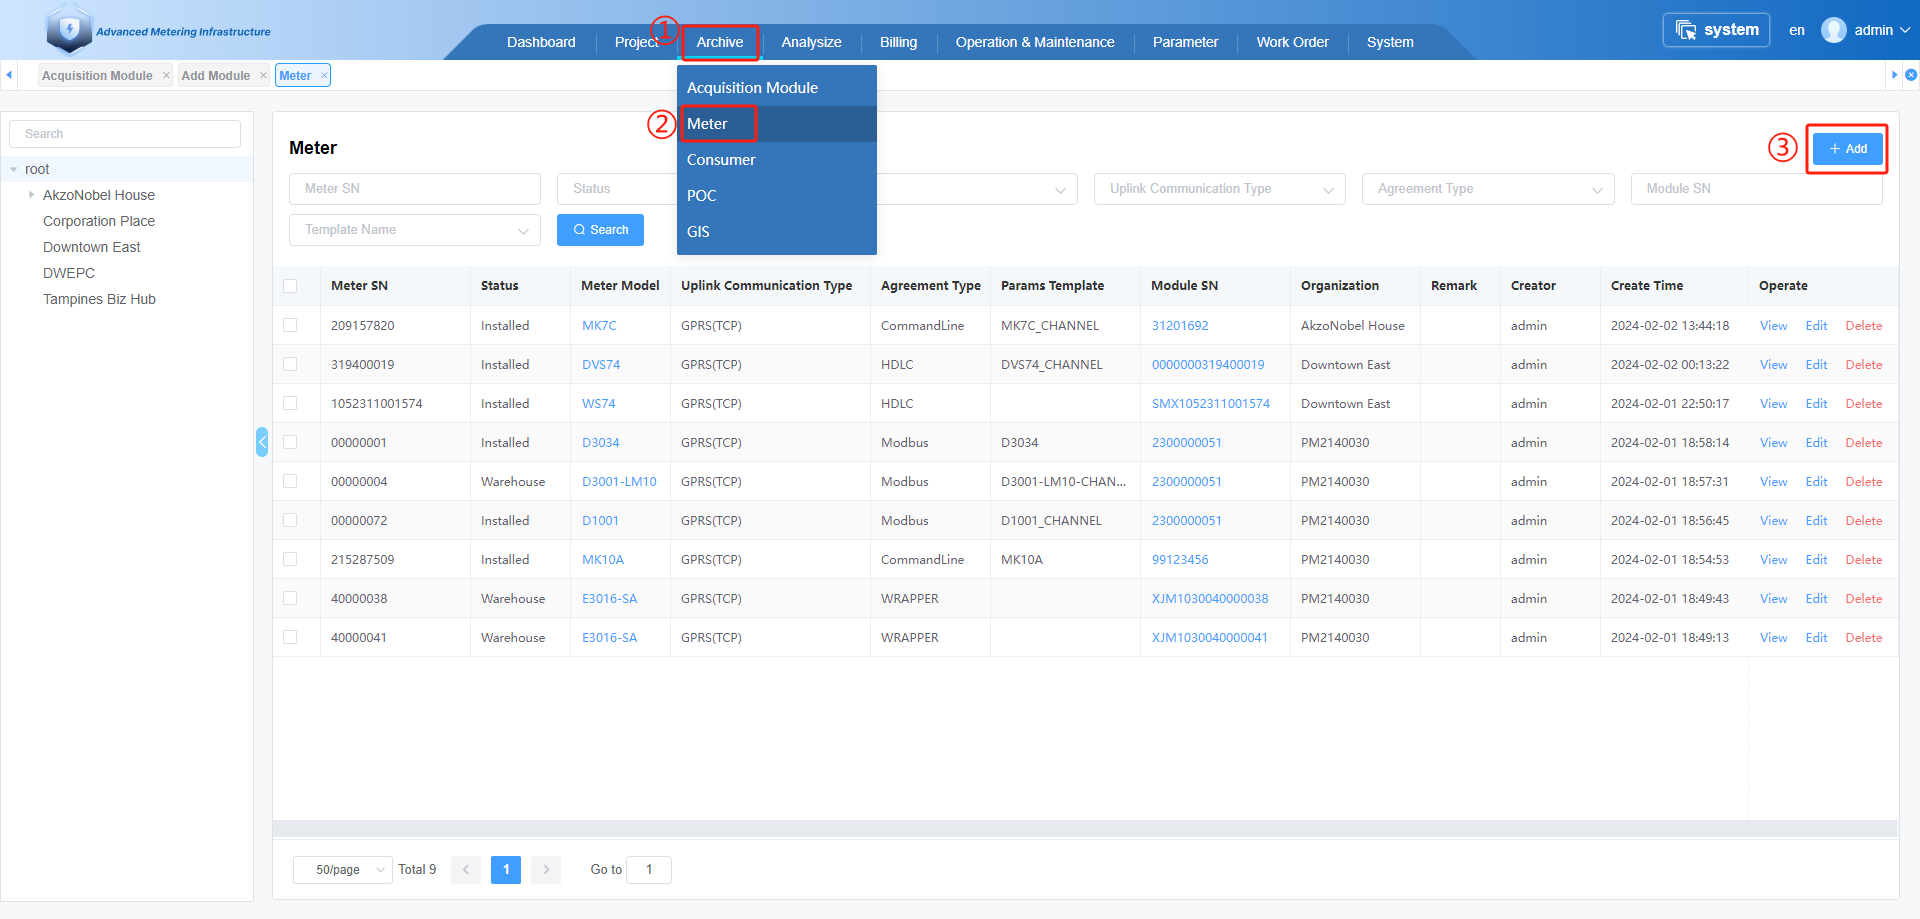
①.Click on the " Archive " menu button.
②.Click on the " Meter" menu button.
③.Click on the " +Add " button.
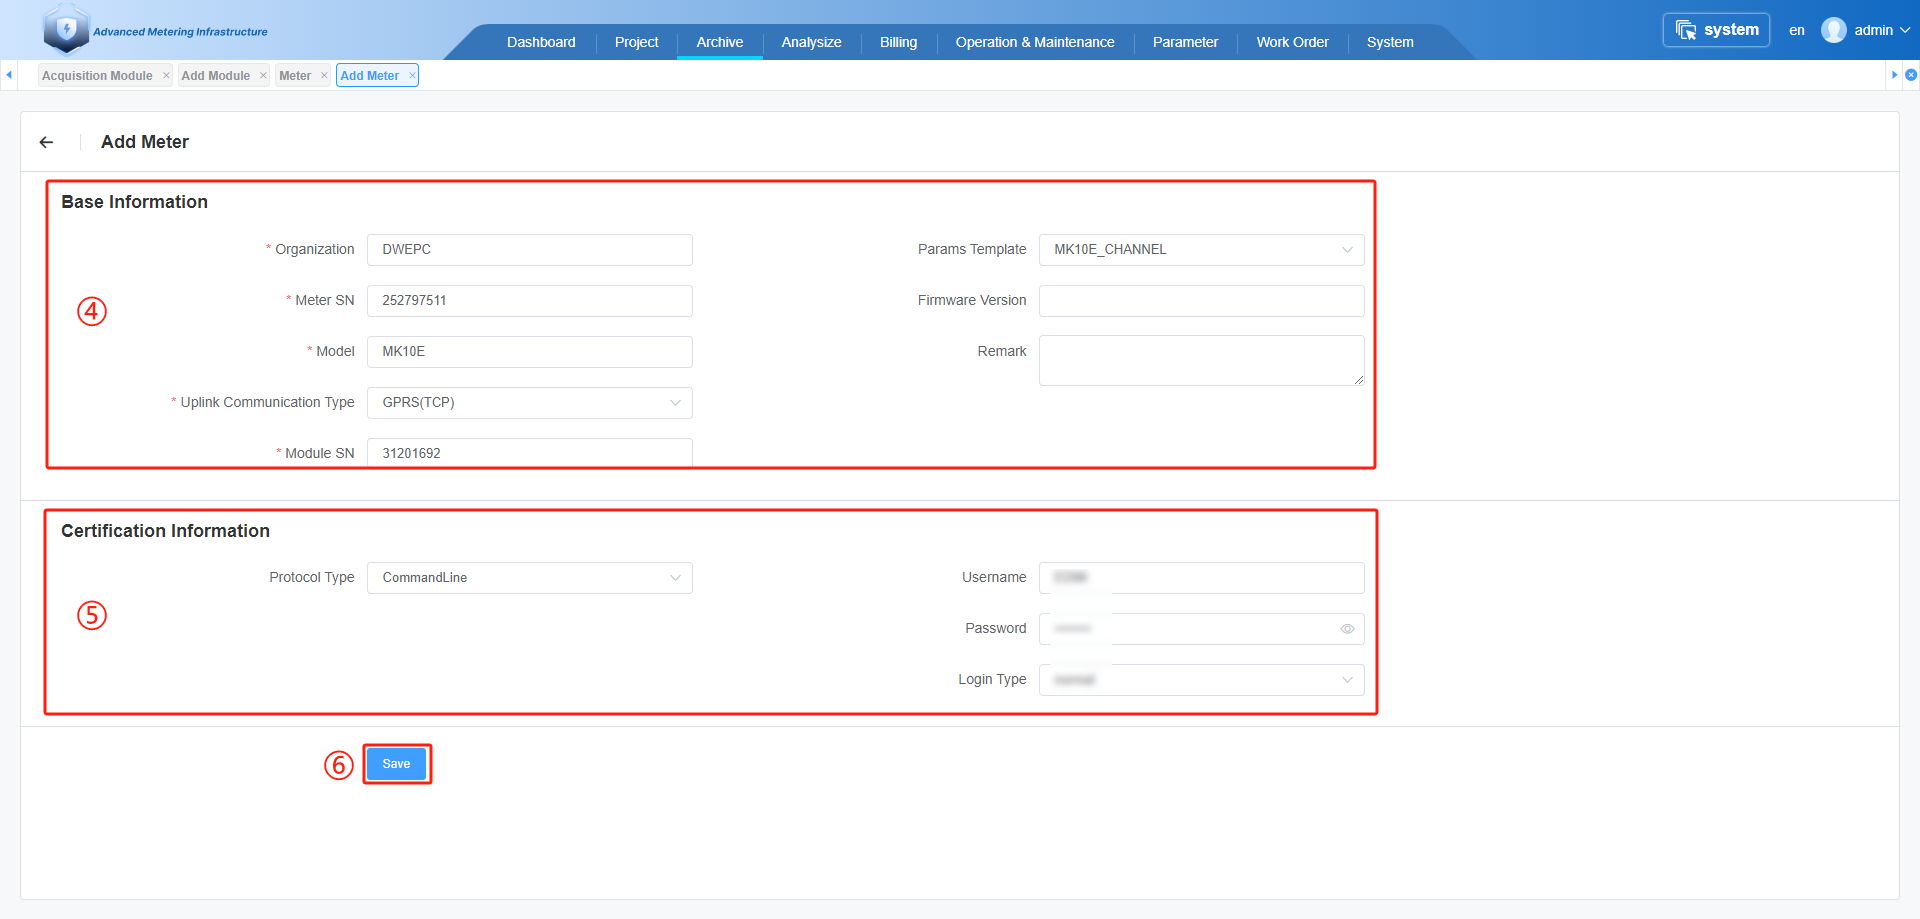
④. Input Meter Base Infomation.
⑤. Input Meter Certification Information.
⑥.Click on the " Save " menu button.
# 4. Add POC
This step binds the consumer and the meter, creating a collection point.
The method to add POC (Point of Collection) can be done either through the web or the app. You just need to choose one method.
# 4.1 Add consumer
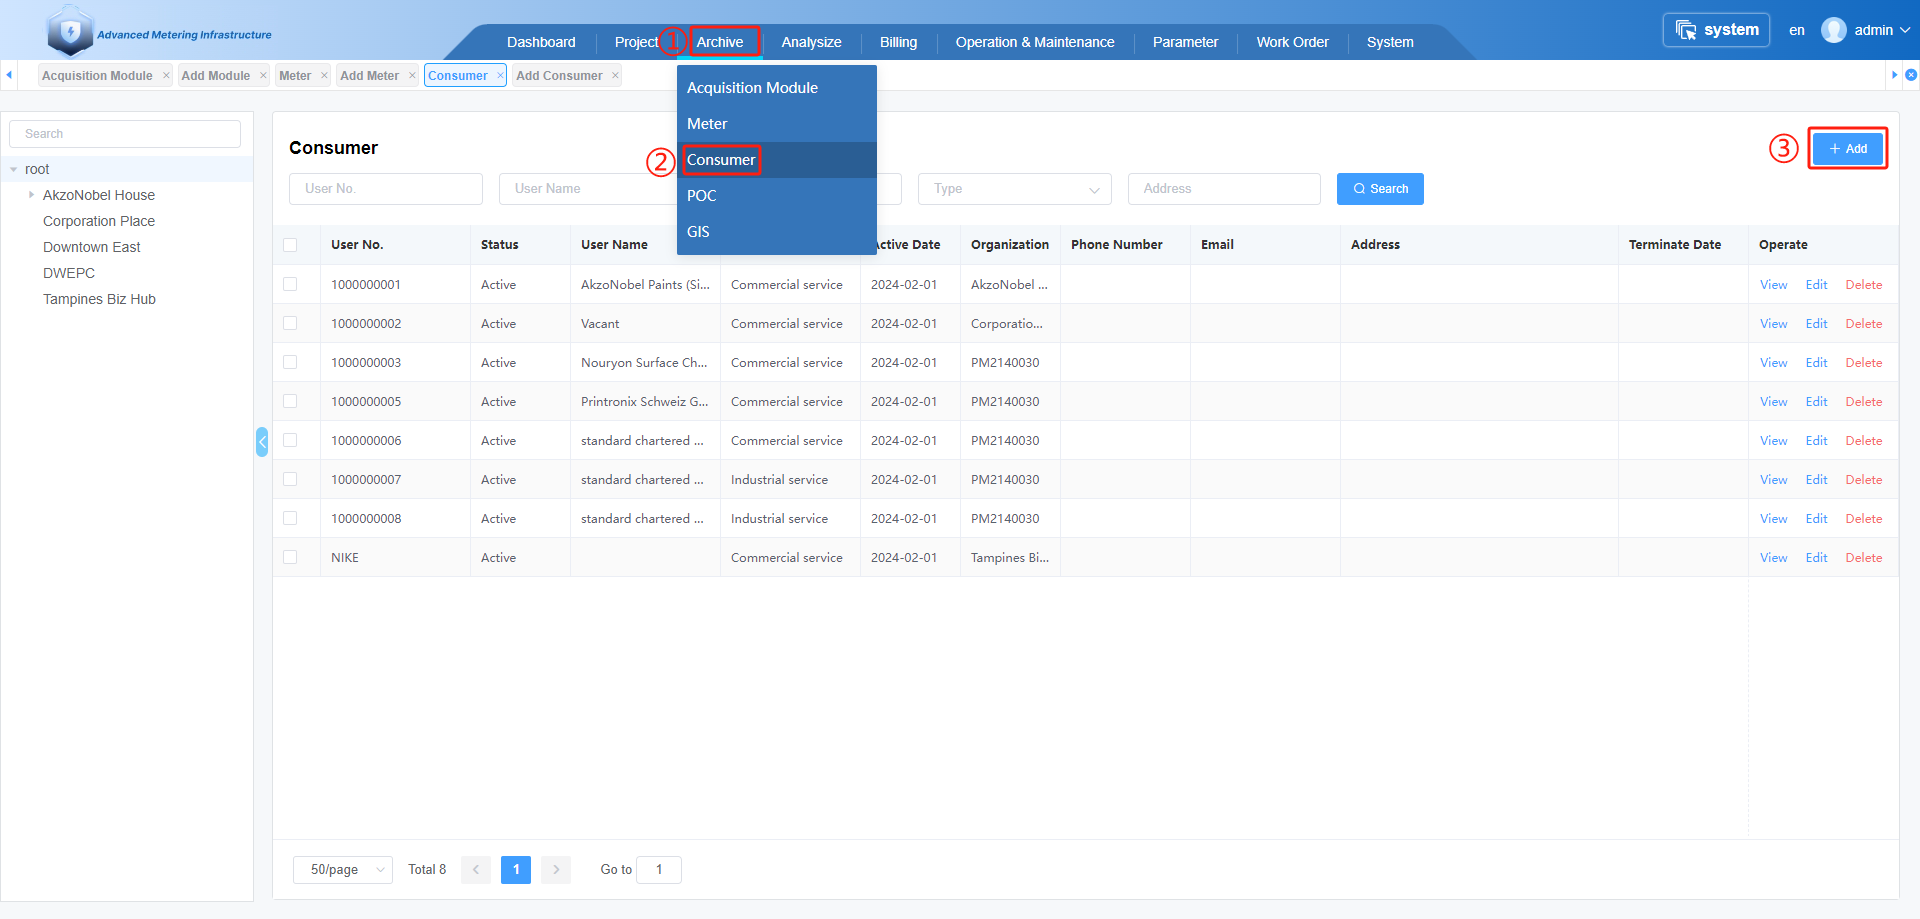
①.Click on the " Archive " menu button.
②.Click on the " Consumer" menu button.
③.Click on the " +Add " button.
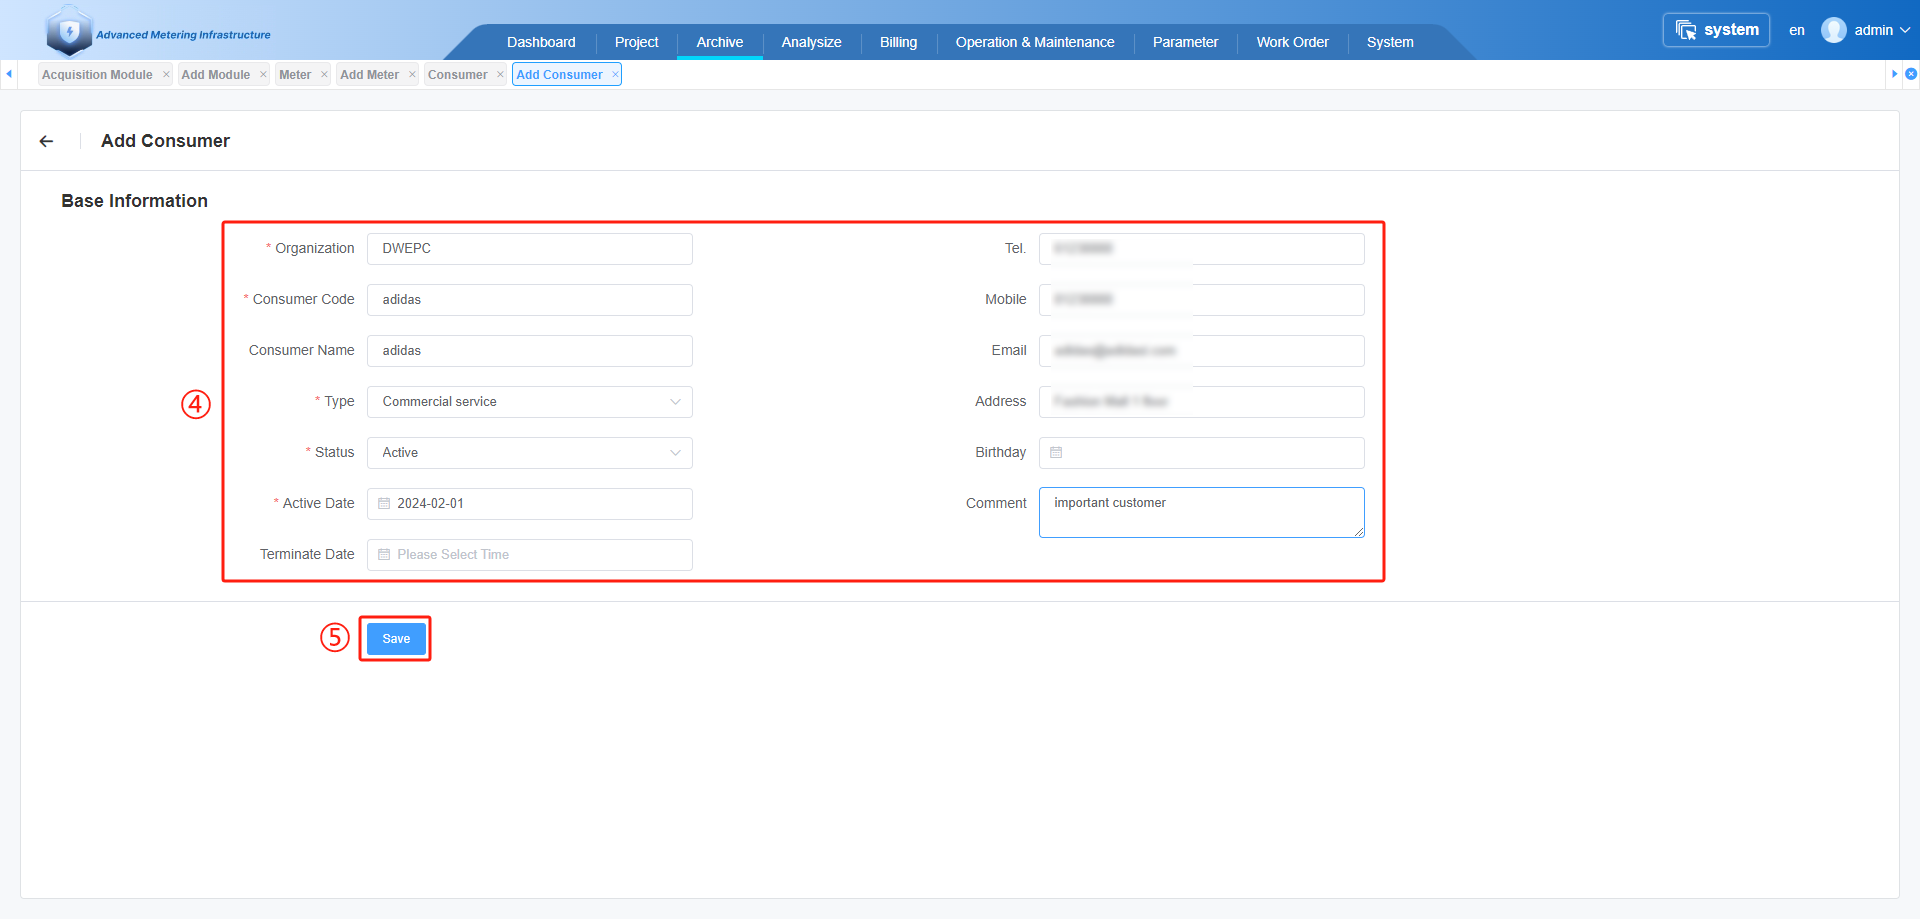
④. Input Consumer Base Infomation.
Select Organization,
Input Consumer Code,
Select Type,
Select Status(Usually set to 'Active' status. If 'Terminated' is selected, it will stop generating billing reports.),
Select Active Date.
⑤. Click on the " Save " menu button.
# 4.2 Add POC (WEB)
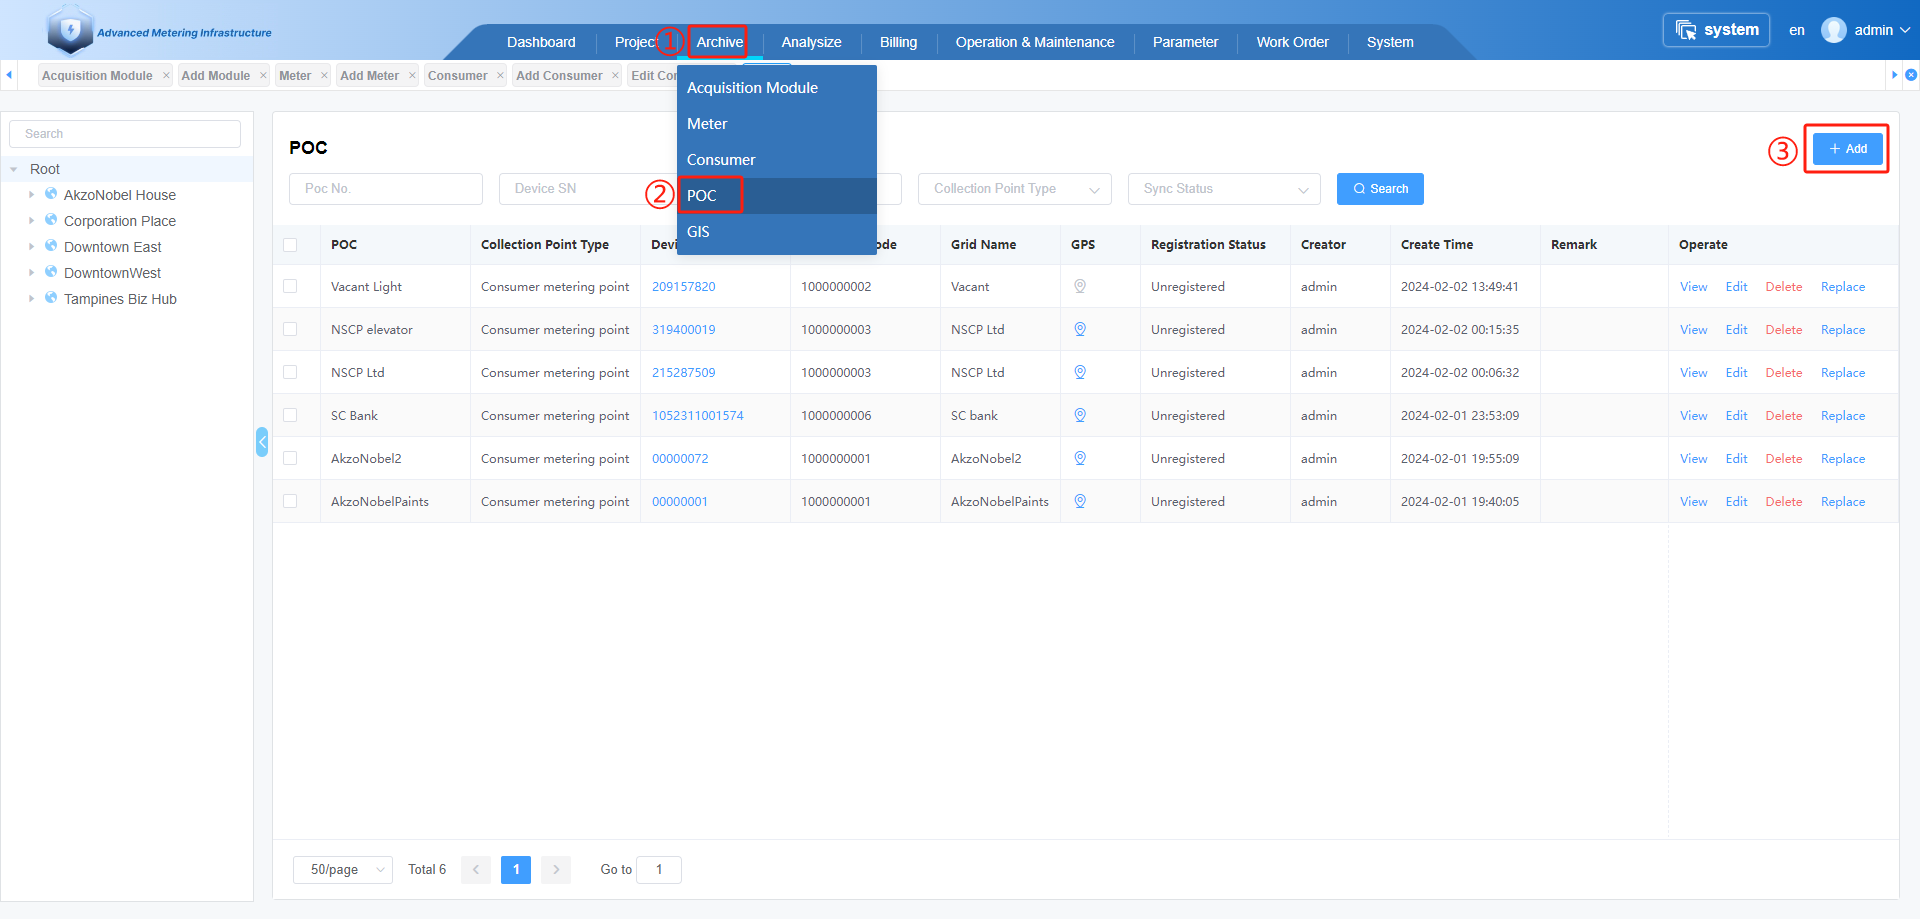
①.Click on the " Archive " menu button.
②.Click on the " POC" menu button.
③.Click on the " +Add " button.

④. Select Sites 、Projects 、Grid Service Rate 、Device SN 、Consumer Code 、Type ,
Input POC name.
⑤. Click on the location icon to open the map positioning interface.
⑥. Click on the location of the site on the map.
⑦. Click on the " confirm " button.
⑧. Click on the " Save " button.
# 4.3 Add POC (APP)
# 4.3.1 Add Construction Users

①.Click on the " Work Order" menu button.
②.Click on the " Construction Users " menu button.
③.Click on the " +Add " button.
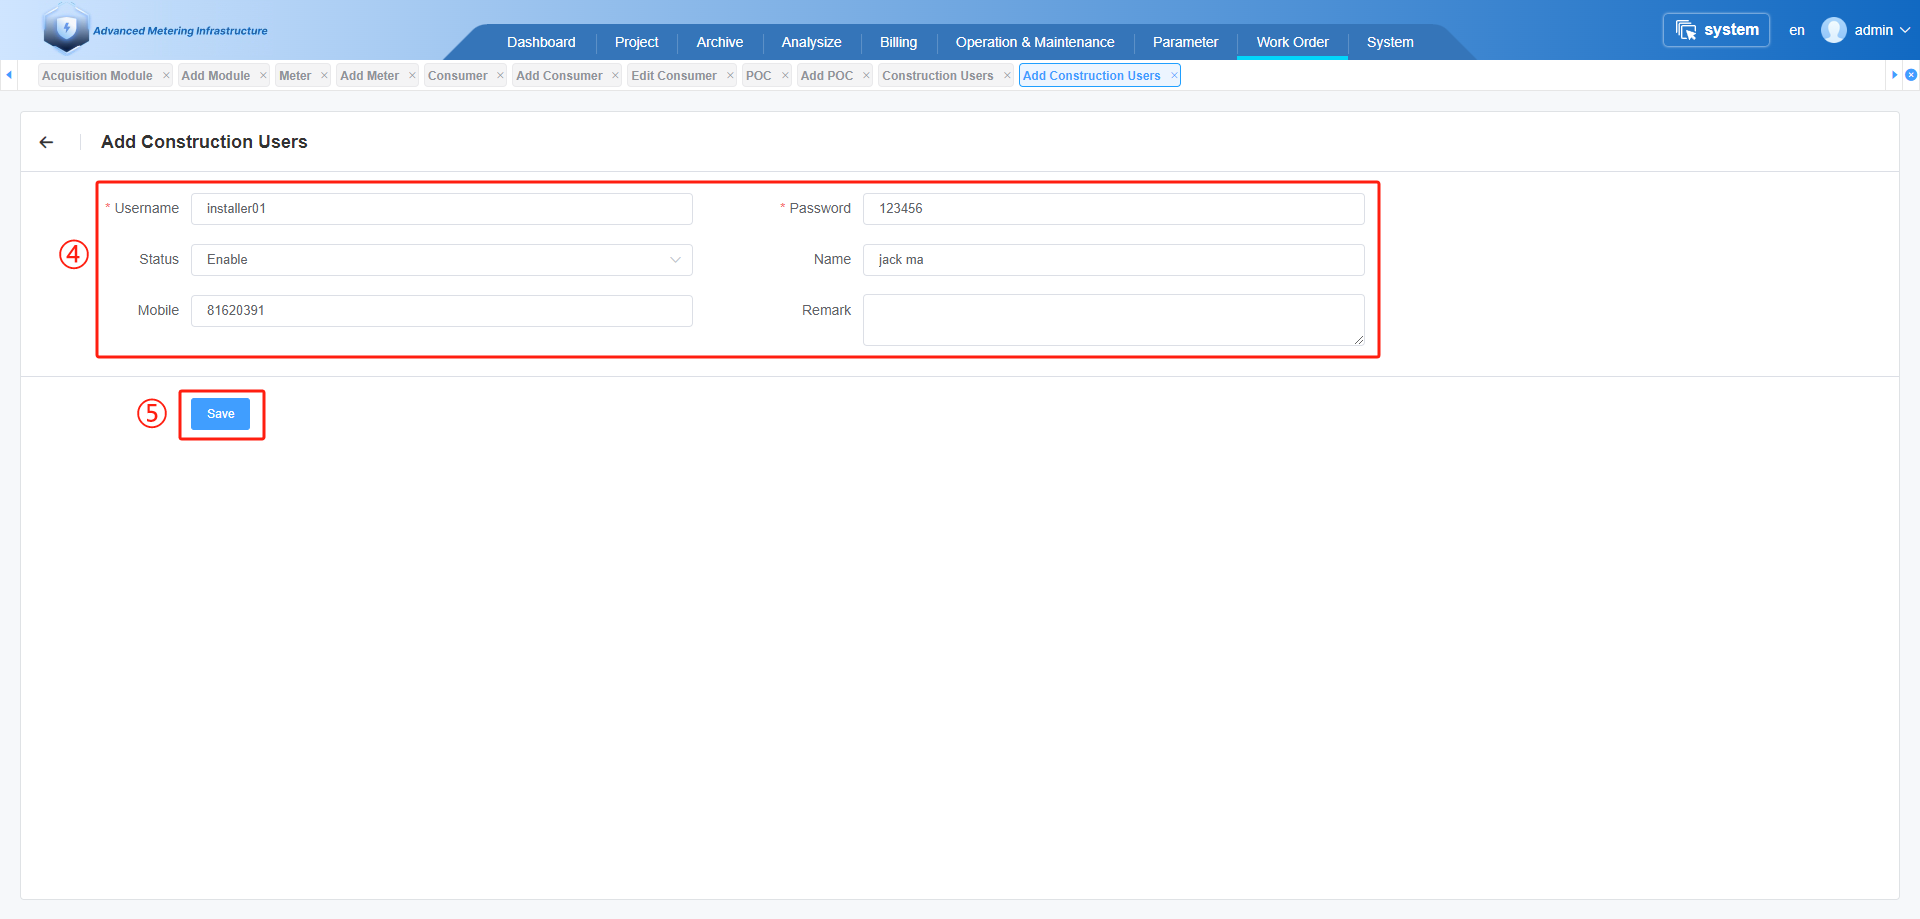
④. Input Construction User info.
⑤.Click on the " Save " button.
# 4.3.2 Assign work order
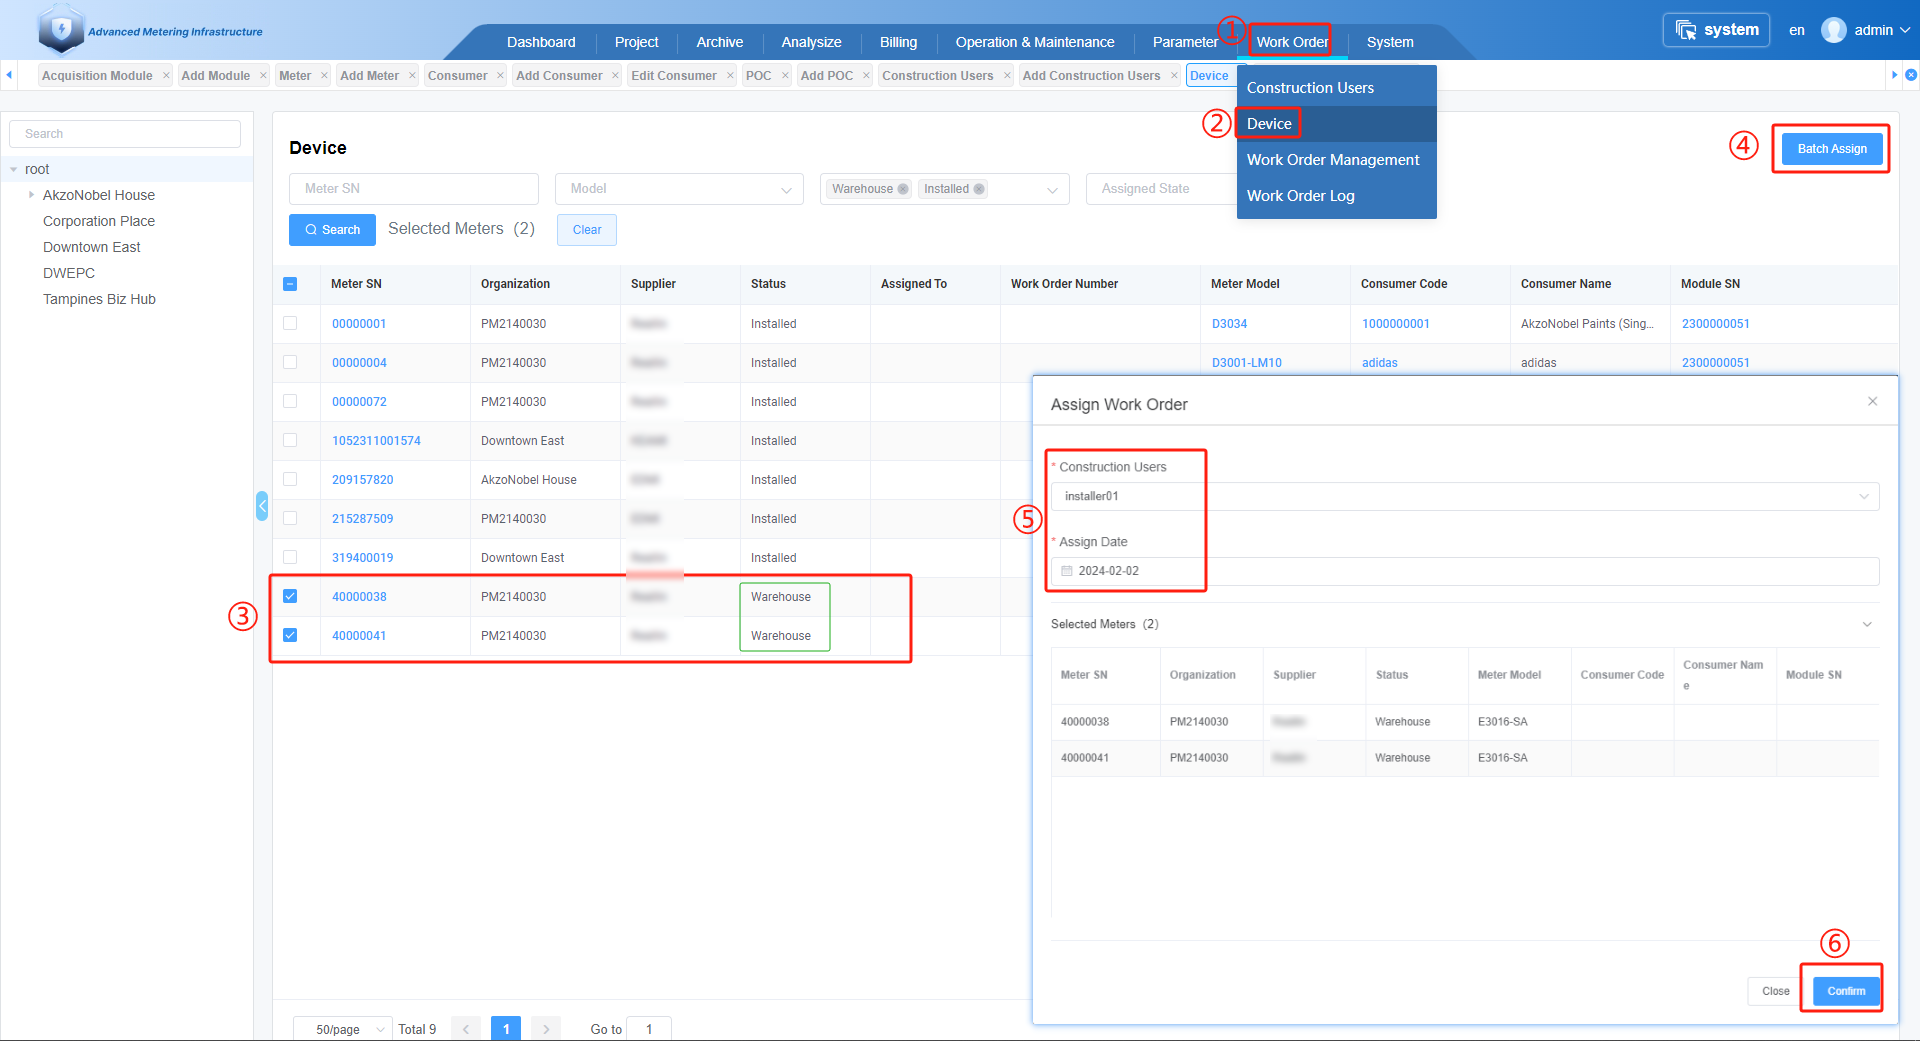
①.Click on the " Work Order" menu button.
②.Click on the " Device " menu button.
③.Select meters with the status "Warehouse".
④.Click on the " Batch Assign " button.
⑤.Select the installation user and Assign Date.
⑥.Click on the " Save " button.
# 4.3.3 Add a POC using the app
Please log in to the app in advance using the created installation account.
Process: Login - Bind device - Scan meterSN+moduleSN - Input POC info - Save
Please refer to the GIF for specific operating steps.

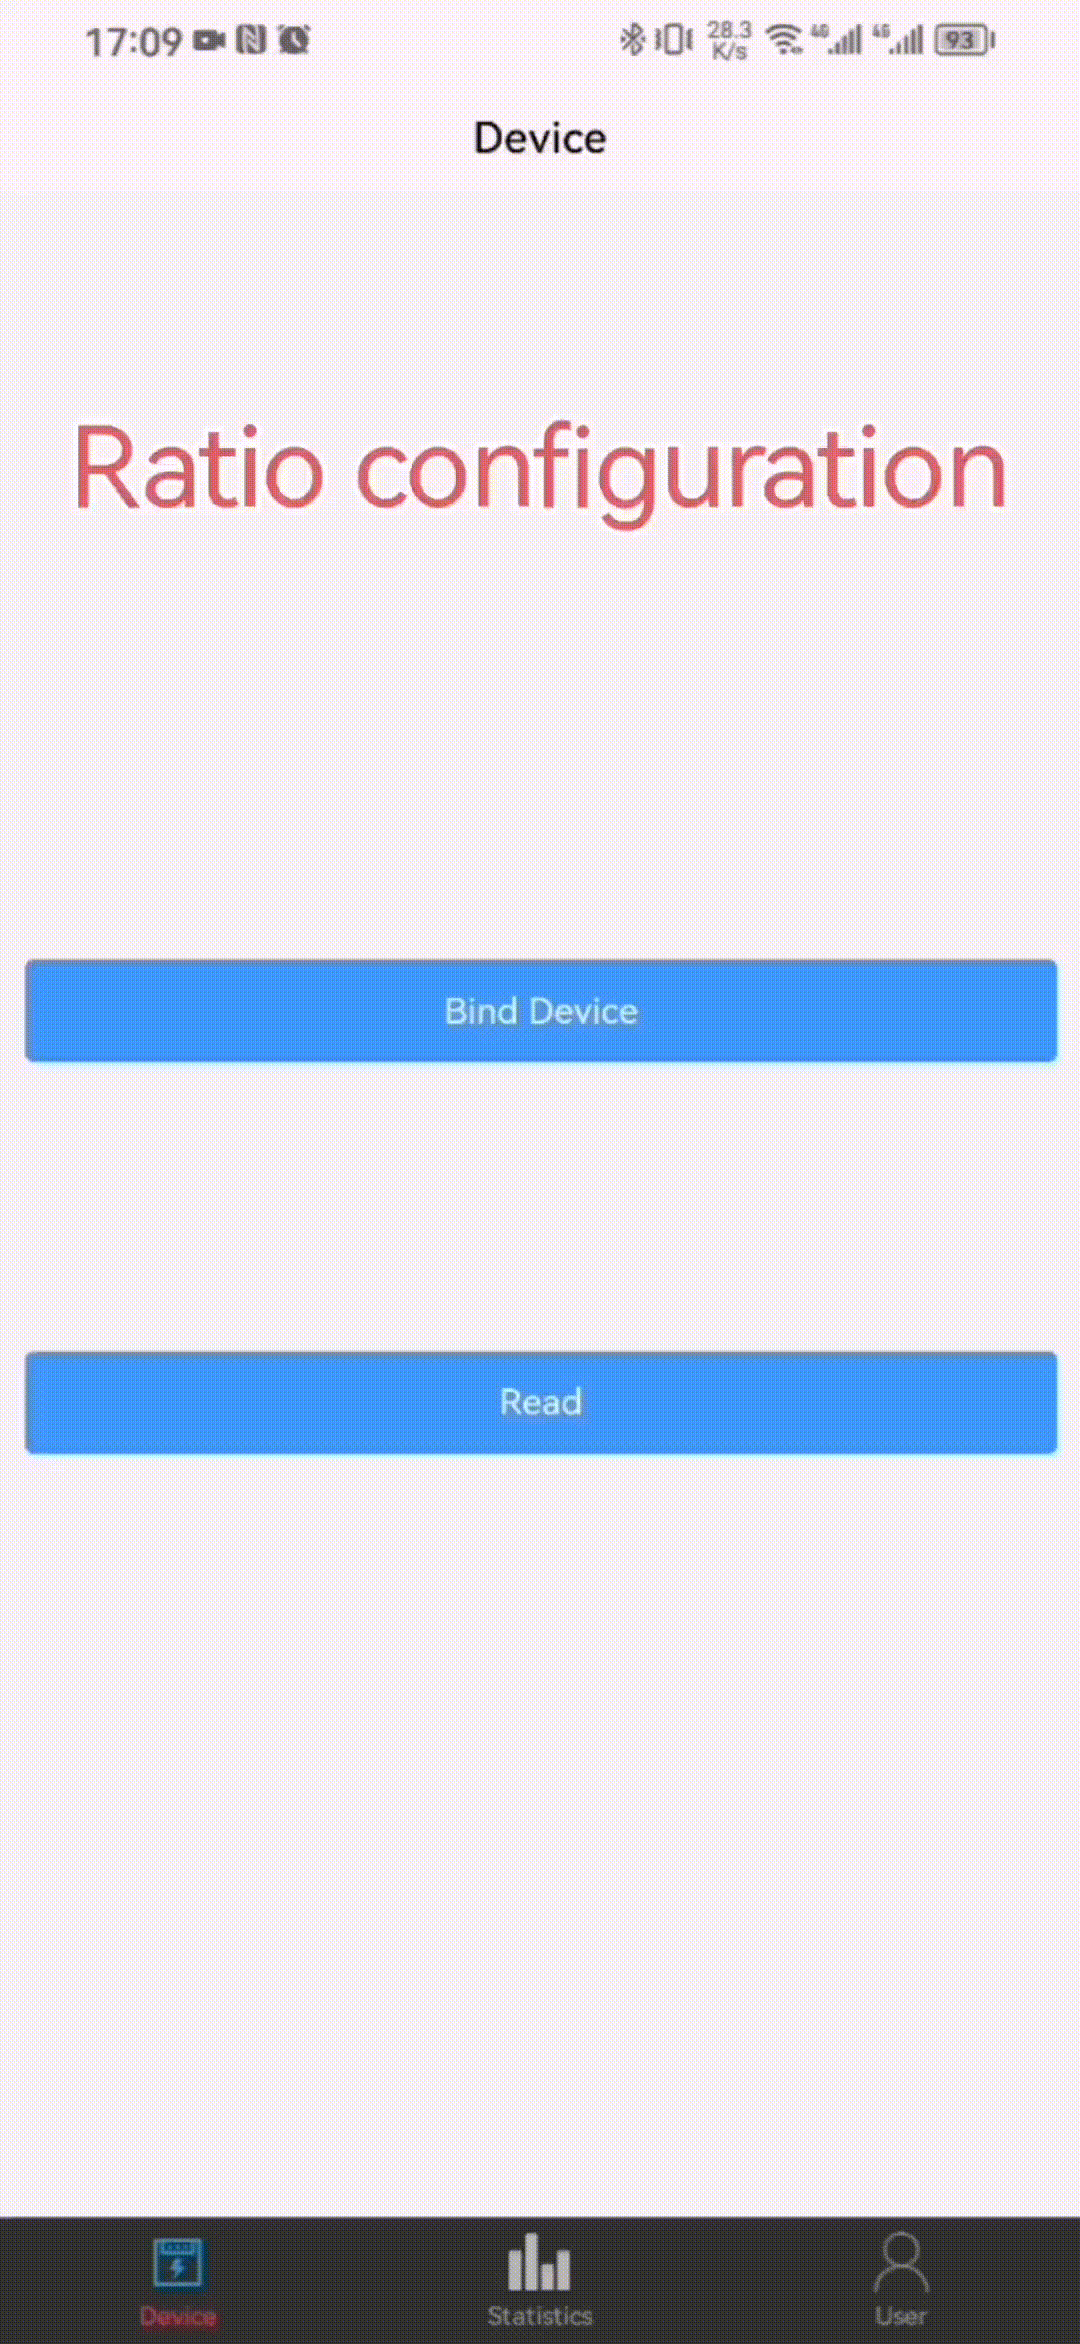
# 4.4 Configuration CT Ratio / PT Ratio (APP)
Process: Login - Read - Scan meterSN - Setting CT&PT - Read - Report
Please refer to the GIF for specific operating steps.
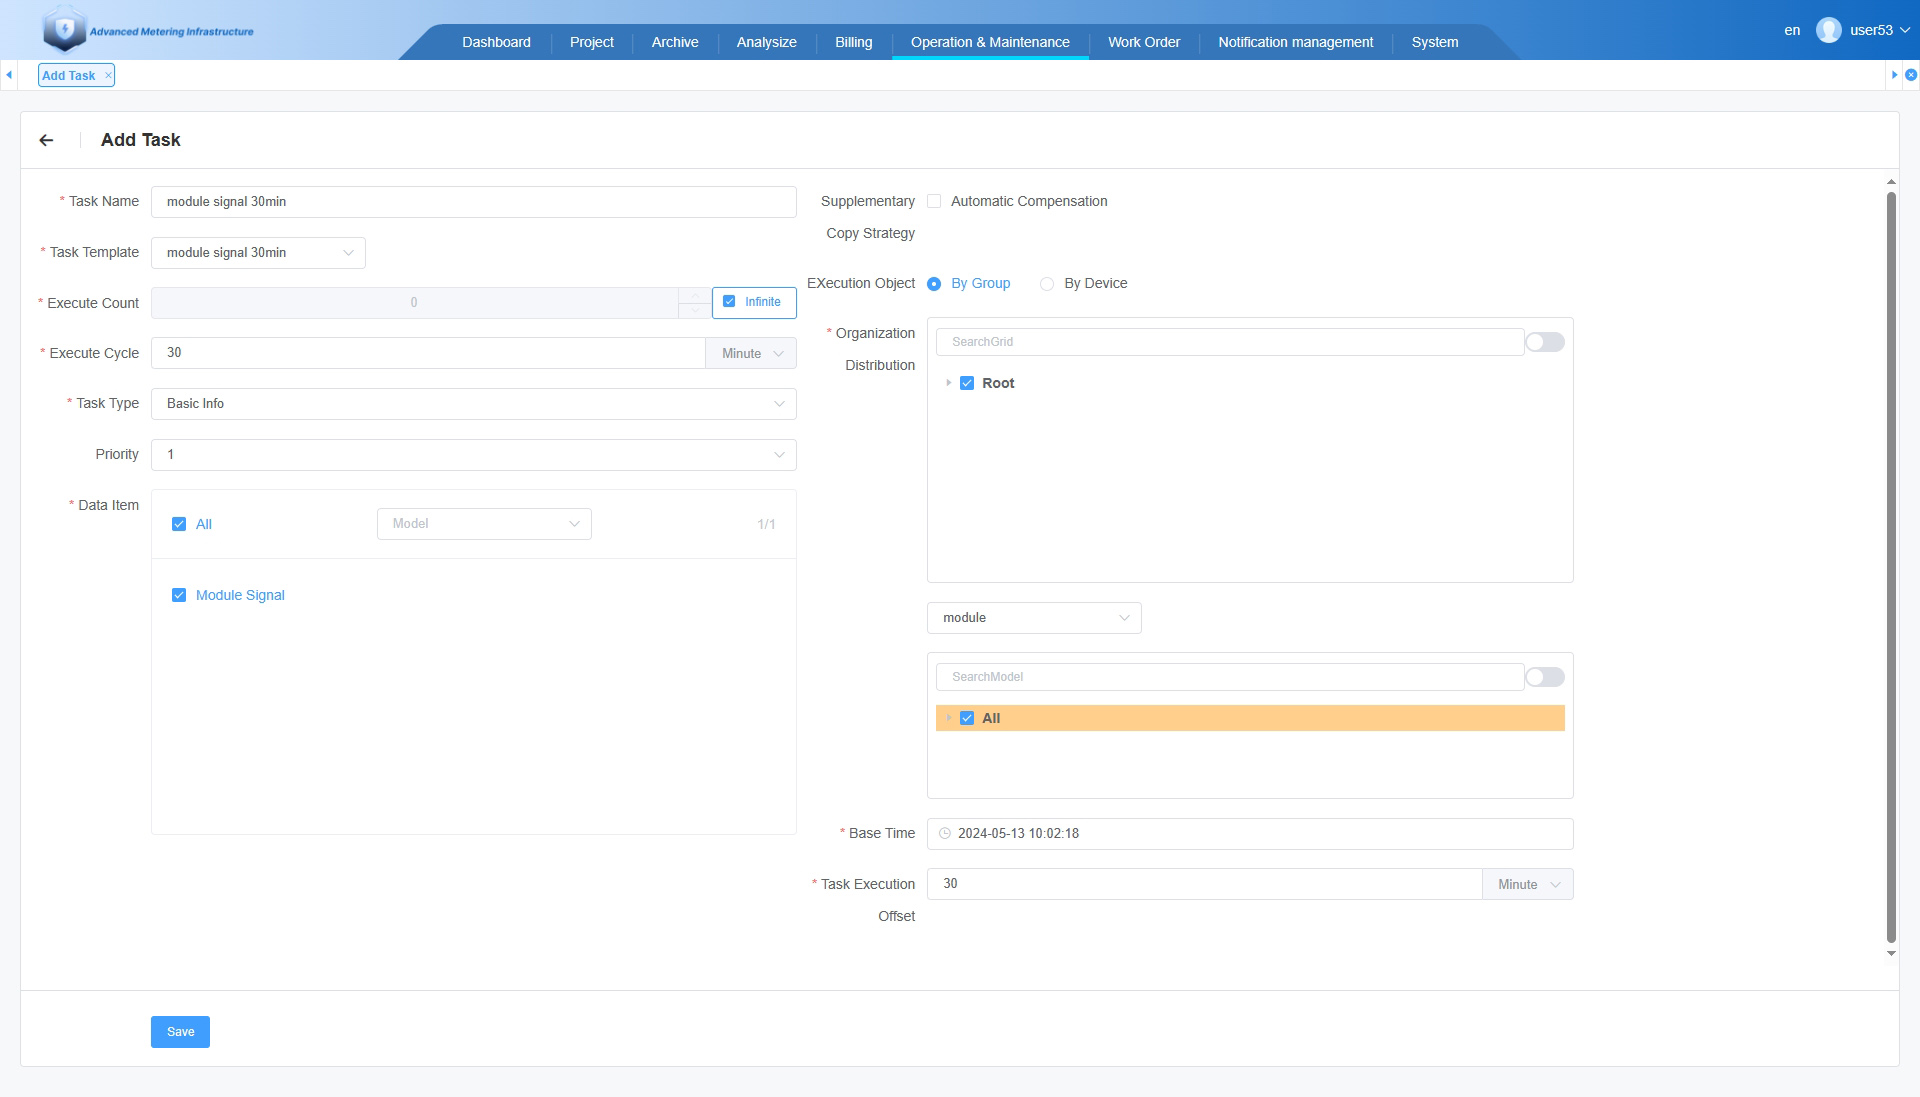
# 5.Configuration of data collection tasks
# 5.1 Open the data collection task configuration page
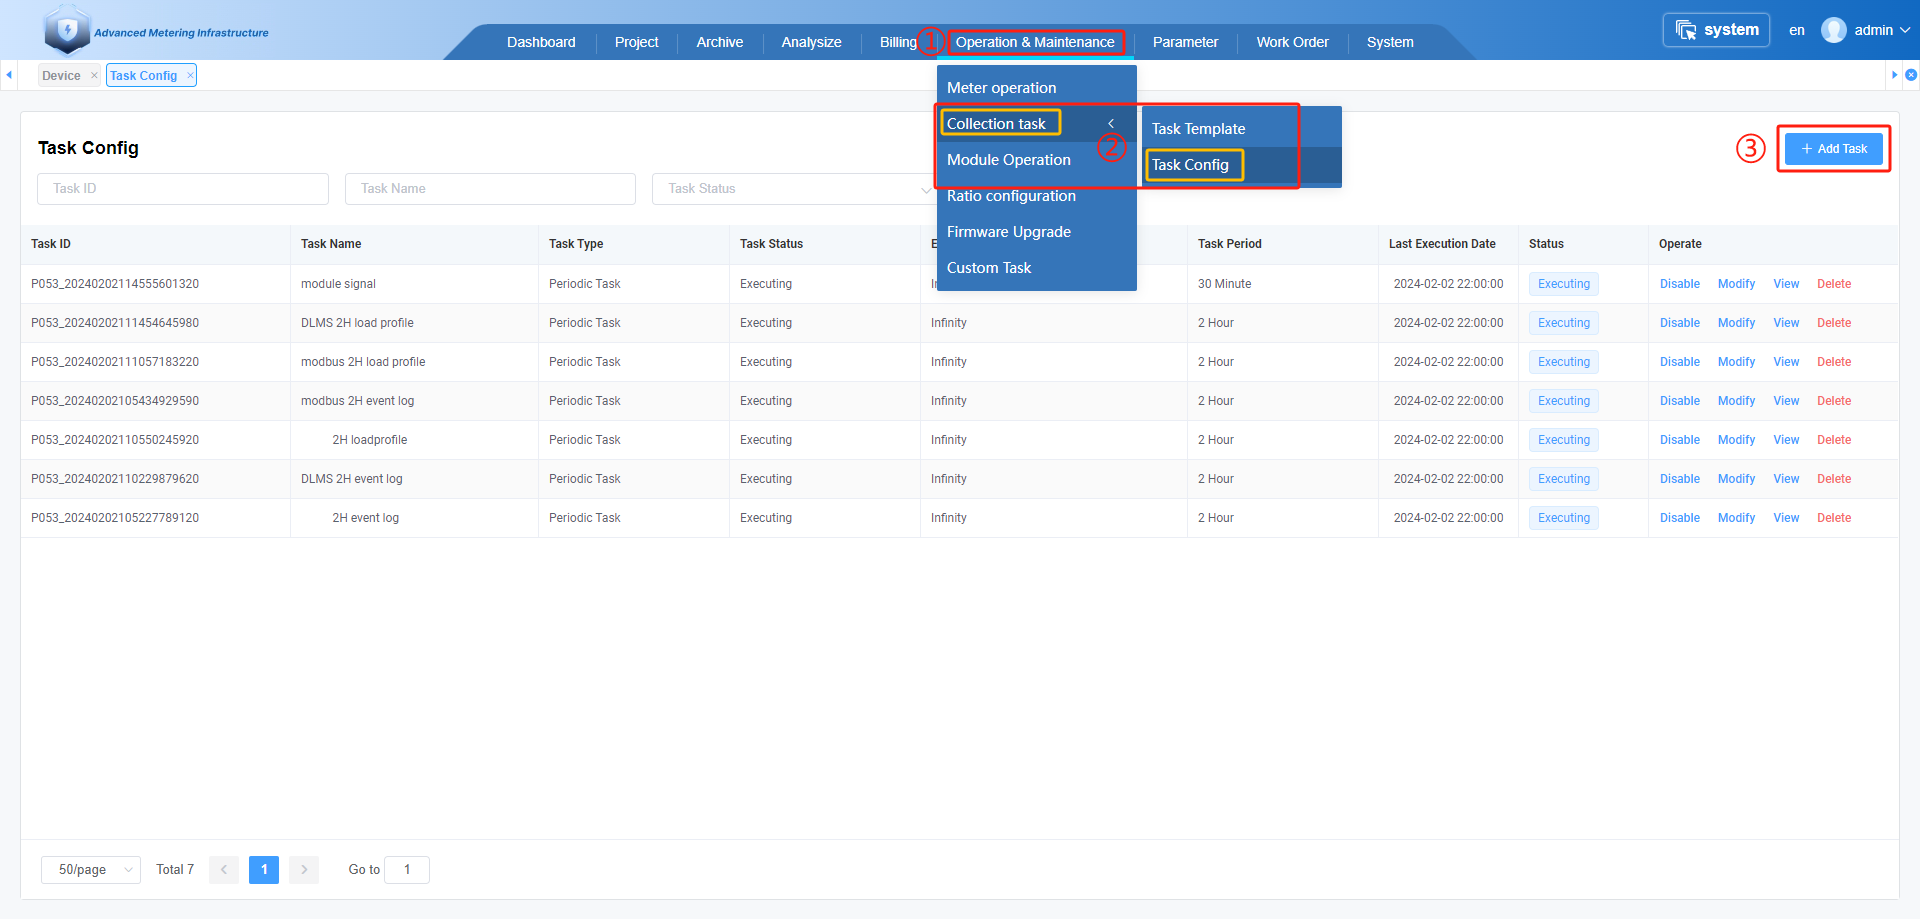
①.Click on the " Operation & Maintenance" menu button.
②.Click on the " Collocation task " menu button.
Click on the " Task Config " menu button.
③.Click on the " +Add " button.
# 5.2 Configure the data collection task
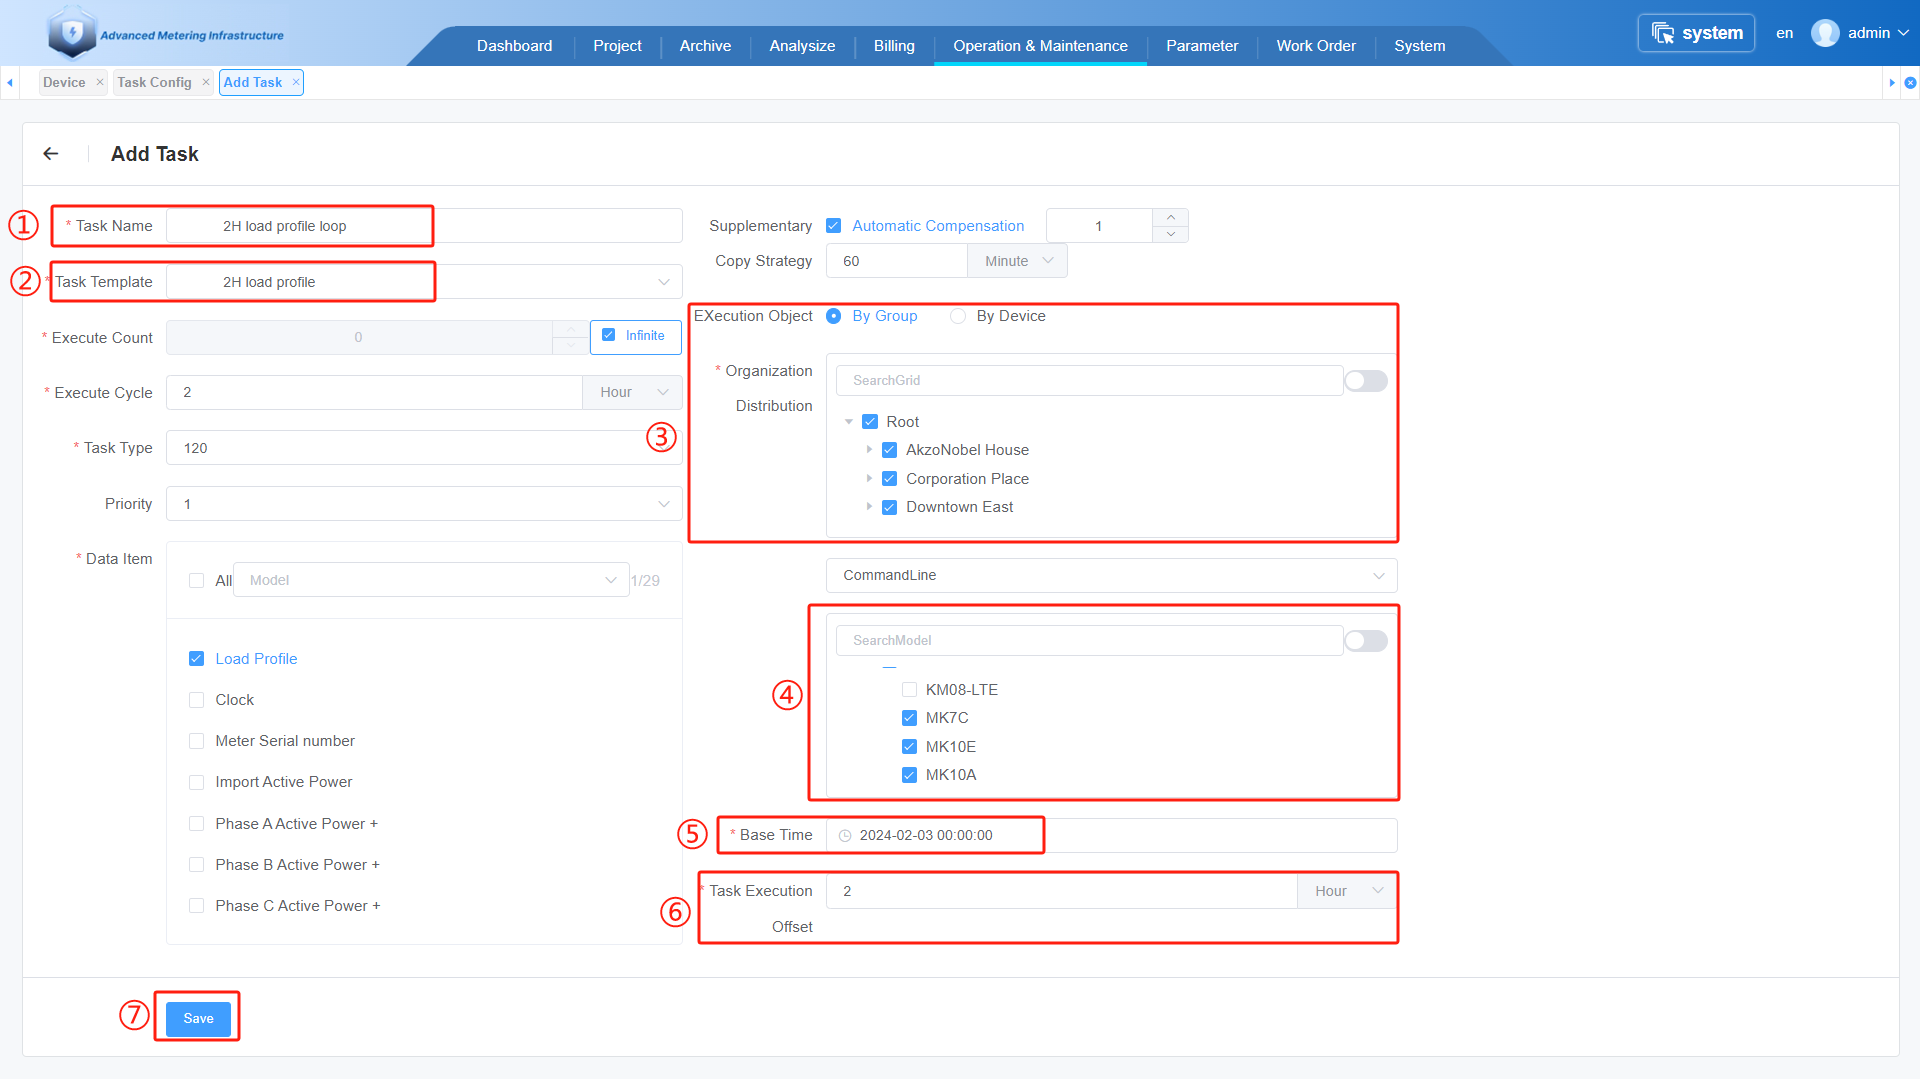
①.Input Task Name.
②.Select Task Template.
Please choose the corresponding task template based on the protocol type of the device you want to read.
③.Select the Grid where the device is located.
④.Select the model of the device you want to read.
⑤.Select the start time for the task (It cannot be earlier than the current time).
⑥.input Task Execution Offset (It is advisable to keep it consistent with the task execution interval).
⑦.Click on the " Save " button.
# 6. Configuration and query of Electricity Useage Reports
# 6.1 Add Billing Report Template
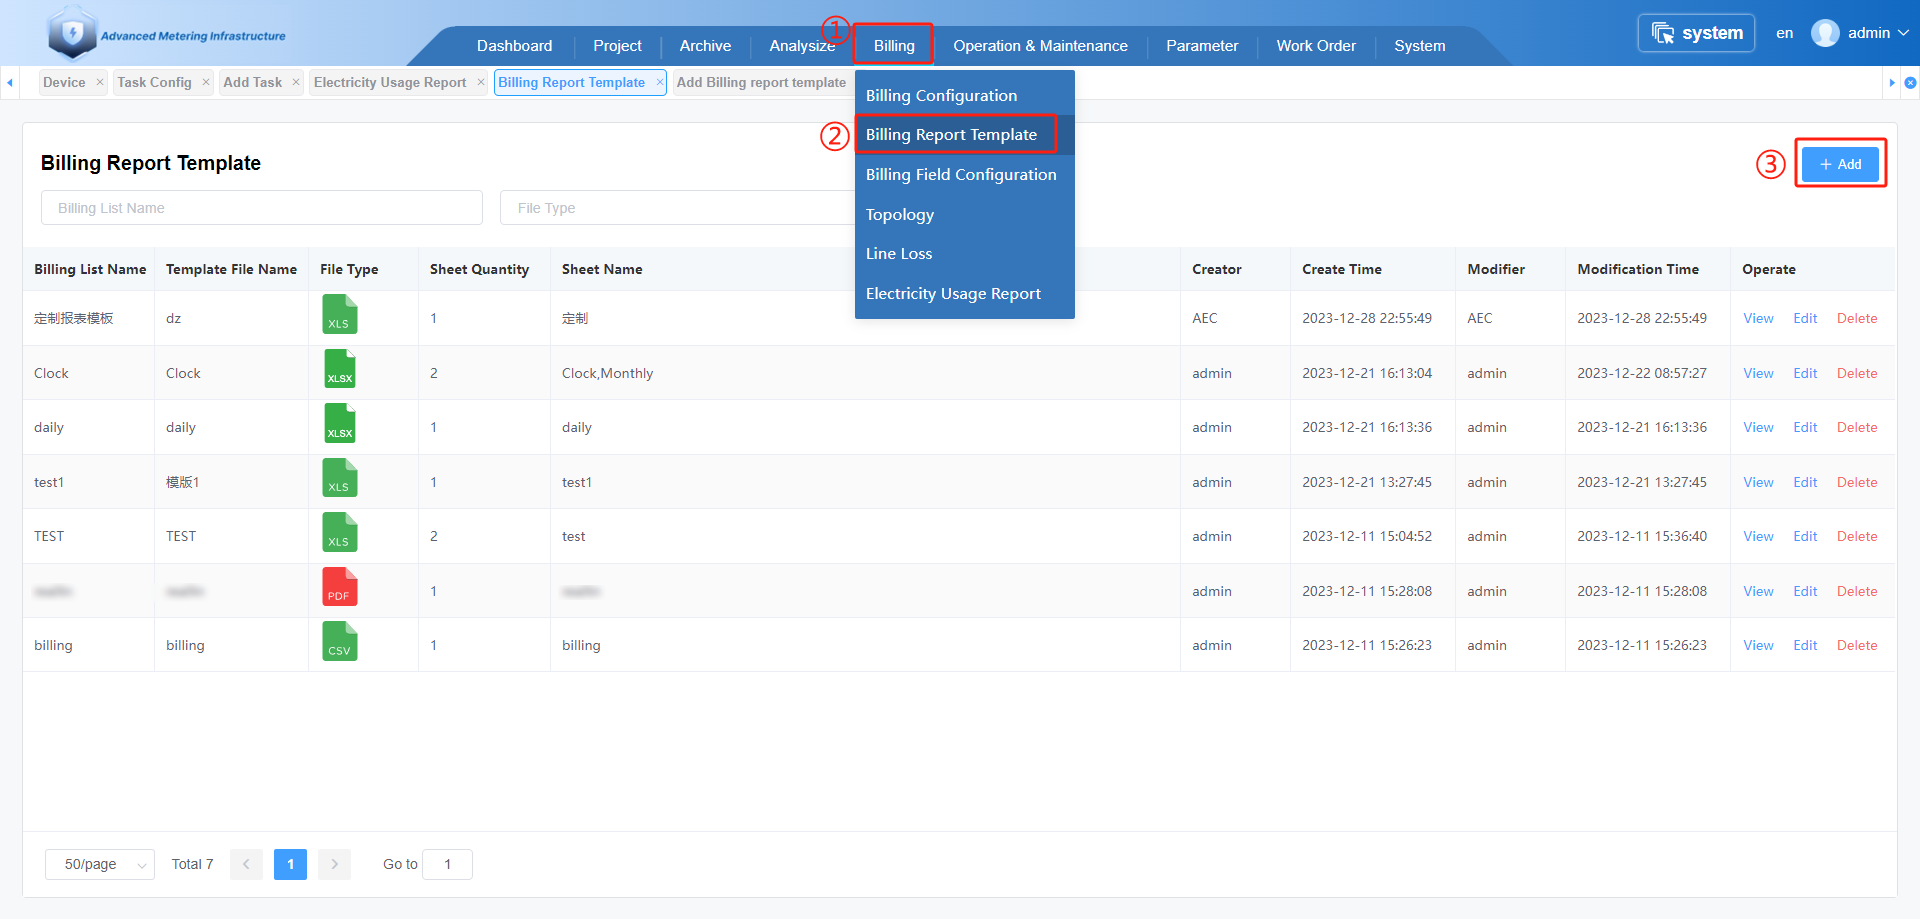
①.Click on the " Billing " menu button.
②.Click on the " Billing Report Template " menu button.
③.Click on the " +Add " button.
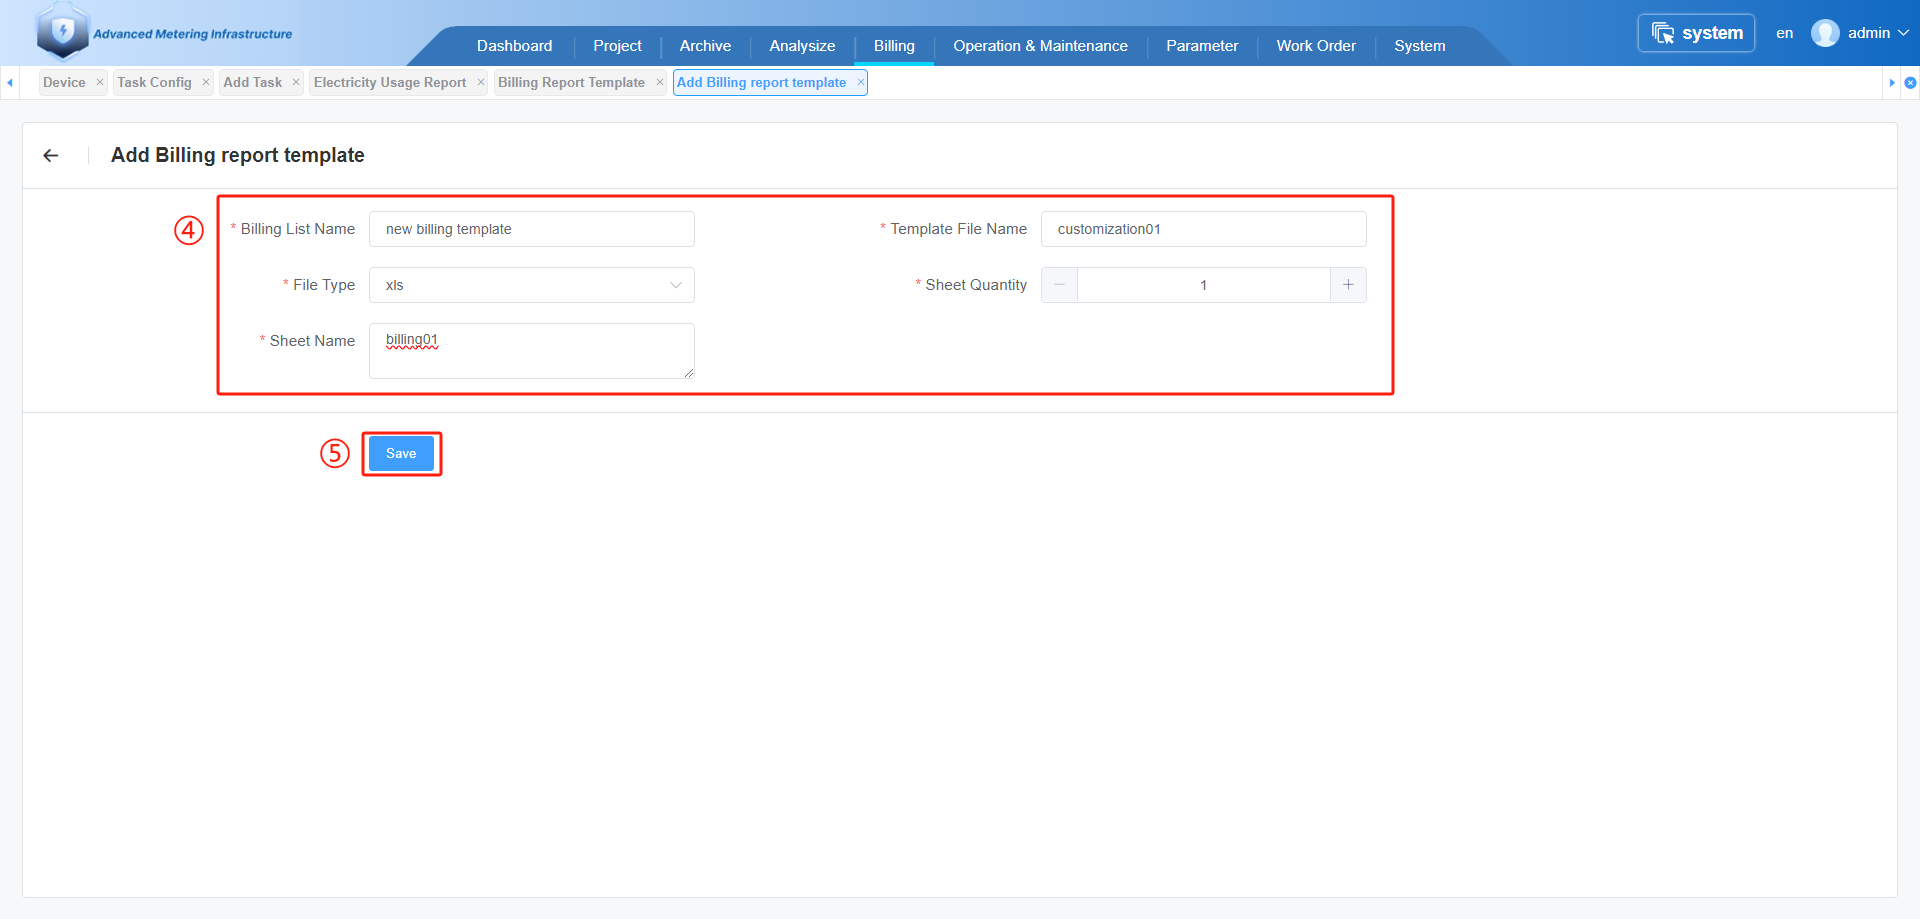
④.Input Billing List Name 、Template File Name 、Sheet Name,
Select File Type 、Sheet Quantity.
⑤.Click on the " Save " button.
# 6.2 Configuration template fields
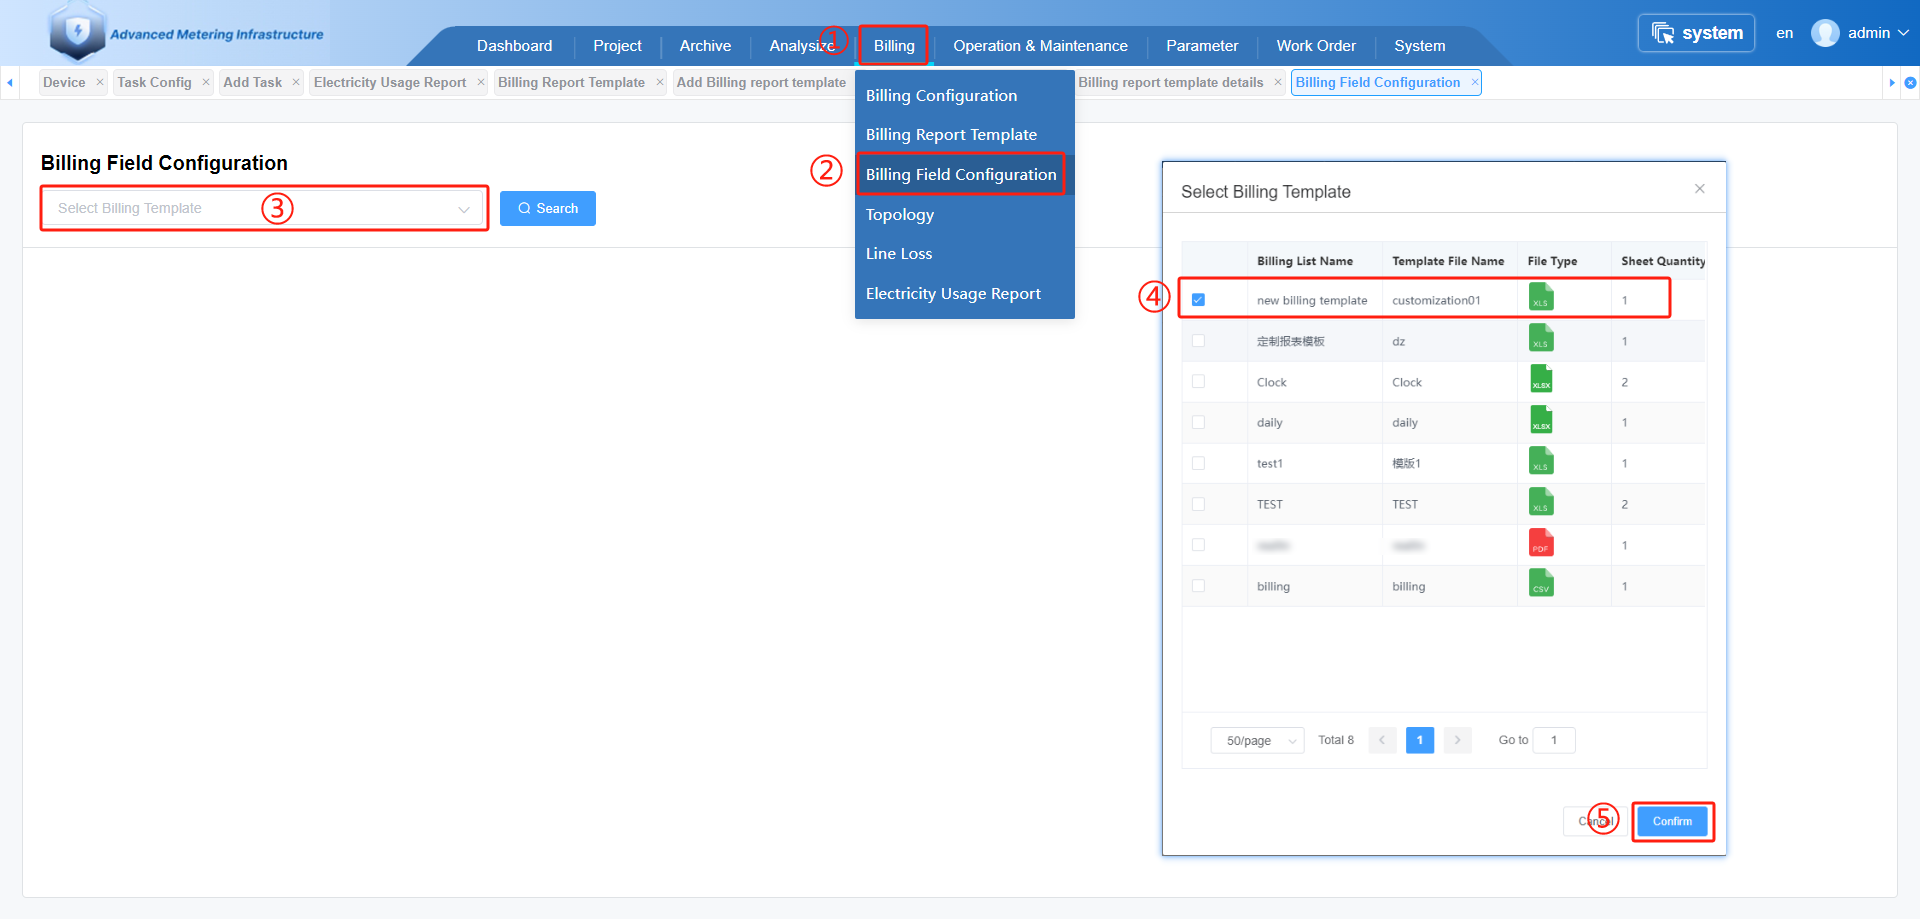
①.Click on the " Billing " menu button.
②.Click on the " Billing Field Configuration " menu button.
③.Click here.
④.Select the template you want to edit.
⑤.Click on the " Confirm " button.
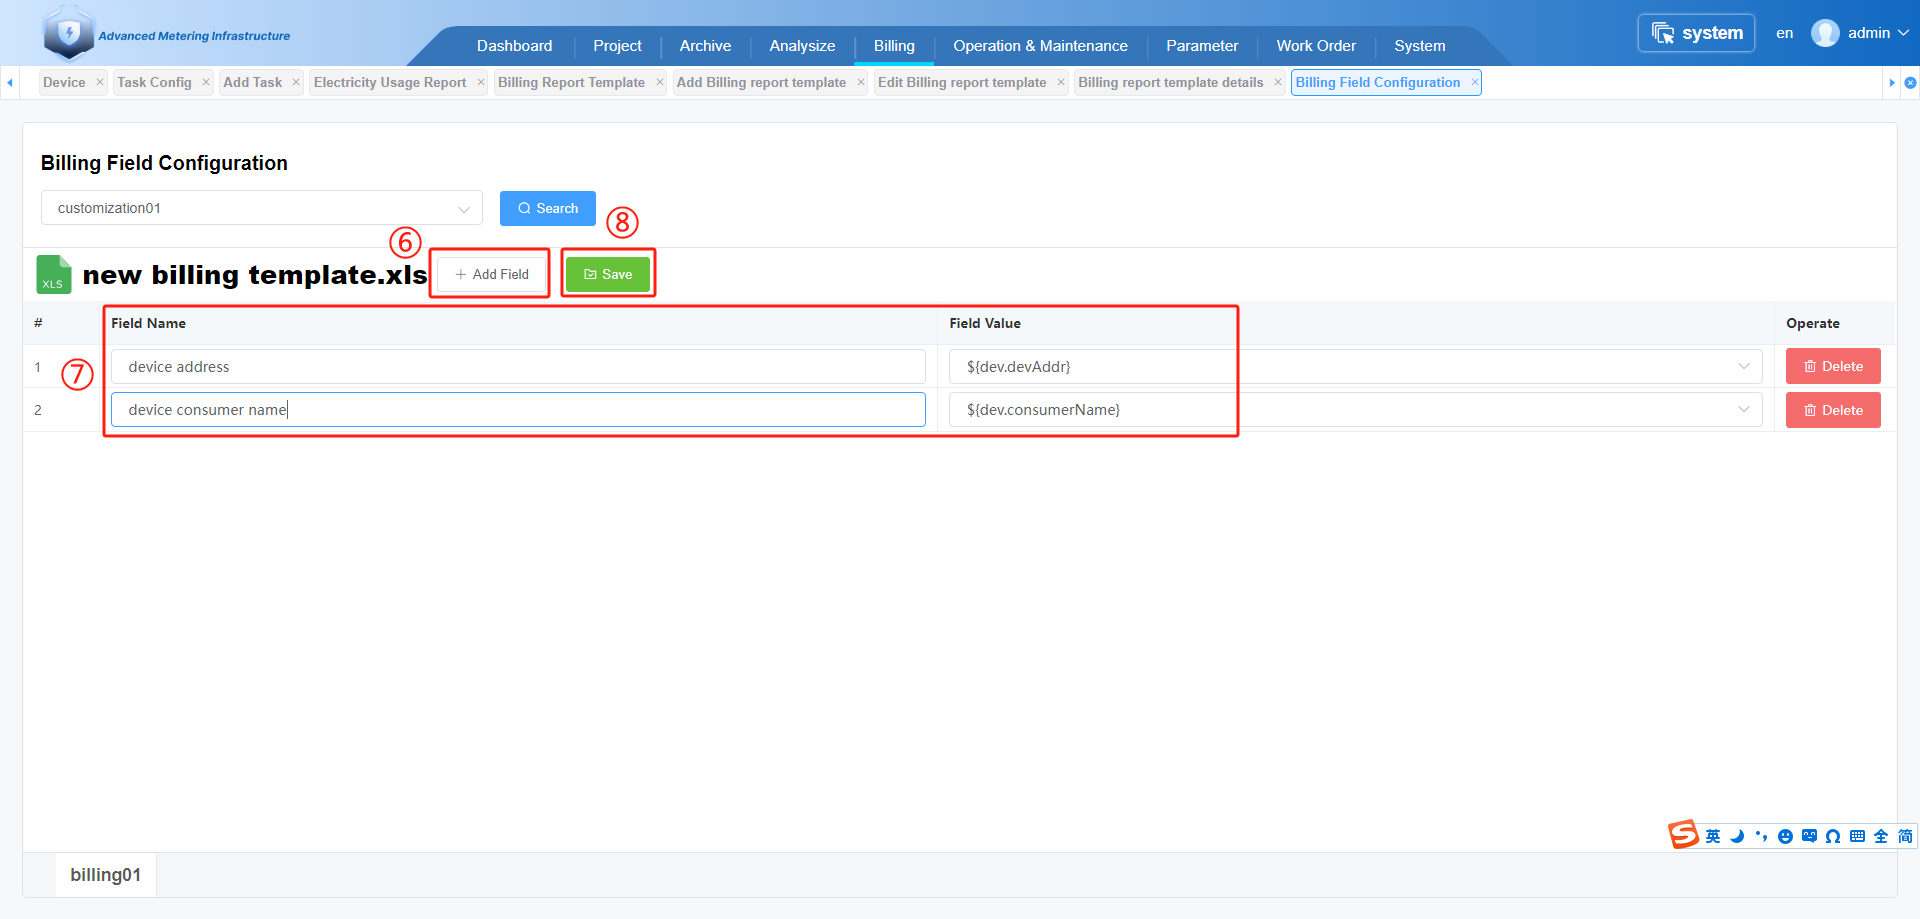
⑥.Click " +Add Field " button.
⑦.Input Field Name and select Field Value.
Repeat steps ⑥ and ⑦, adding the fields you need.
⑧.Click " Save " button.
# 6.3 Query Electricity Usage report
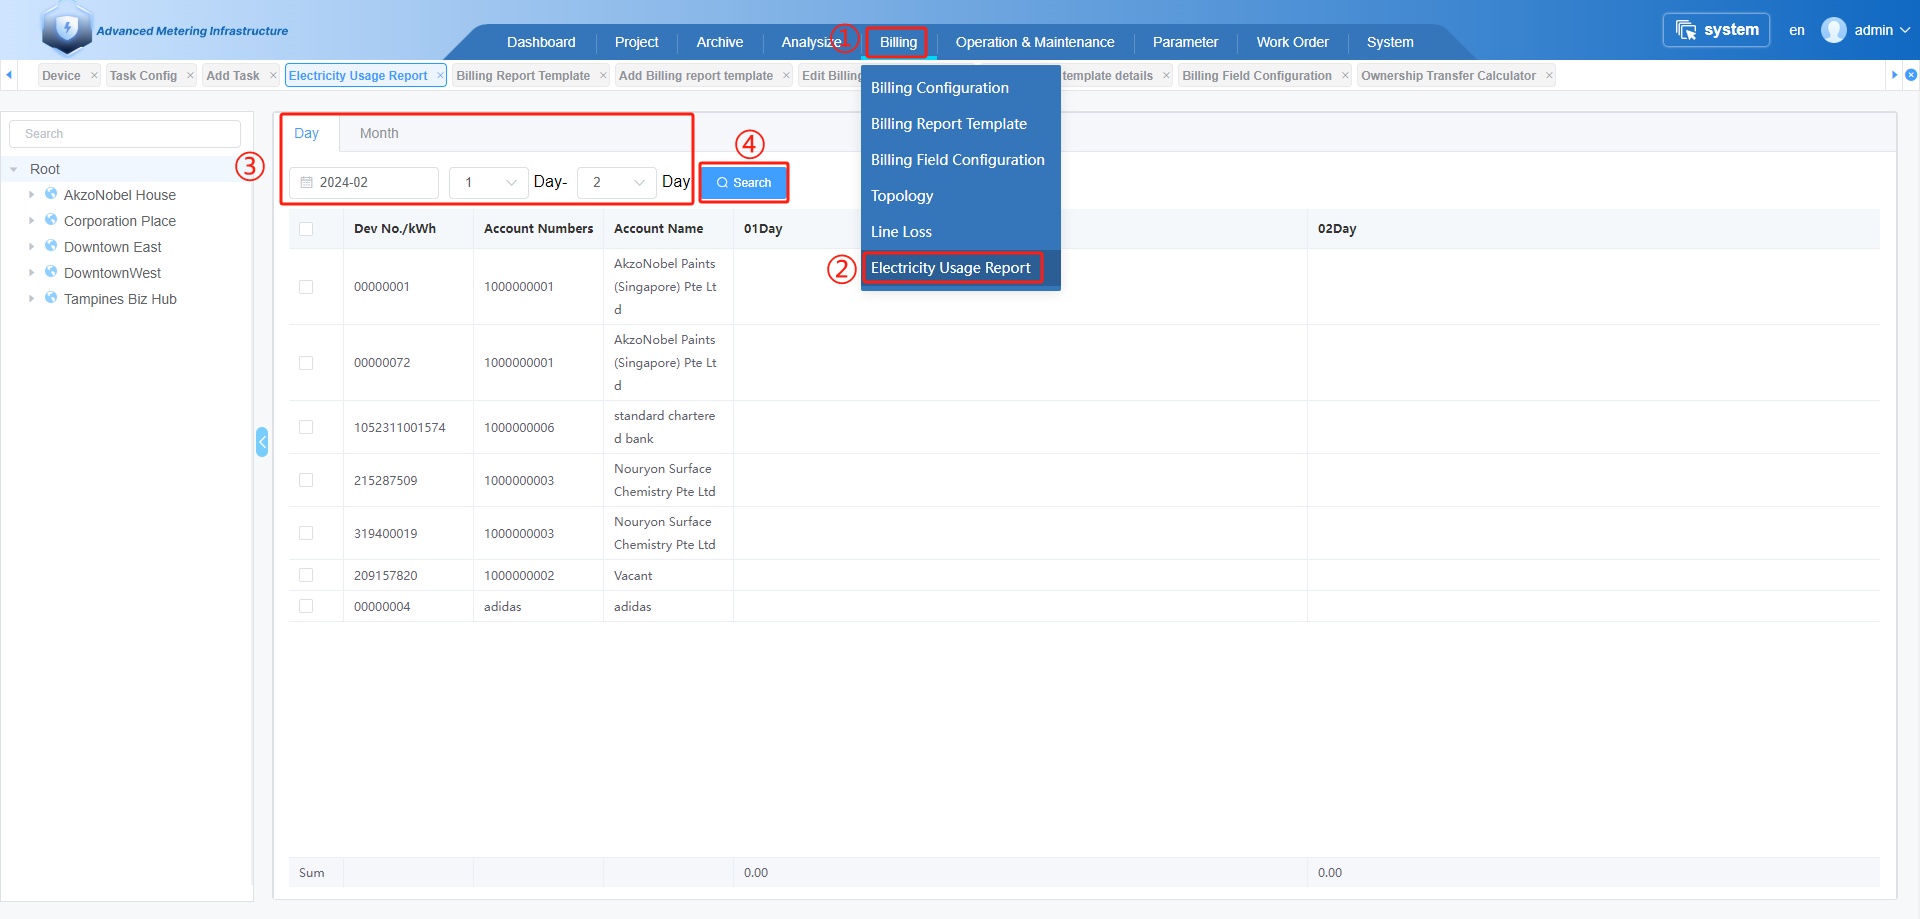
①.Click on the " Billing " menu button.
②.Click on the " Electricity Usage report " menu button.
③.Select the start and end dates for the query.
④.Click " Search" button.
# 6.4 Export Electricity Usage report
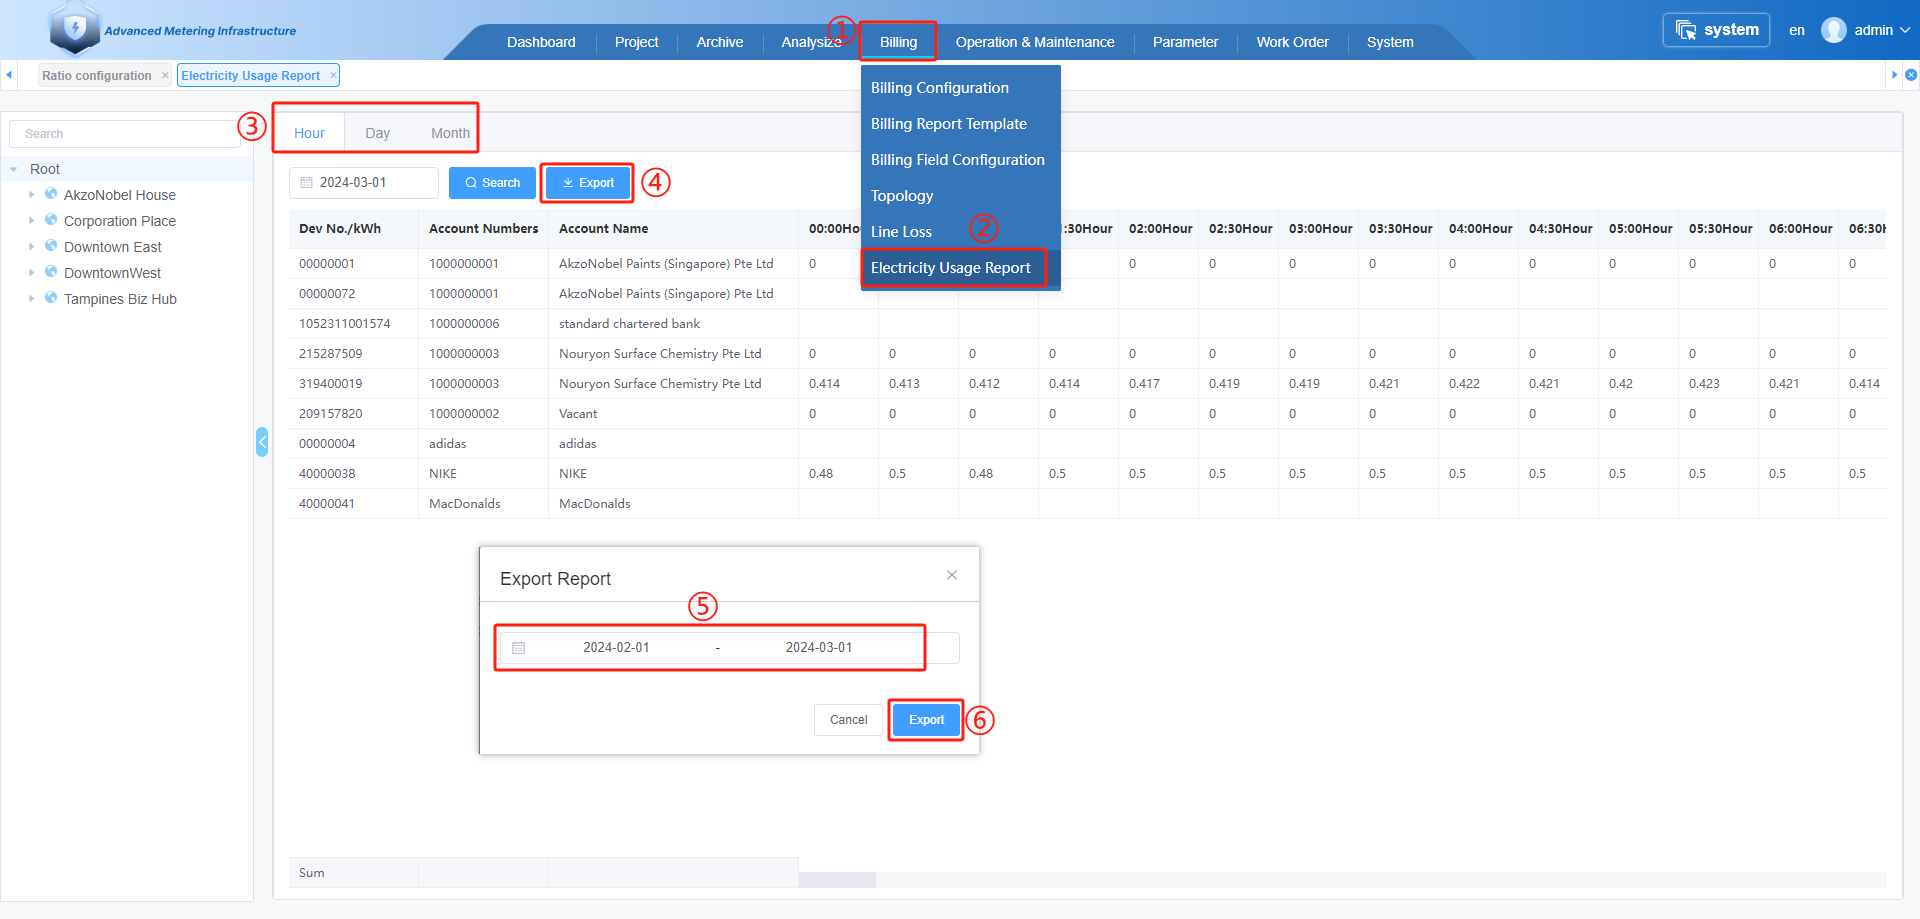
①.Click on the " Billing " menu button.
②.Click on the " Electricity Usage report " menu button.
③.Select the time unit for the data.
④.Click on the " Export " button.
⑤.Select the start and end dates for the query.
⑥.Click " Export" button.
# 6.5 Export billing report
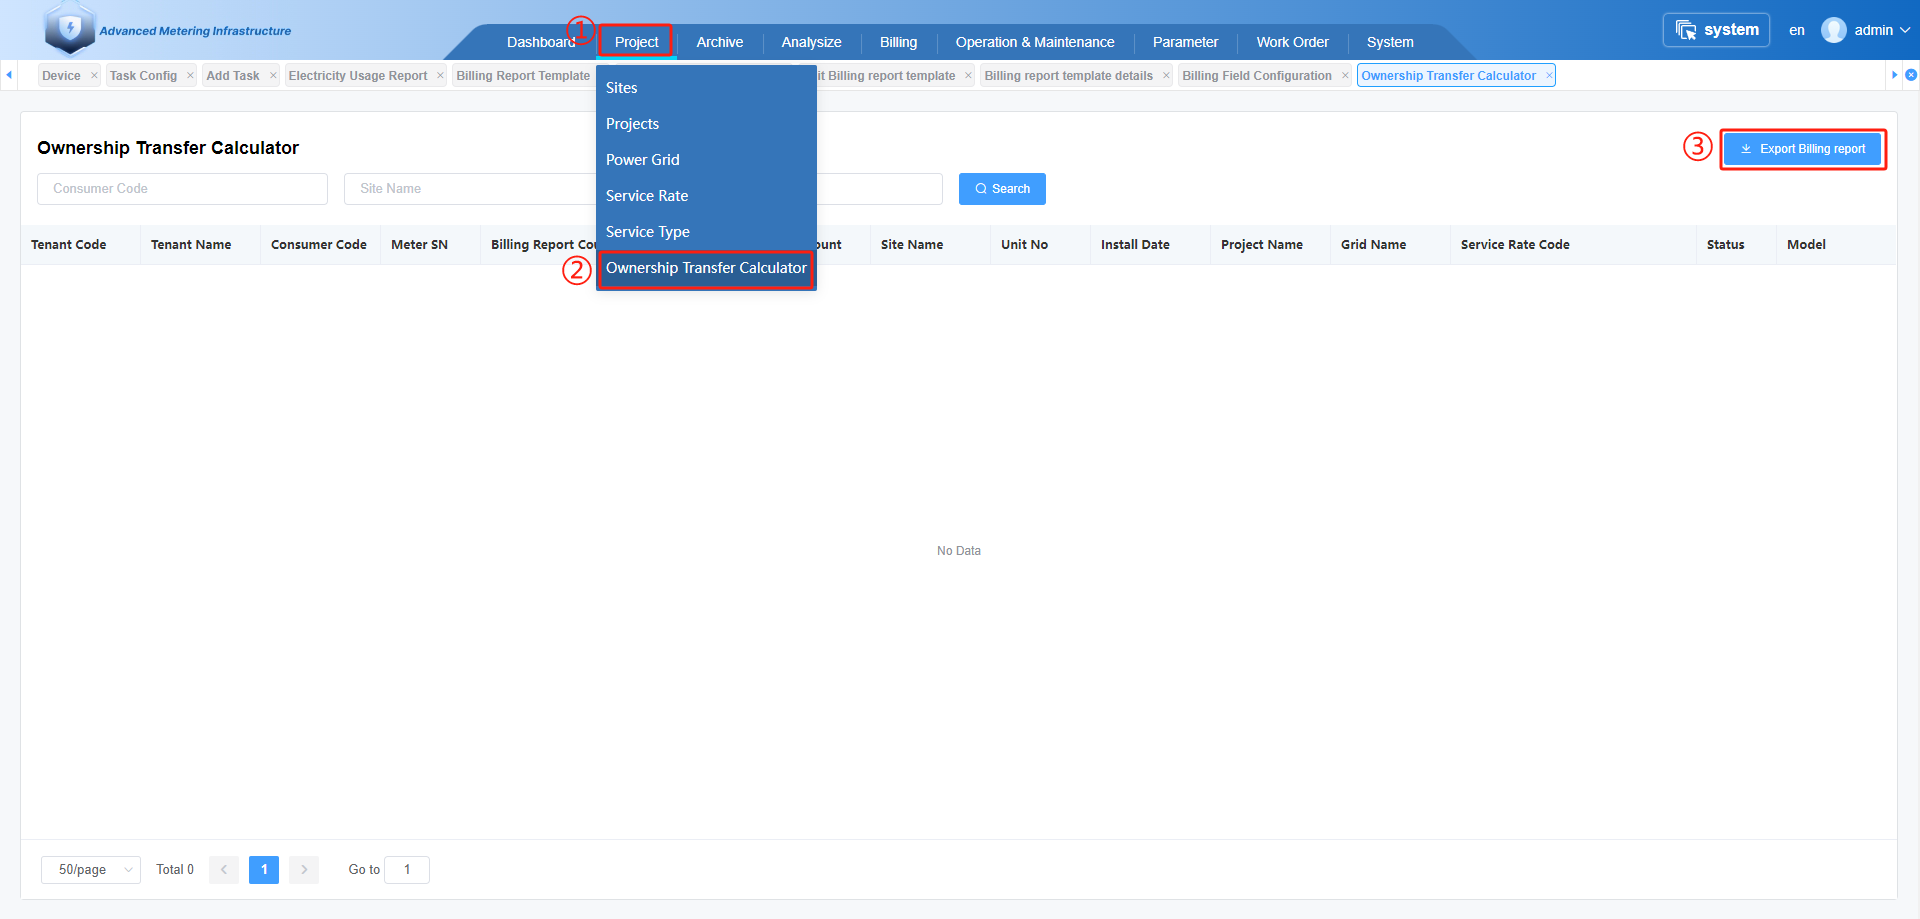
①.Click on the " Project " menu button.
②.Click on the " Ownership Transter Calculator " menu button.
③.Click " Export Billing Report" button.
# 7. Configuration topology and query line loss
# 7.1 Add Topology
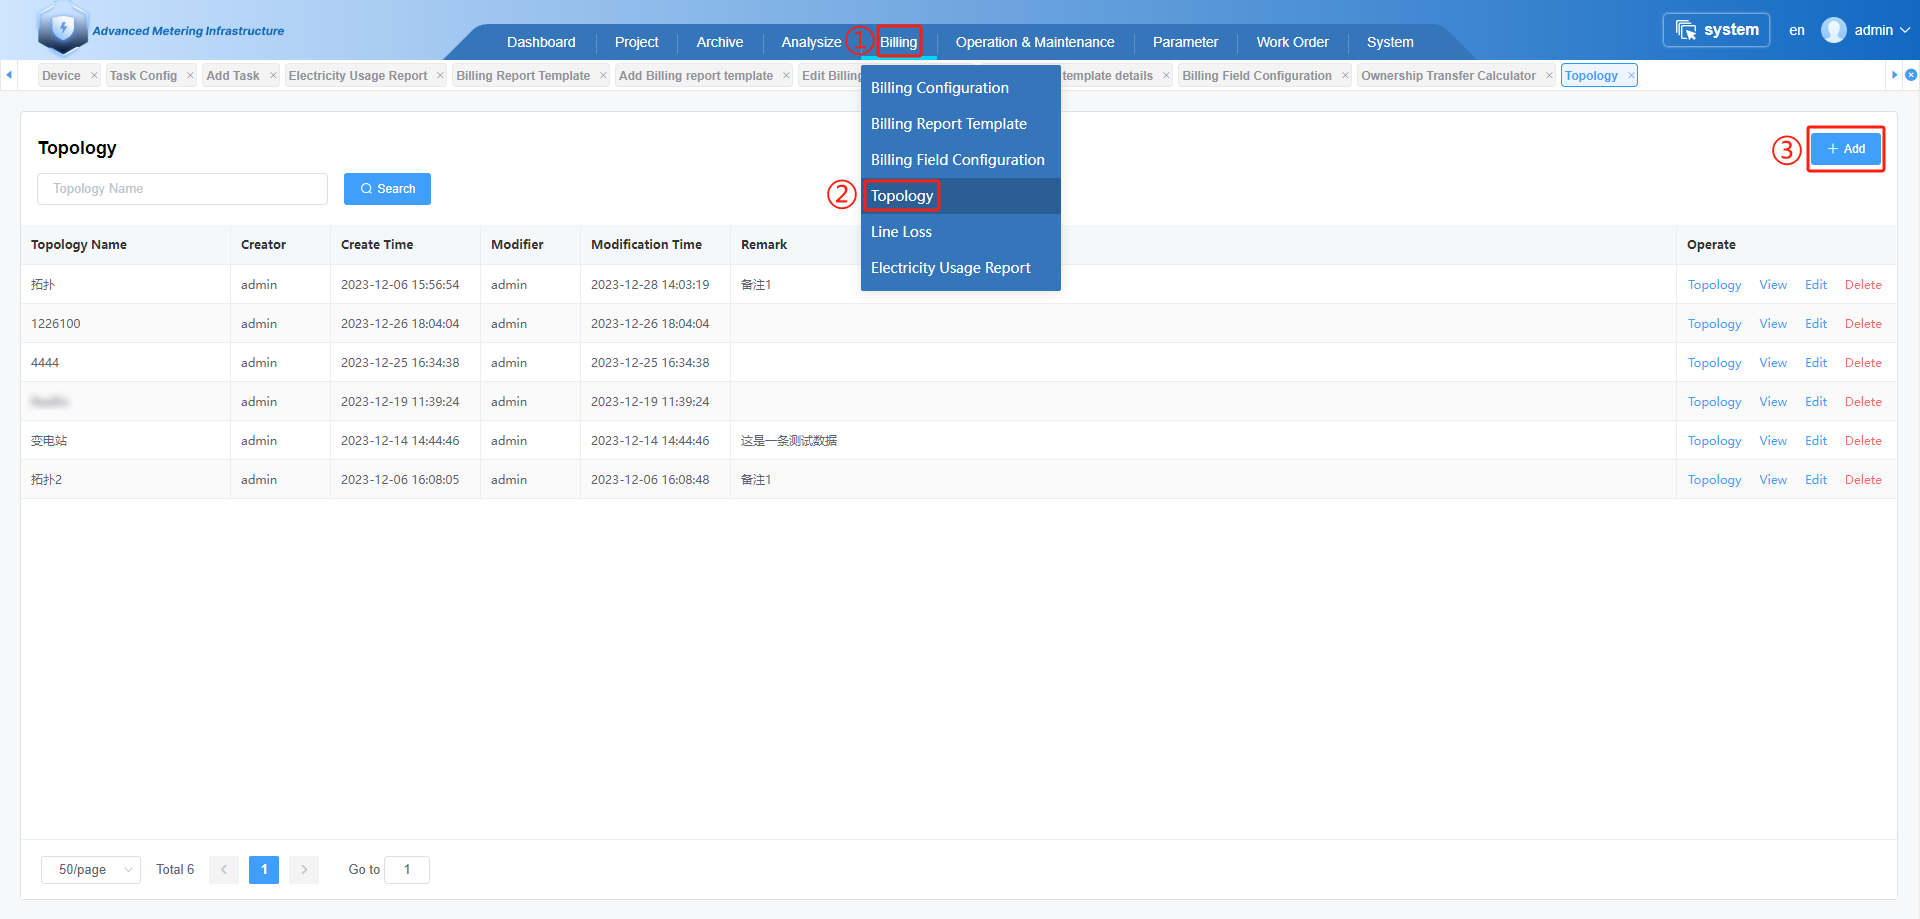
①.Click on the " Billing " menu button.
②.Click on the " Topology " menu button.
③.Click " +Add " button.
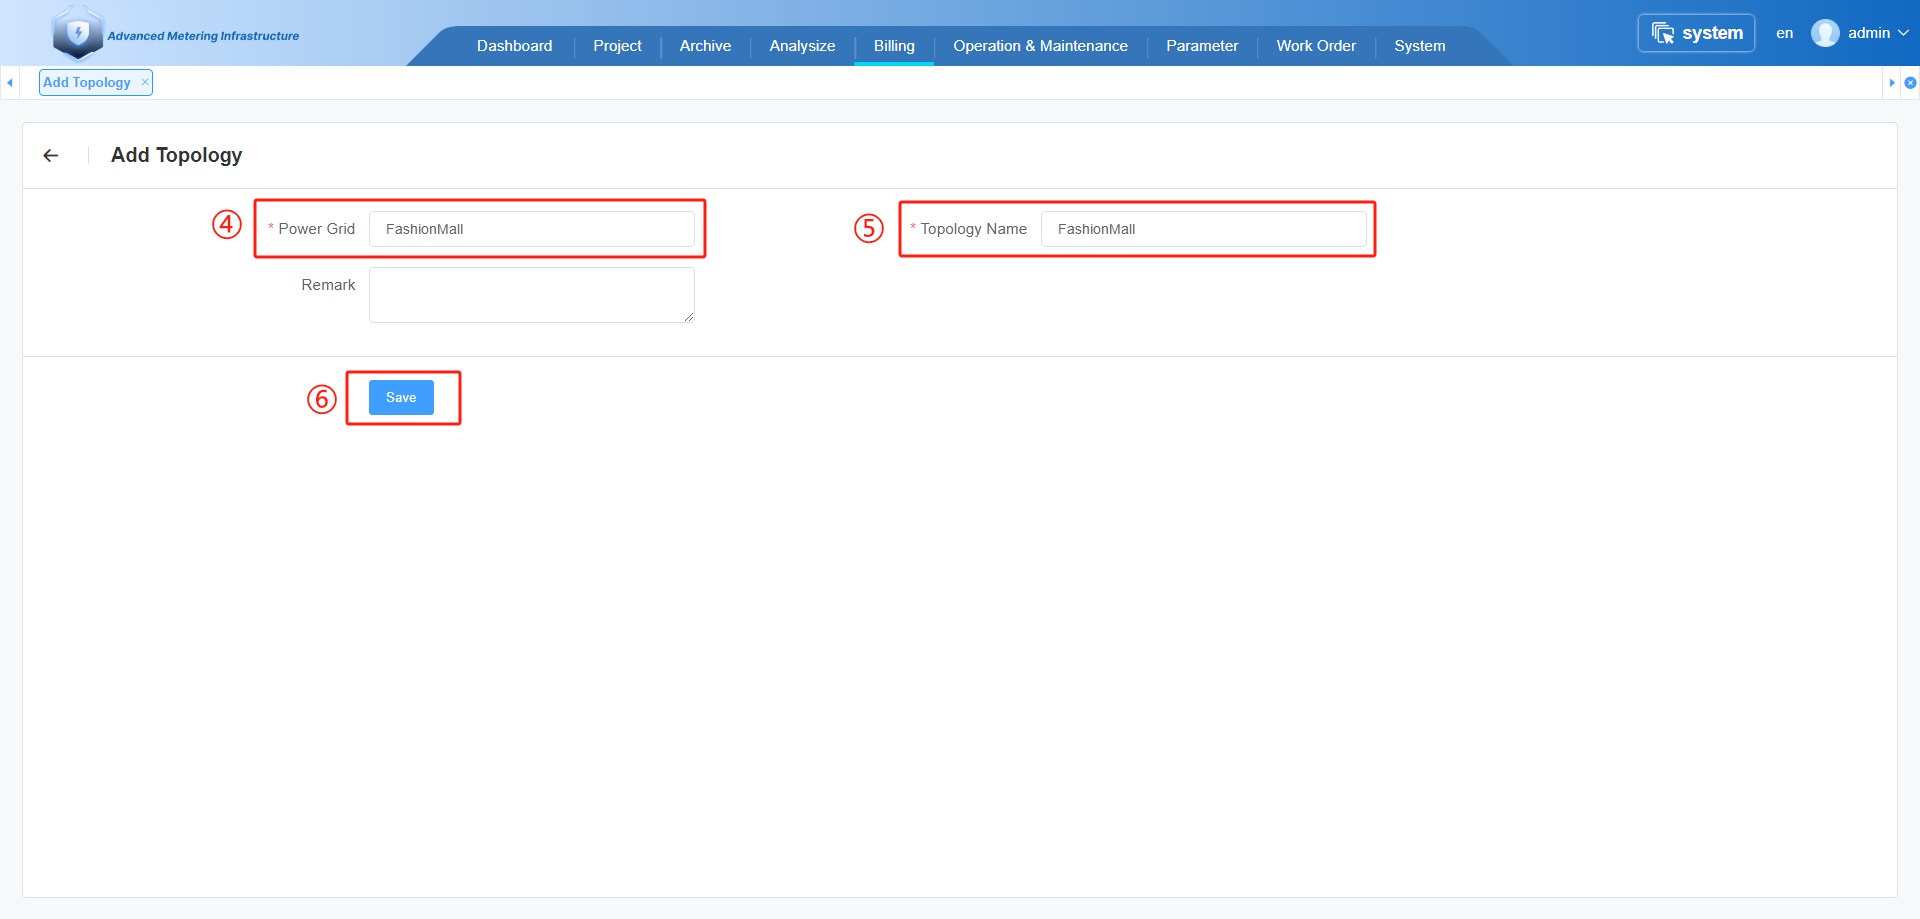
④.Select Power Grid.
⑤.Input Topology Name.
⑥.Click " Save " button.
# 7.2 Configuration Topology
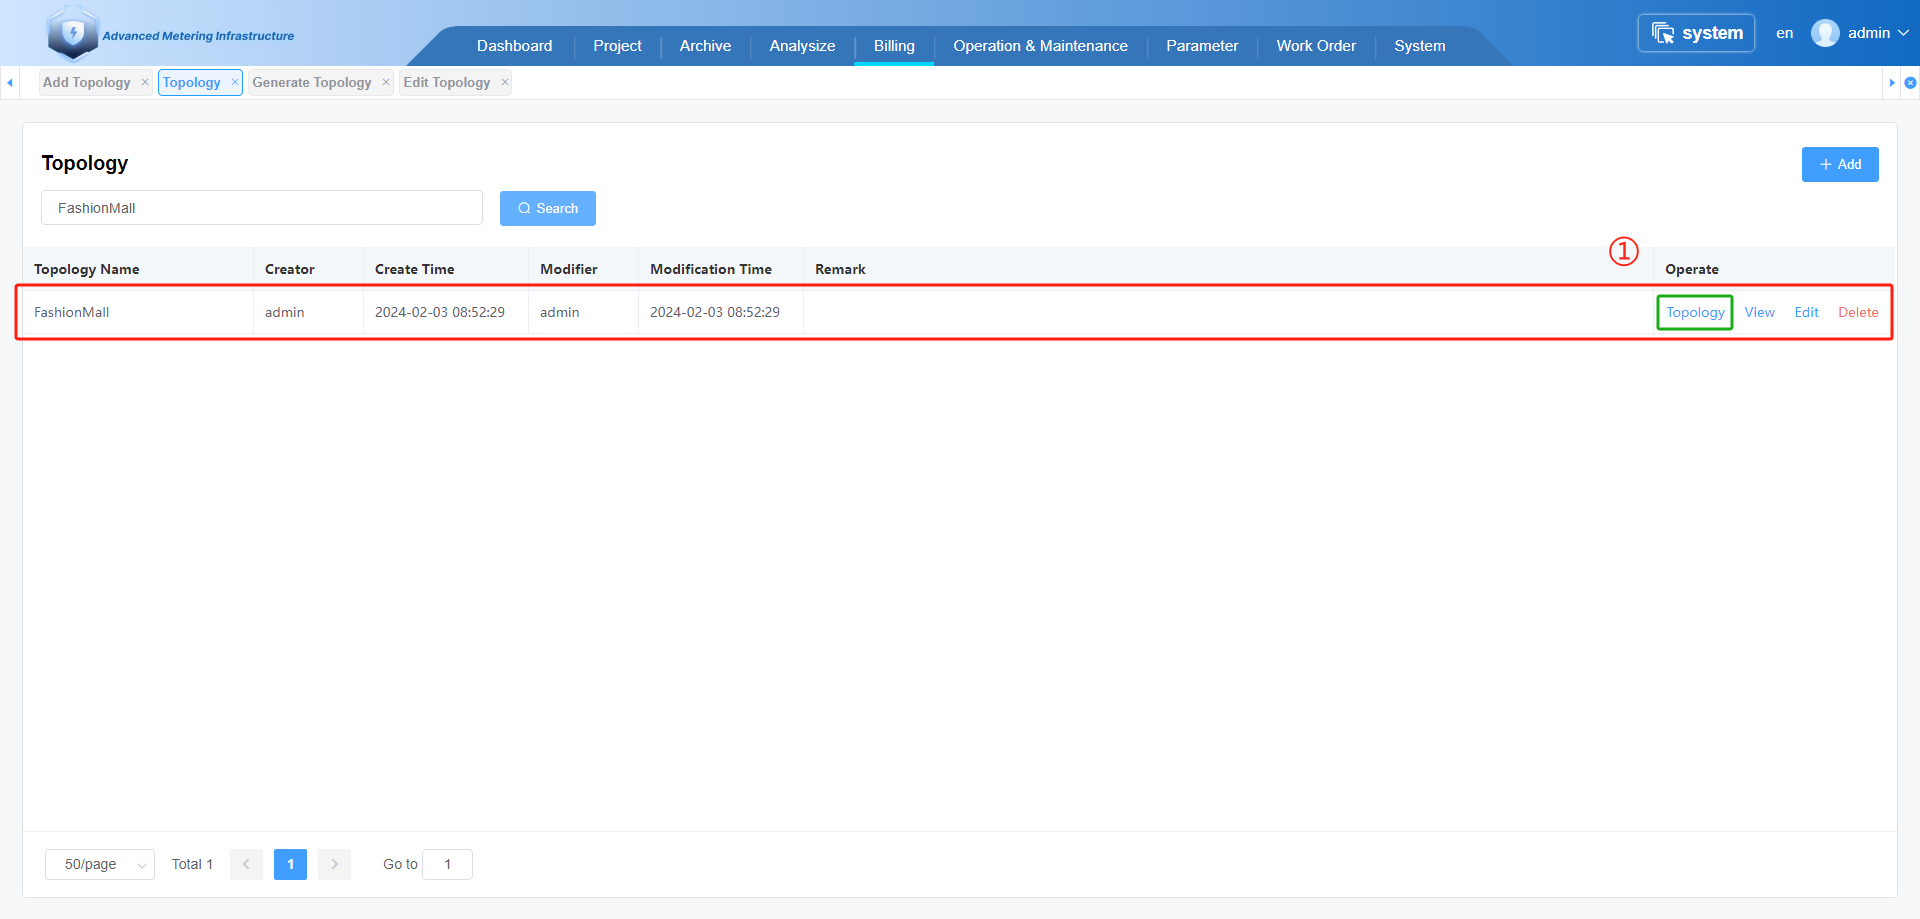
①.Click " Topology " button, Open the configuration topology page.
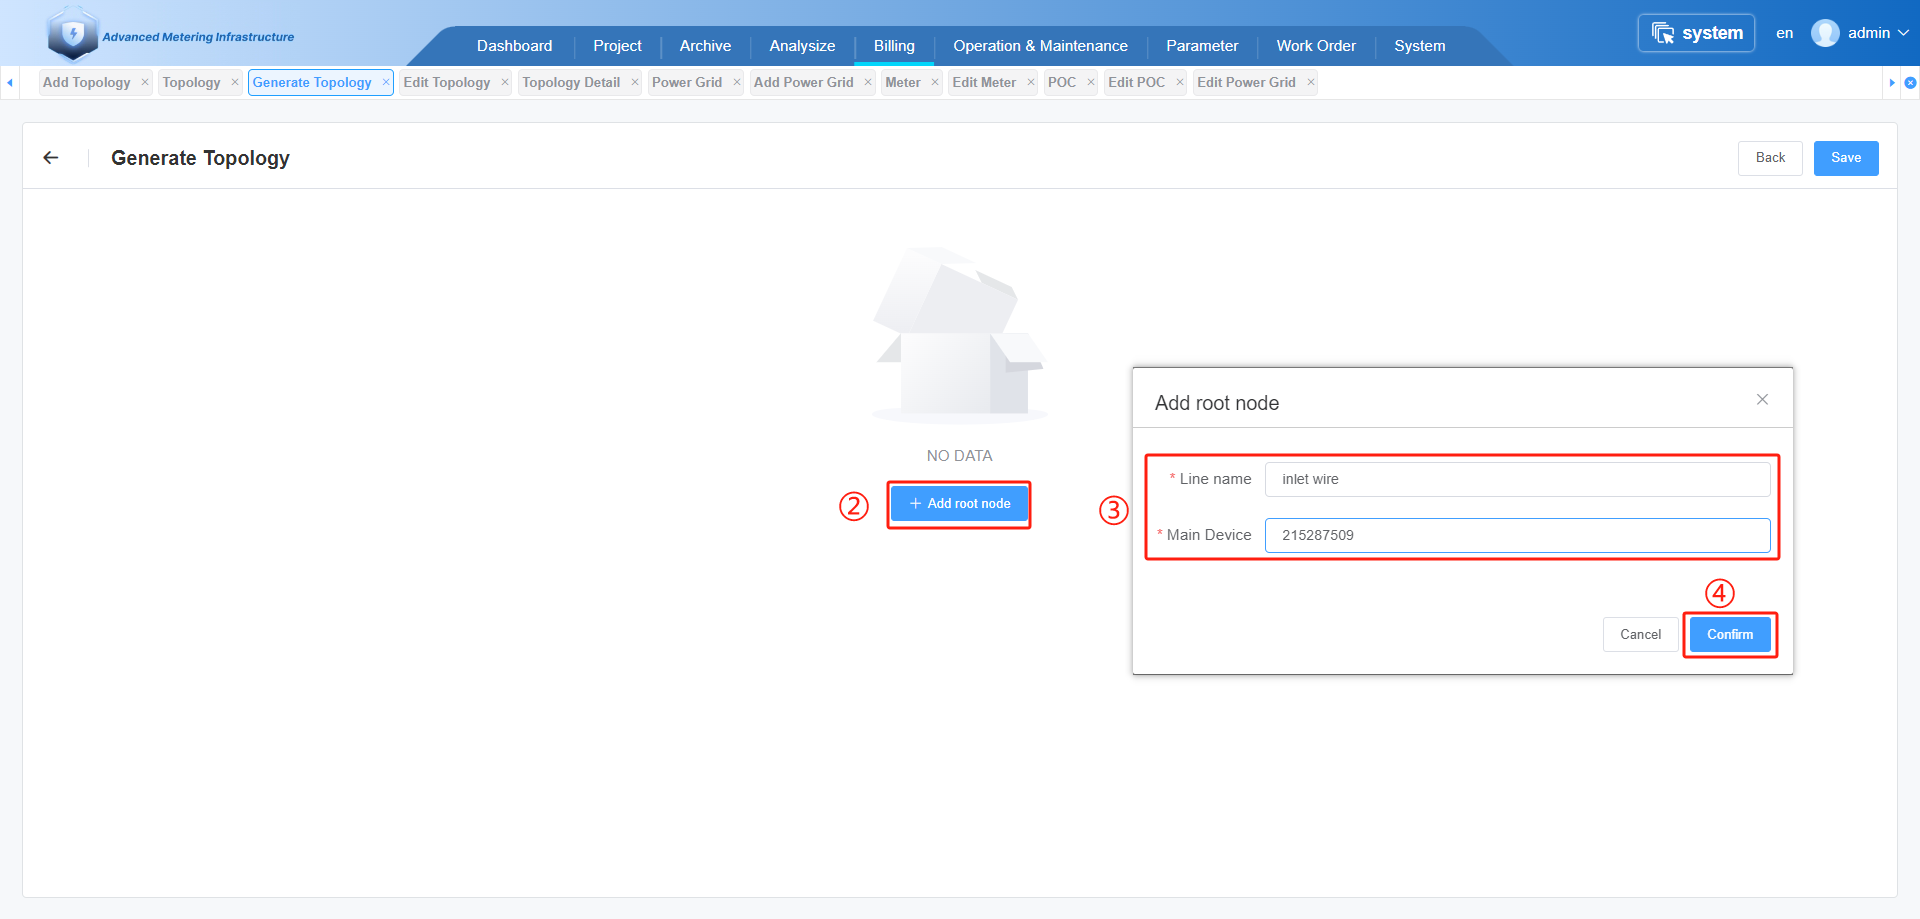
②.Click " +Add root node " button.
③.Input Line name ,and select Main Device(The root node main device is typically the master meter for a consumption unit).
④.Click " Confirm " button.
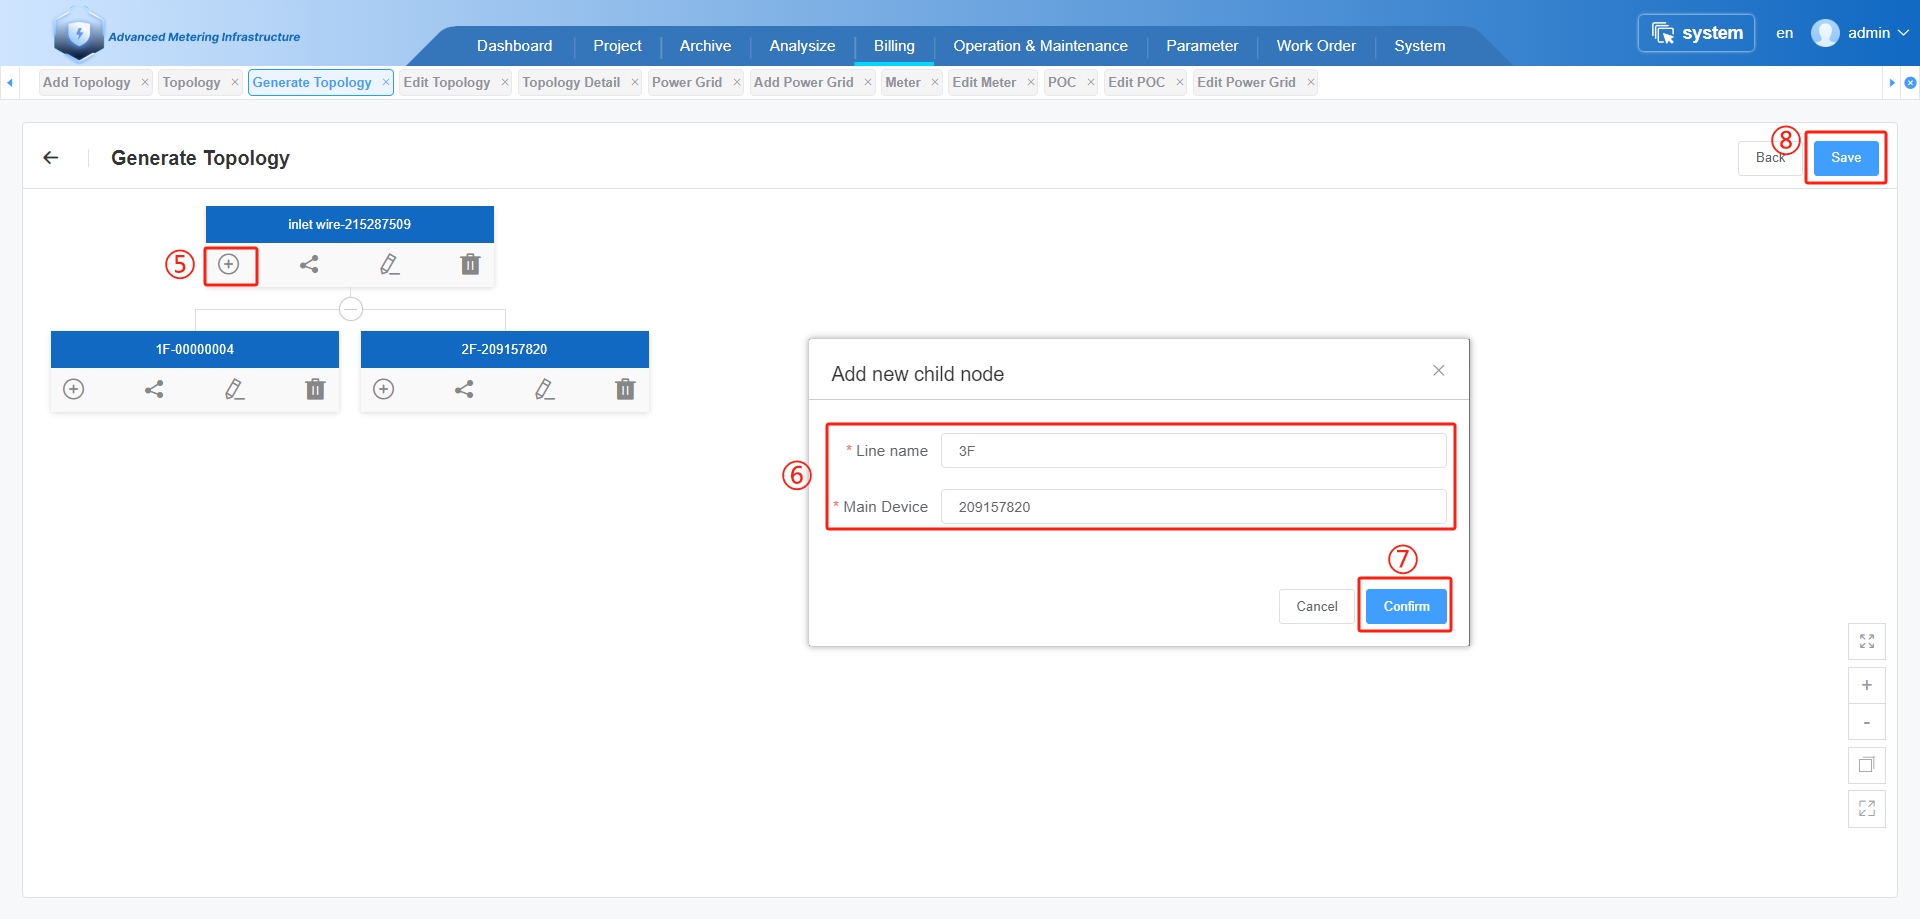
⑤.Click " + " button.
⑥.Input child node Line name,and select child node device.
⑦.Click " Confirm " button.
Repeat steps ⑤-⑦ according to the power grid structure.
⑧.Click " Save " button.
# 7.3 Query line loss

①. Click on the " Billing " menu button.
②. Click on the " Line loss " menu button.
③. Input topology name , select date.
④. Click on the " Search " button , You will see the line loss data displayed in a list format.
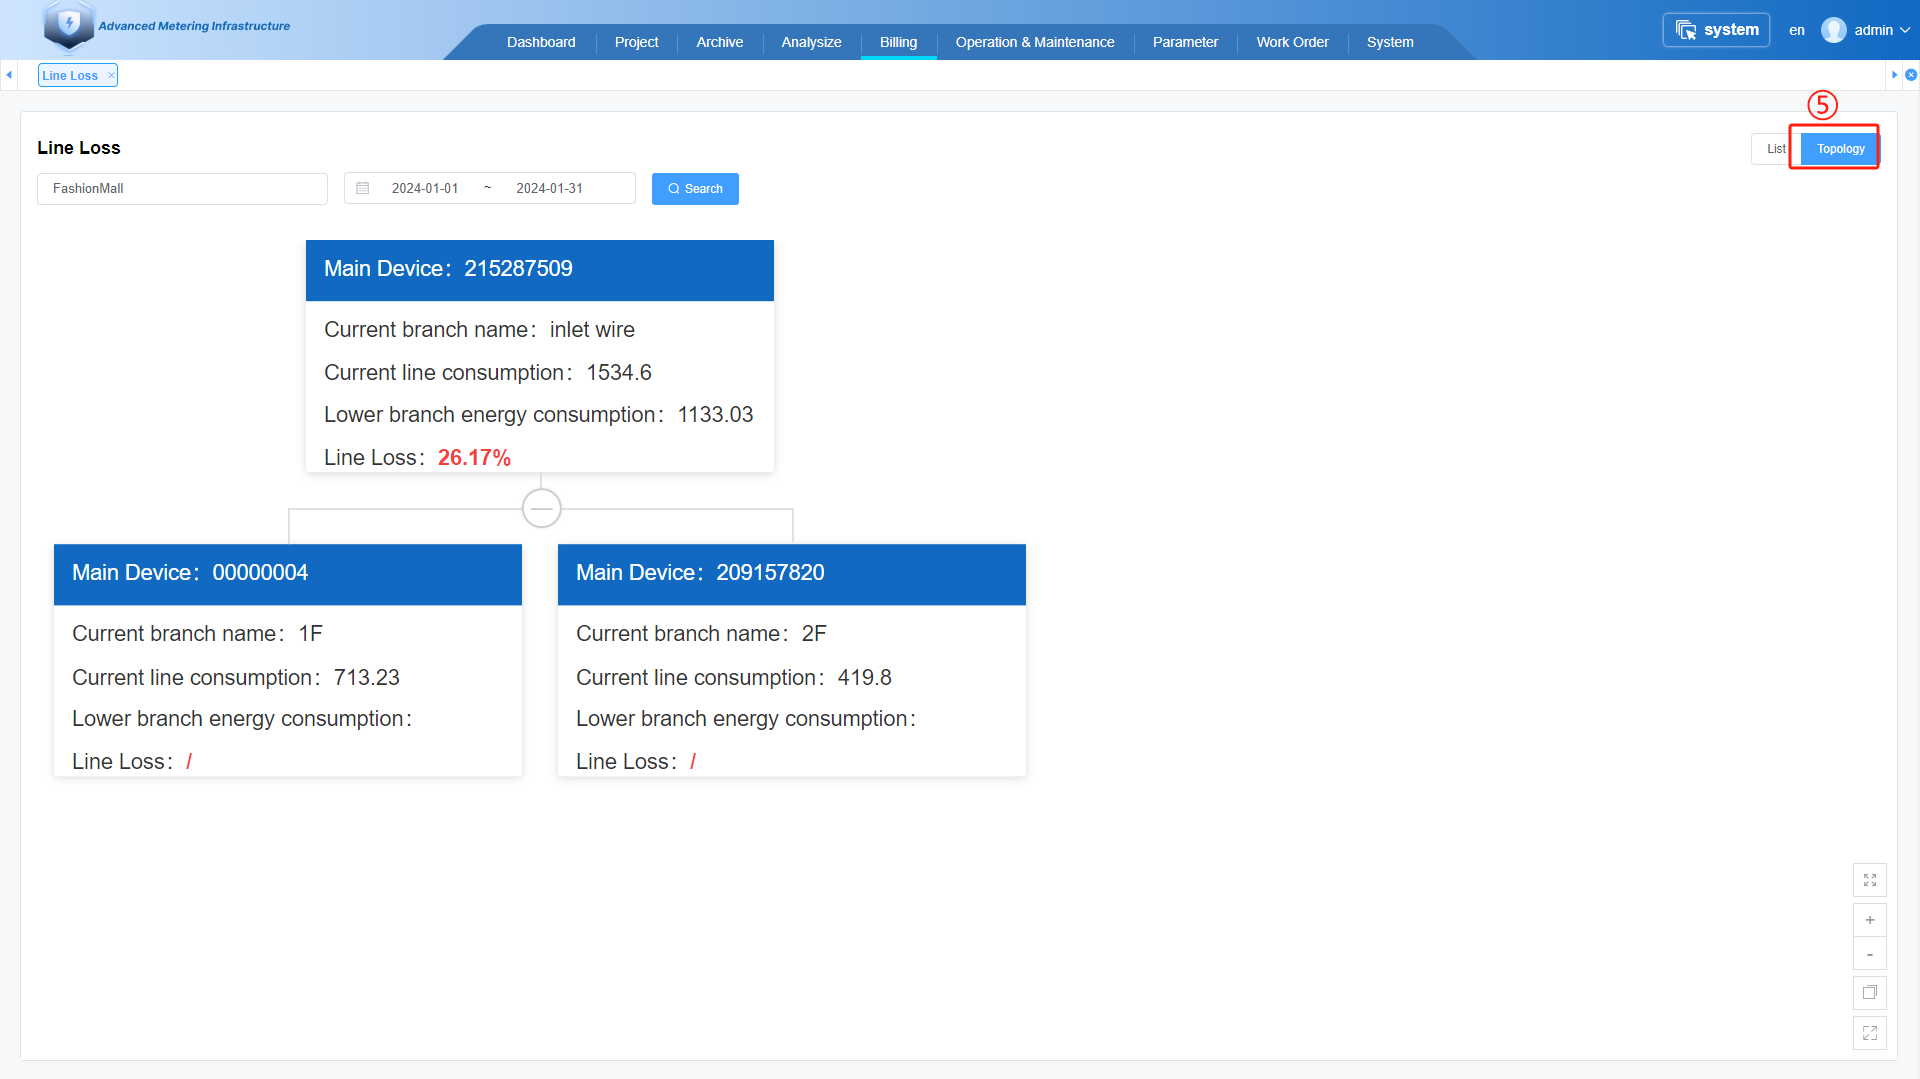
⑤. Click on the " Topology " button to switch to the topology map and display line losses.
# 8.Meter operation
# 8.1 Meter Relay Operation
Note: Whether the meter can remotely open or close the main relay depends on the hardware and settings of the meter. Please confirm with the salesperson whether your meter supports remote opening or closing of the main relay.

①.Click on the " Operation&Maintenance " menu button.
②.Click on the " Meter operation " menu button.
③.Select meter.
④.Click " Operating " button.
⑤.To disconnect the main relay, please click on “ Main relay disconnect ”,
To connect the main relay, please click on“Main relay connect”.
You will be able to see the operation results and relay status shortly.
# 8.2 Meter Read On-demand
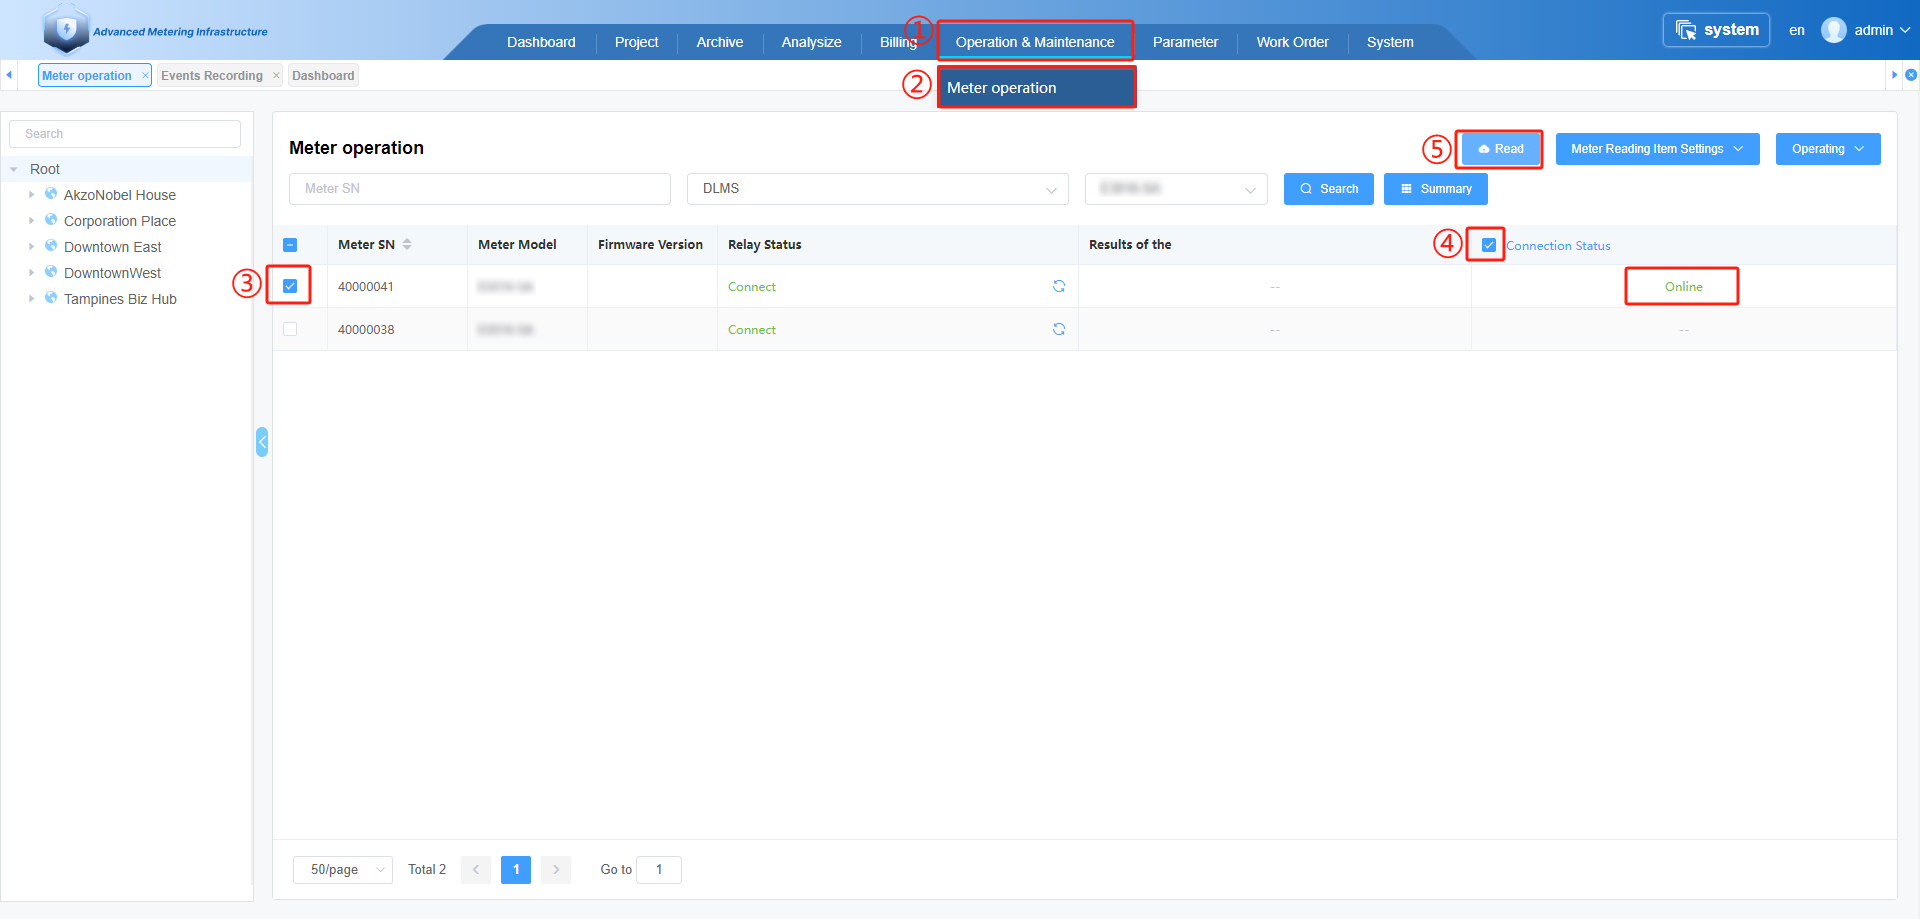
①.Click on the " Operation&Maintenance " menu button.
②.Click on the " Meter operation " menu button.
③.Select meter.
④.Select "Connection Status". (You can click "Meter Reading Item Settings" add other reading item)
⑤.Click on the " Read " button.
# 8.3 Firmware Upgrade
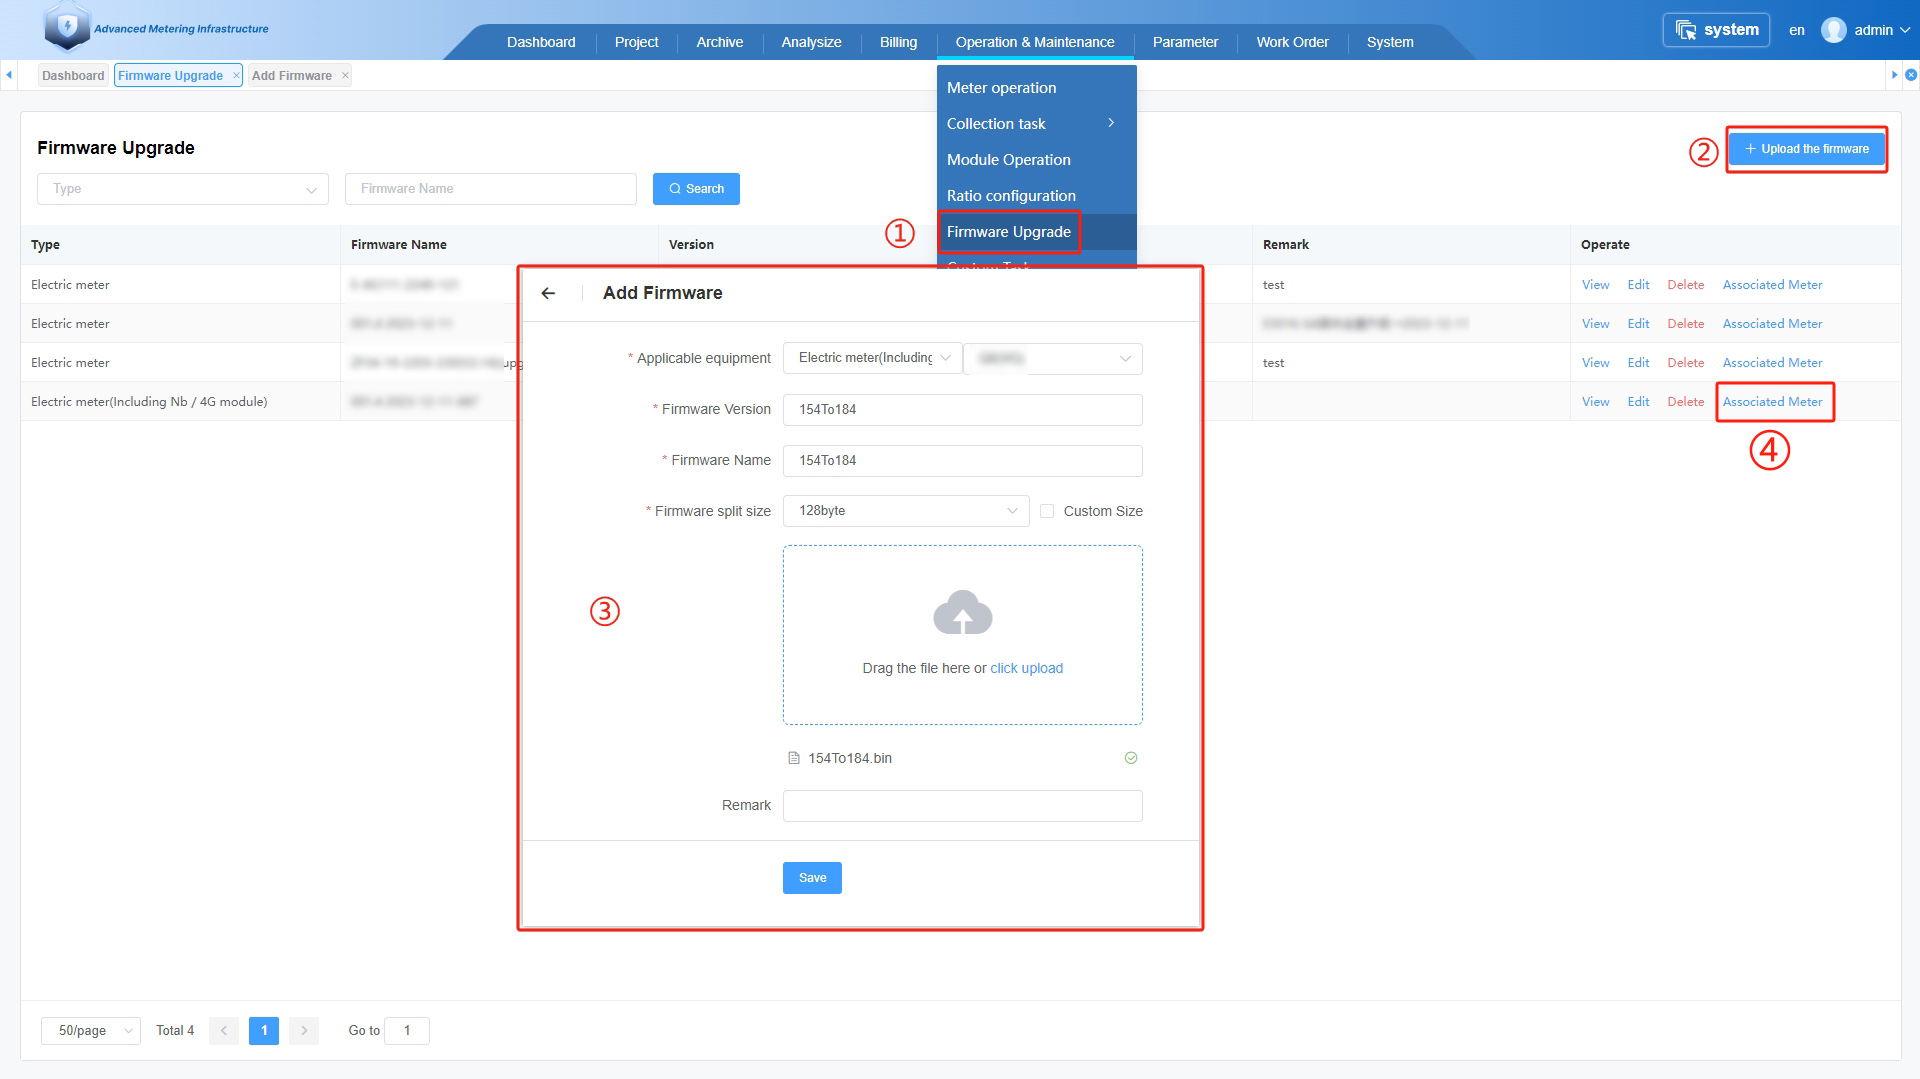
①.Click on the " Operation & Maintenance " and click the " Firmware Upgrade" menu button.
②.Click on the " + Upload the firmware" button.
③.Select Applicable equipment ,Firmware split size , and upload the bin file.
Click on the " Save" button.
④.Find the uploaded firmware and click the "Associated Meter" button.
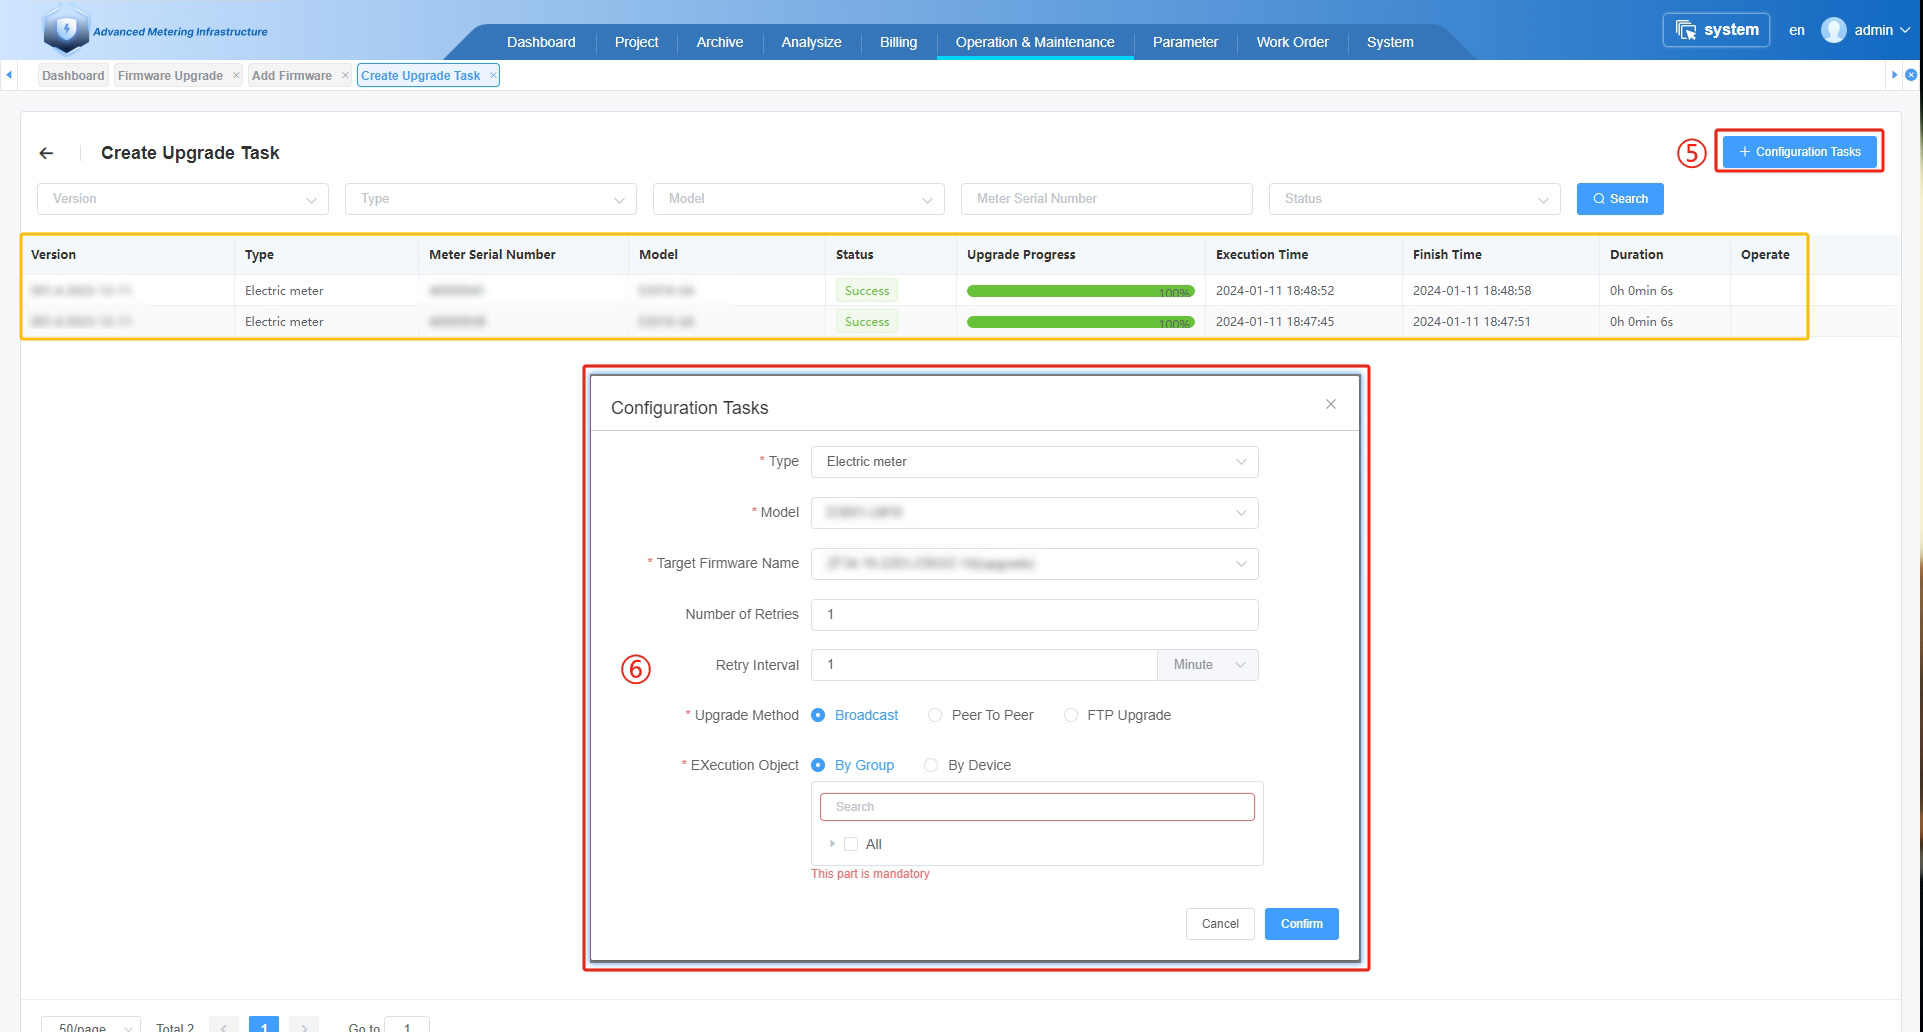
⑤.Click on the " + Configuration Tasks" button.
⑥.Select Firmware and Execution object info ,Click on the " Confirm" button .
Wait a few seconds, you will see the upgrading progress bar, if there is a failure, you can click "retry".
# 8.4 Configuration CT Ratio / PT Ratio (WEB)
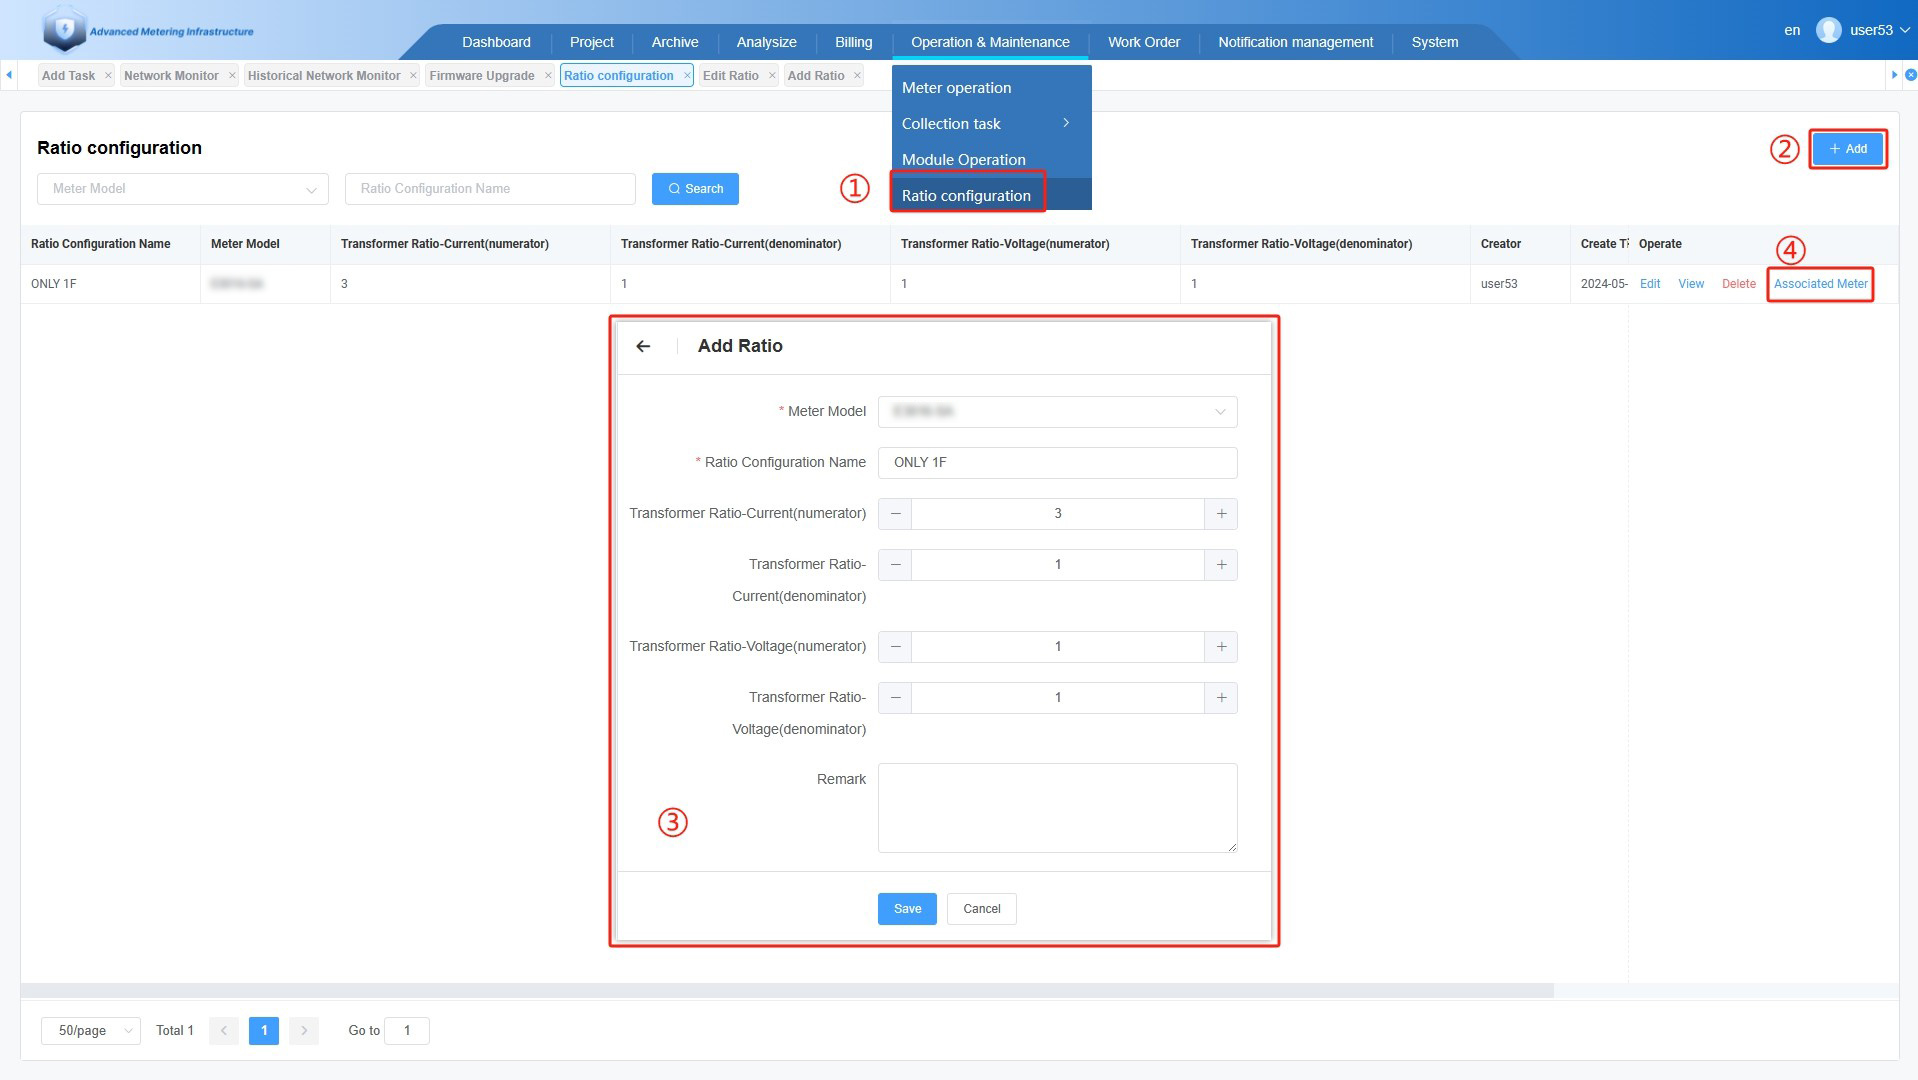
①.Click on the " Operation & Maintenance " and click the " Ratio configuration" menu button.
②.Click on the " + ADD" button.
③.Select Meter Model and Ratio info , Click on the " Save" button.
④.Find the Ratio configuration data and click the "Associated Meter" button.
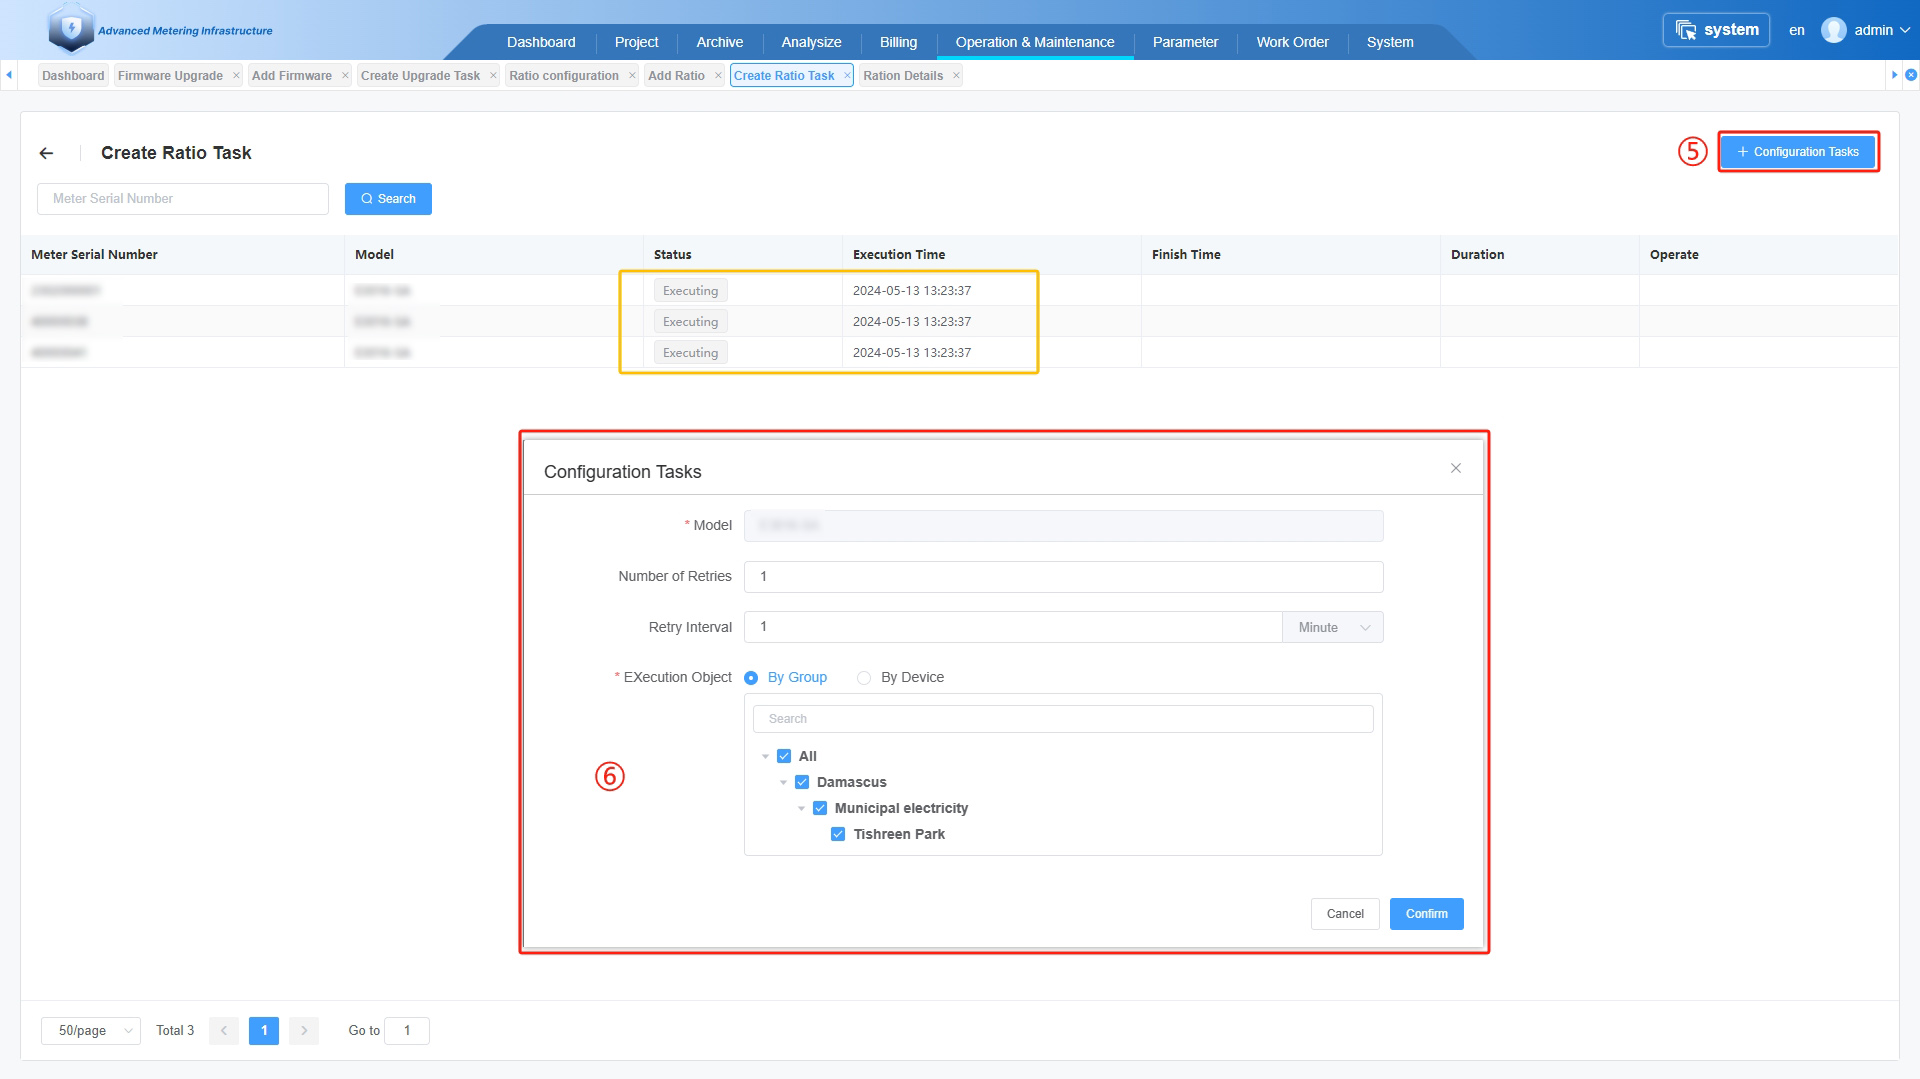
⑤.Click on the " + Configuration Tasks" button.
⑥.Select Execution object info ,Click on the " Confirm" button .
Wait a few seconds, you will see the Ratio configuration progress status.
# 9. Analysize & E-mail Notification
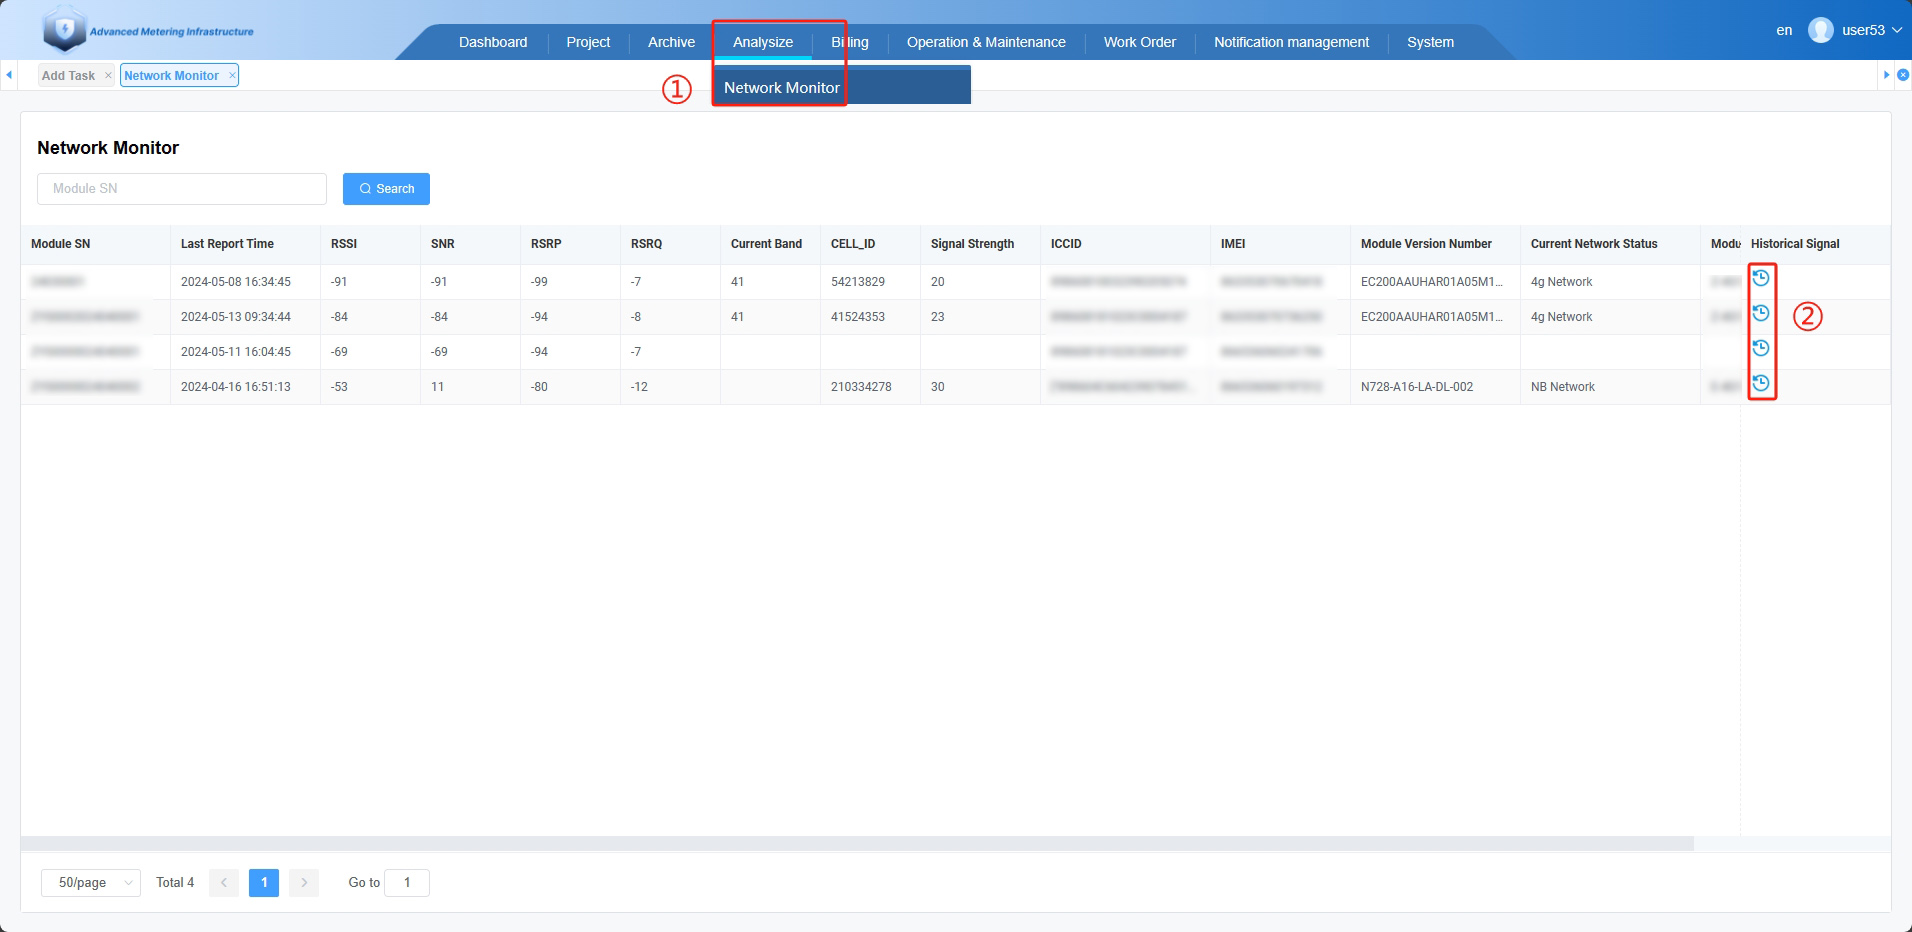
# 9.1 Network Monitor
Operation & Maintenance - Collection task - Collection task - Add Task
Analysize - Network Monitor
# 9.2 Event Recording
Event Recording Typically includes power off, relay disconnect, relay connect, terminal cover open, etc .
If your meter supports alarm event reporting , you can view the reported events here after the event is triggered . if not , you can refer to 5.2 add a evevt collection task ,then view the reported events here.
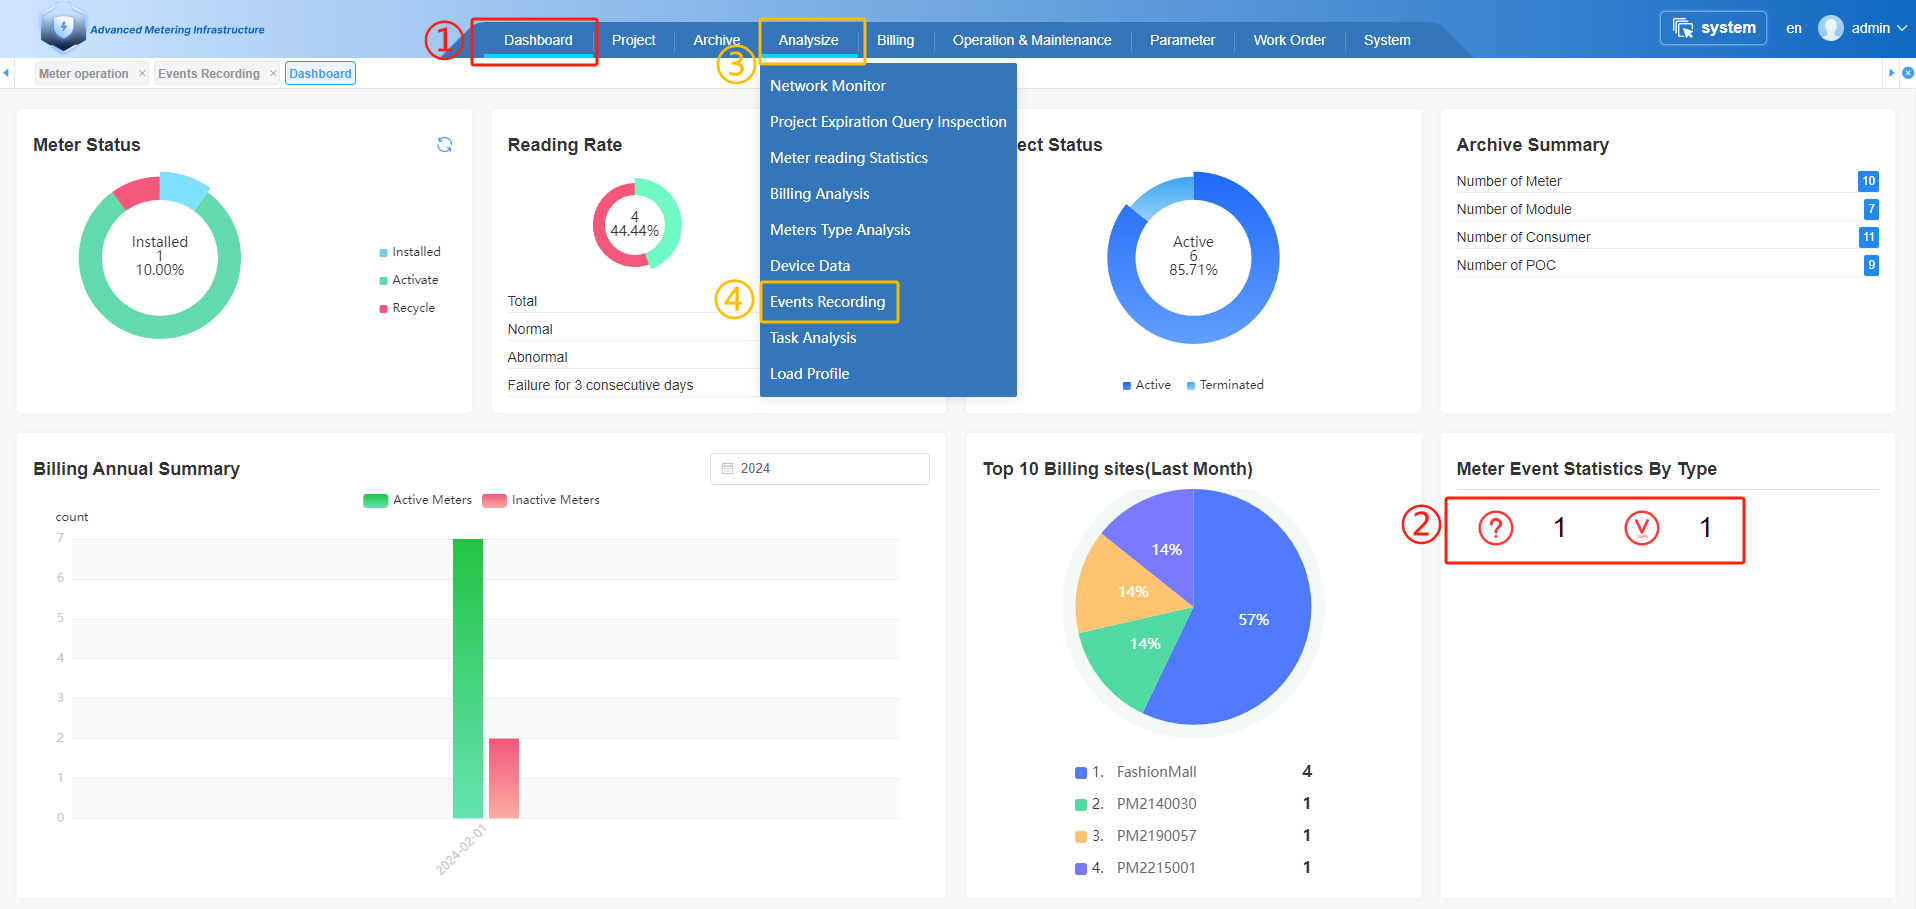
You can view the meter events by clicking on the ②event icon on the ①"dashboard" page, or by clicking on the ③"Data Analysis" menu button and then clicking on ④"Event Recording"menu button.
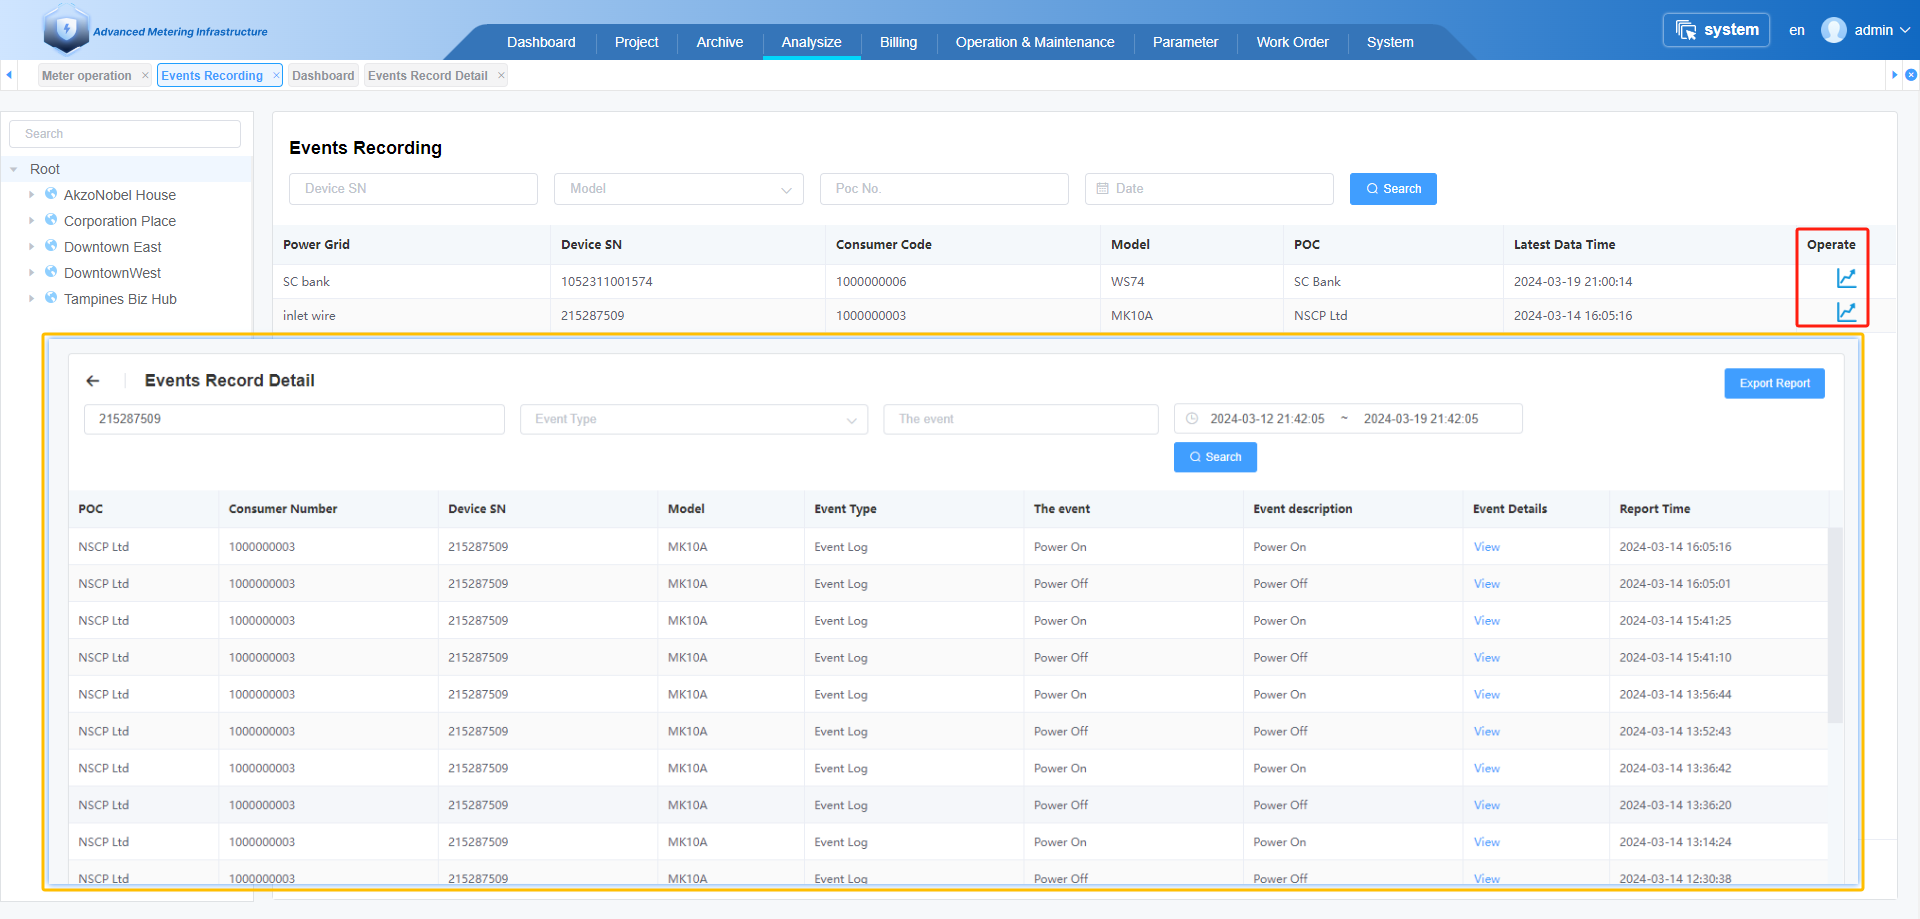
Click on the " Operate " icon, You will be able to see the meter events record detail.
# 9.3 Alarm Event E-mail Notification
# 9.3.1 Add Notification Template
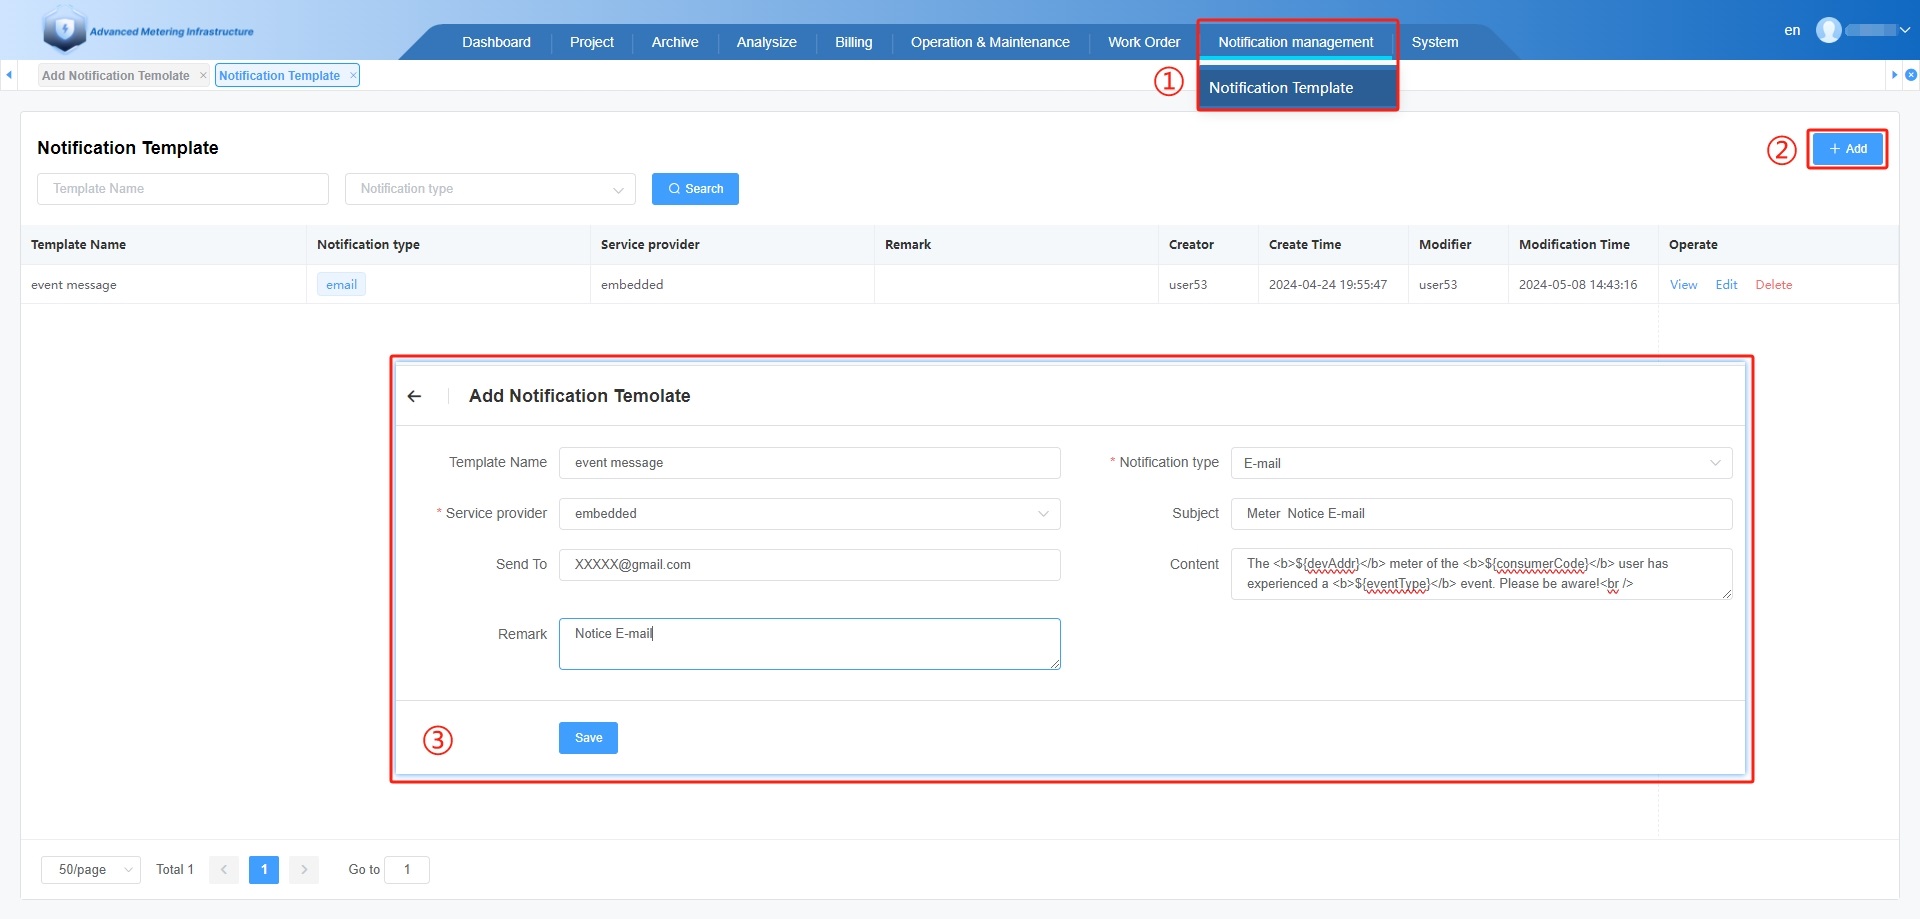
①.Click on the " Notification management " and click the " Notification Template " menu button.
②.Click on the " +Add" button.
③.After filling out the notification template information, click the save button.
Recommended Notification Template Content :
The <b>${devAddr}</b> meter of the <b>${consumerCode}</b> user has experienced a <b>${eventType}</b> event. Please be aware!<br />
<b>consumerCode</b>: ${consumerCode}<br />
<b>consumerName</b>: ${consumerName}<br />
<b>devAddr</b>: ${devAddr}<br />
<b>devModel</b>: ${devModel}<br />
<b>eventType</b>: ${eventType}<br />
<b>eventName</b>: ${eventName}<br />
<b>eventValue</b>: ${eventValue}<br />
# 9.3.2 Add Rule Engine
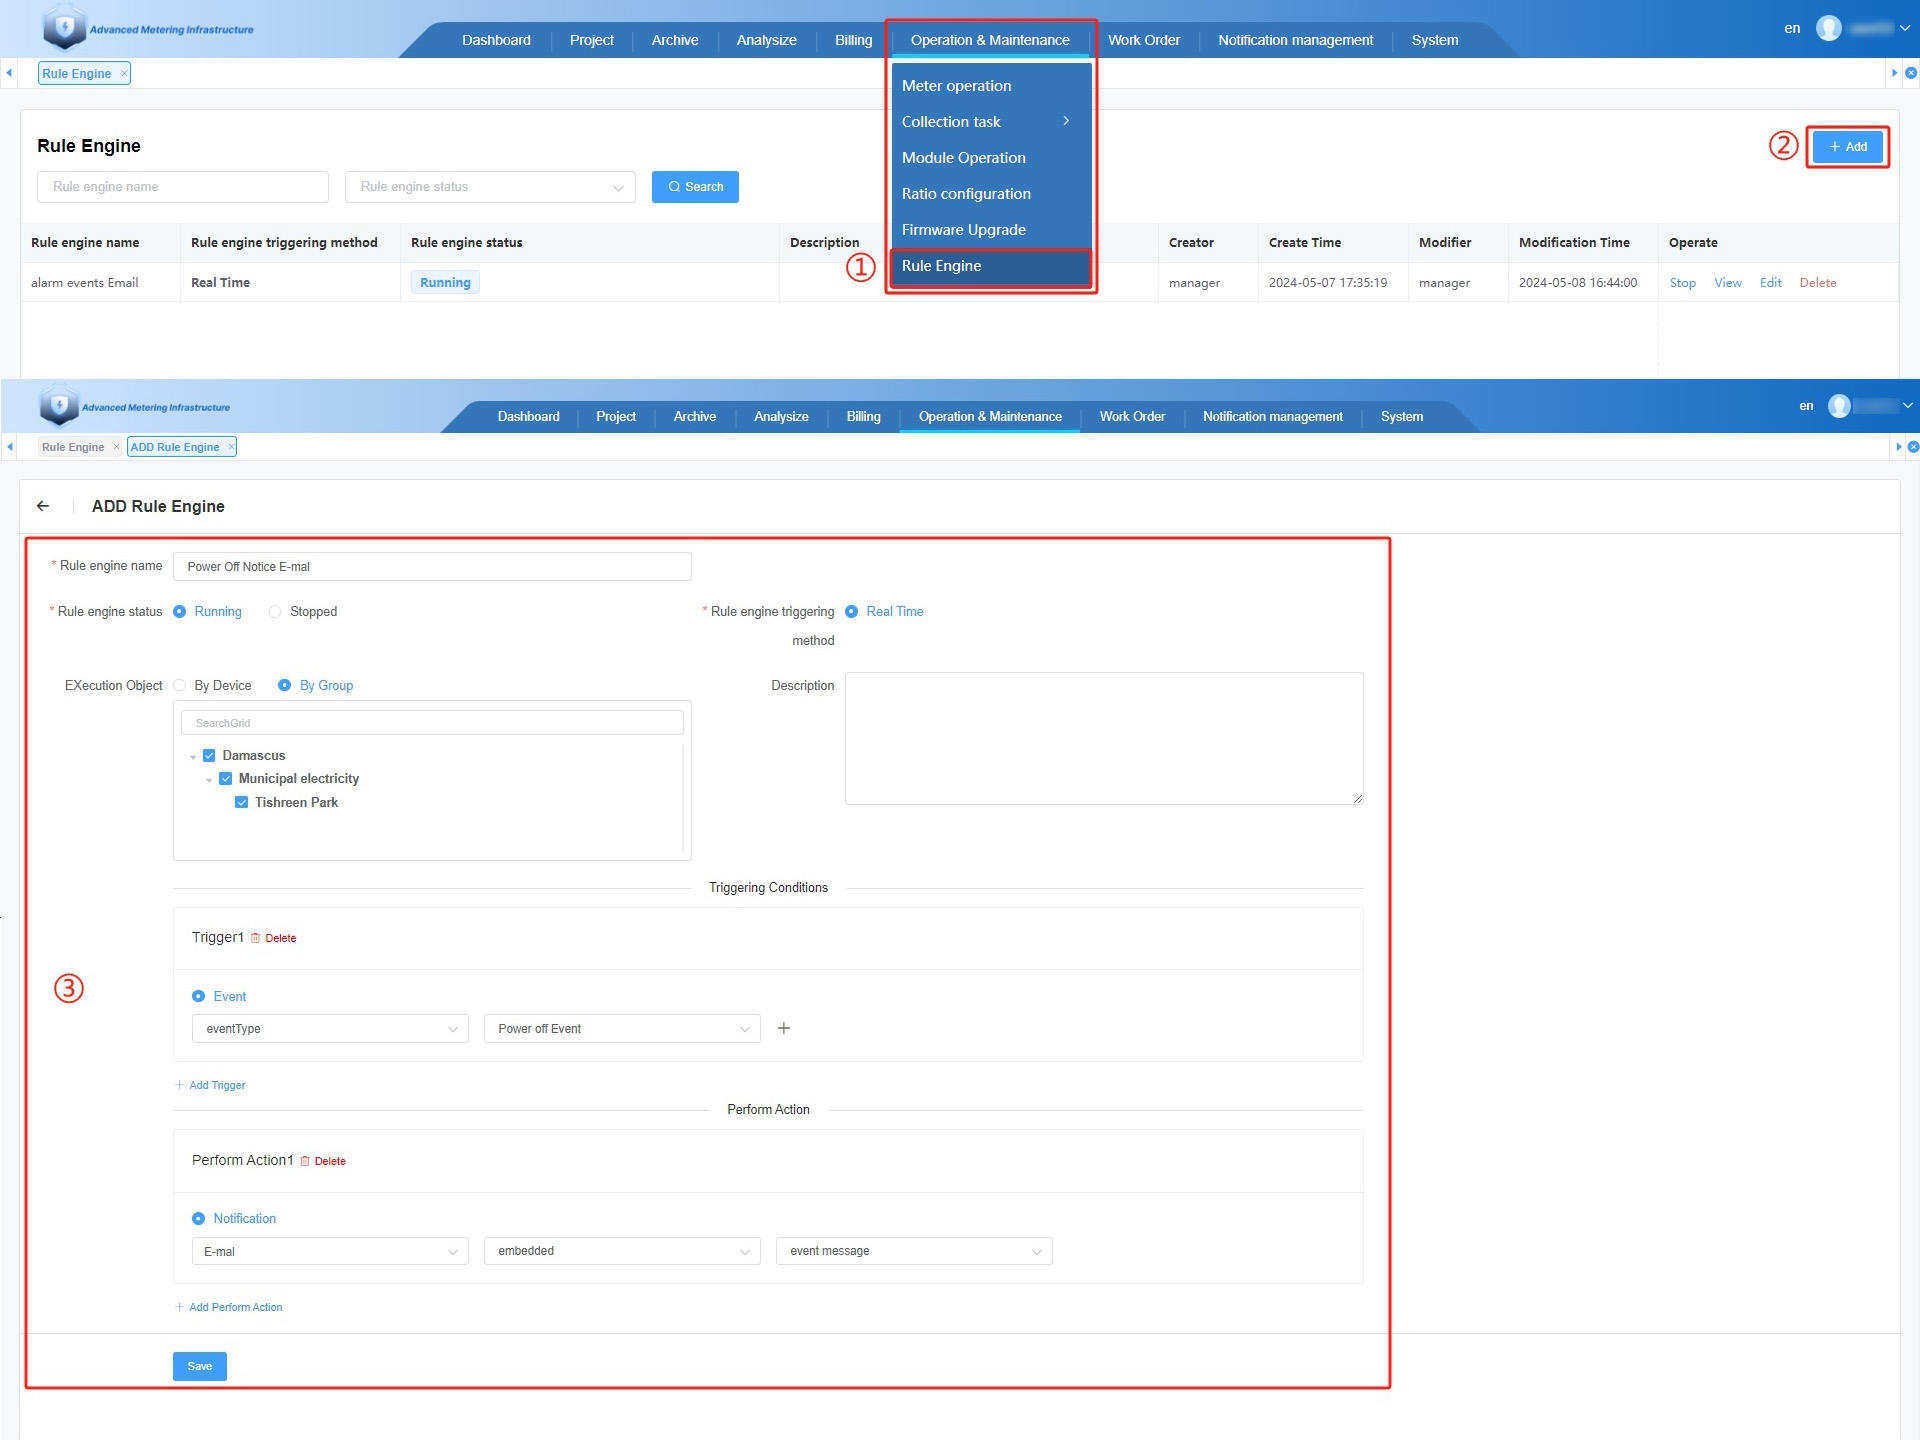
①.Click on the " Operation & Maintenance " and click the " Rule Engine " menu button.
②.Click on the " +Add" button.
③.After filling out the Rule Engine information, click the save button.
Execution Object :recommend " By Group"
Triggering : It is recommended to use eventType as the trigger notification condition.
# 10.Parameter Template
# 10.1 Add Parameter Template Channel
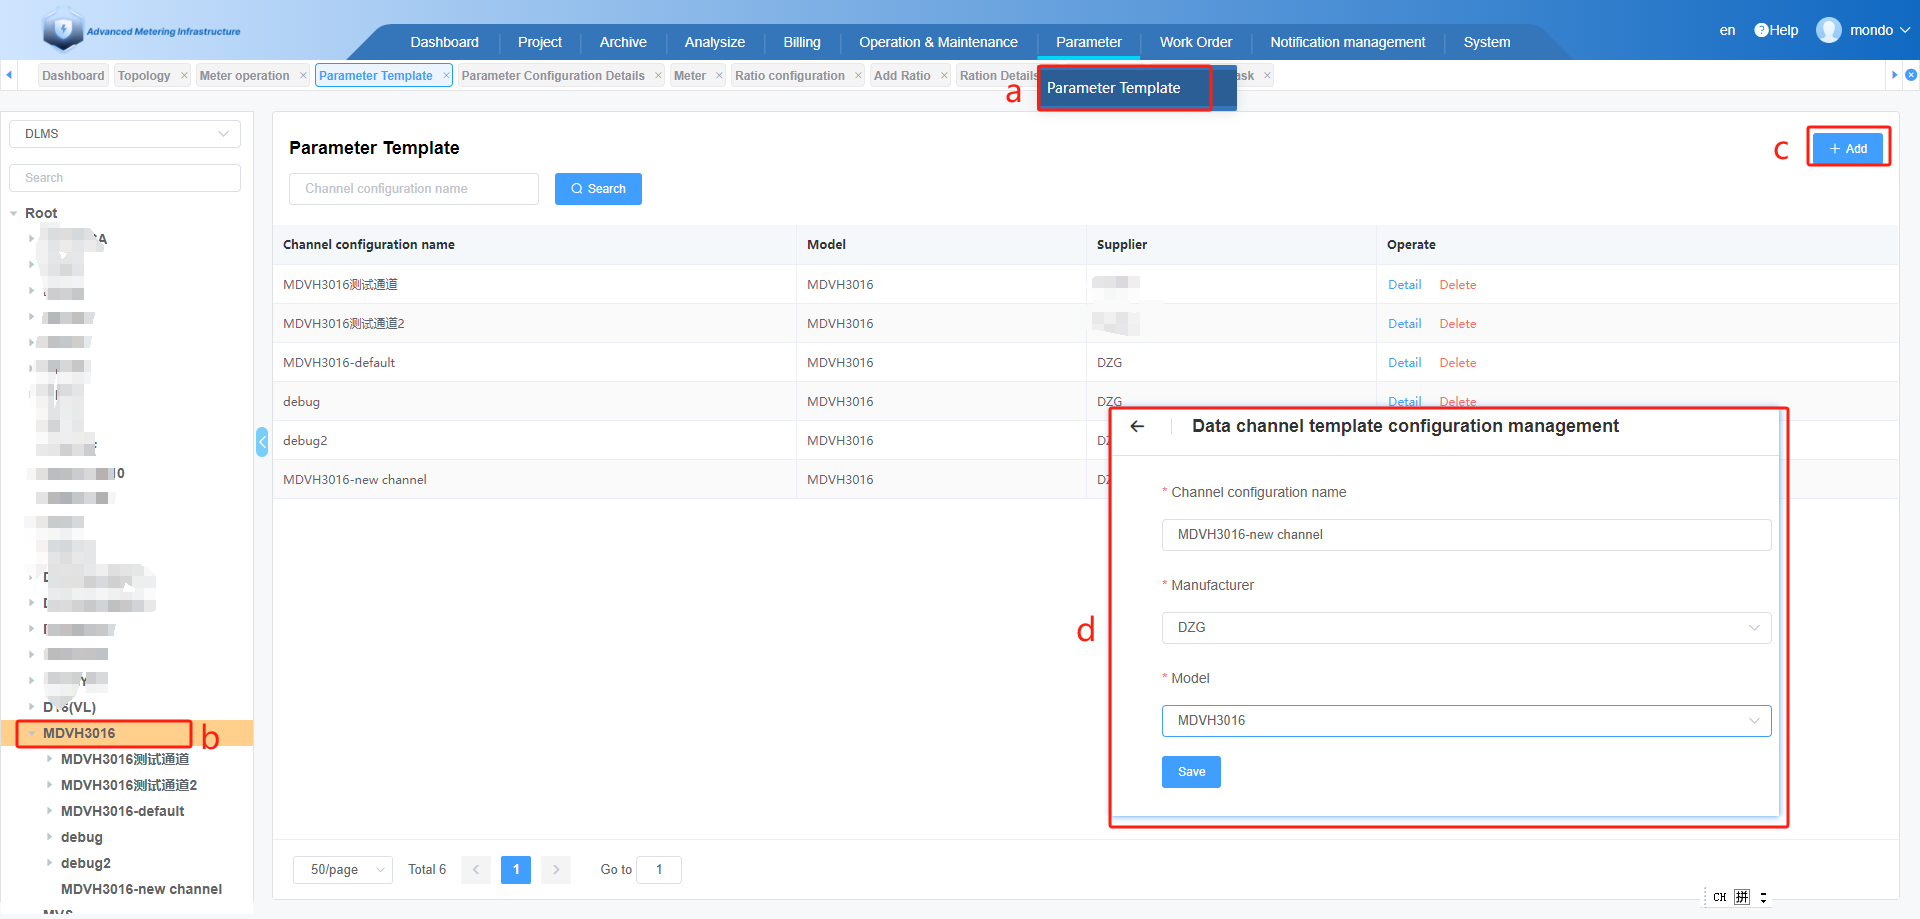
a. Click Parameter Template
b. Select meter model
c. Click "+add"
d. Input channel info
# 10.2 Add Parameter Template
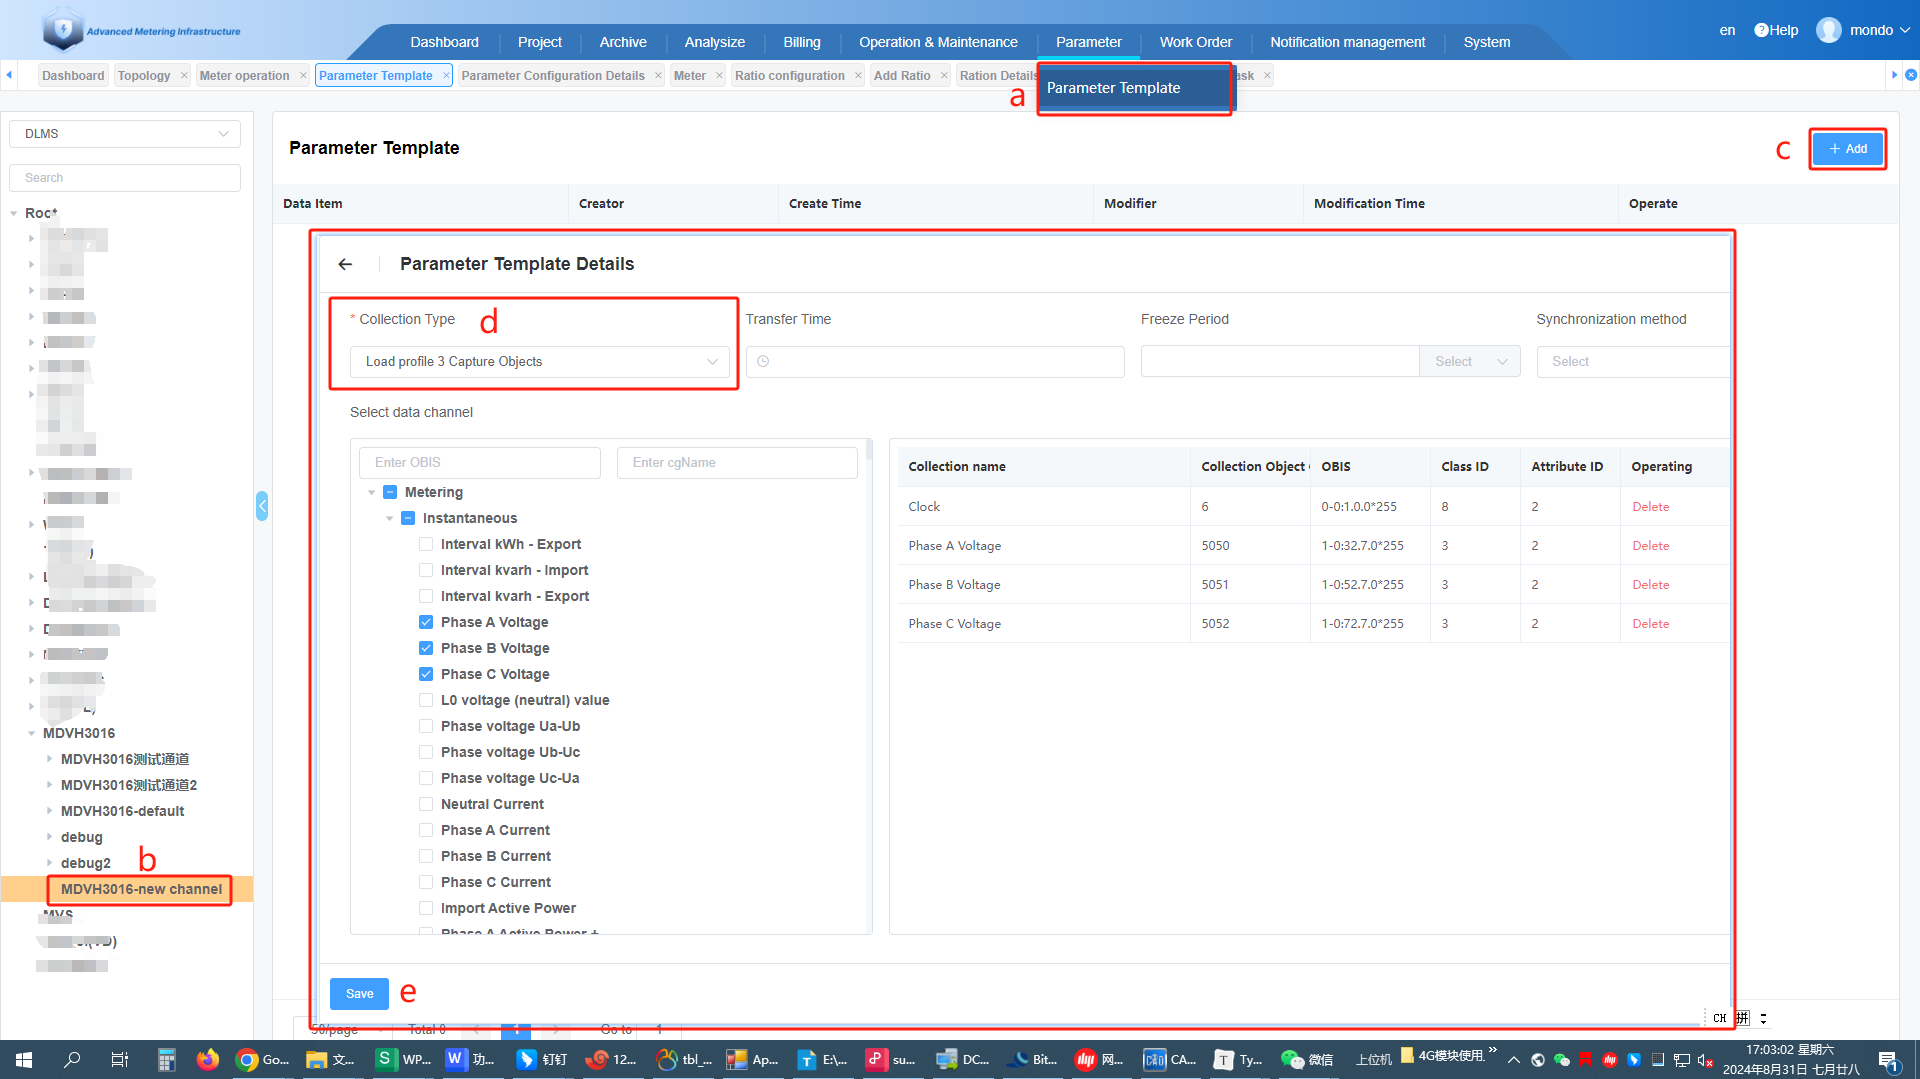
a. Click Parameter Template
b. select channel under the meter model
c. Click "+Add"
d. select Collection Type and edit Parameter info
e. save
# 10.3 Parameter Configuration
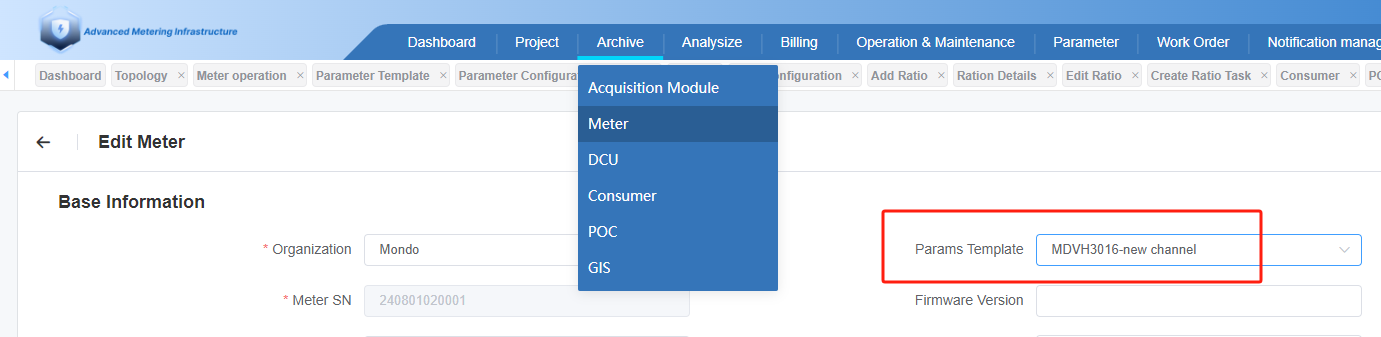
First make sure that the parameter template of the table file is associated with this template:
Archive - Meter - Edit Meter - Params Template
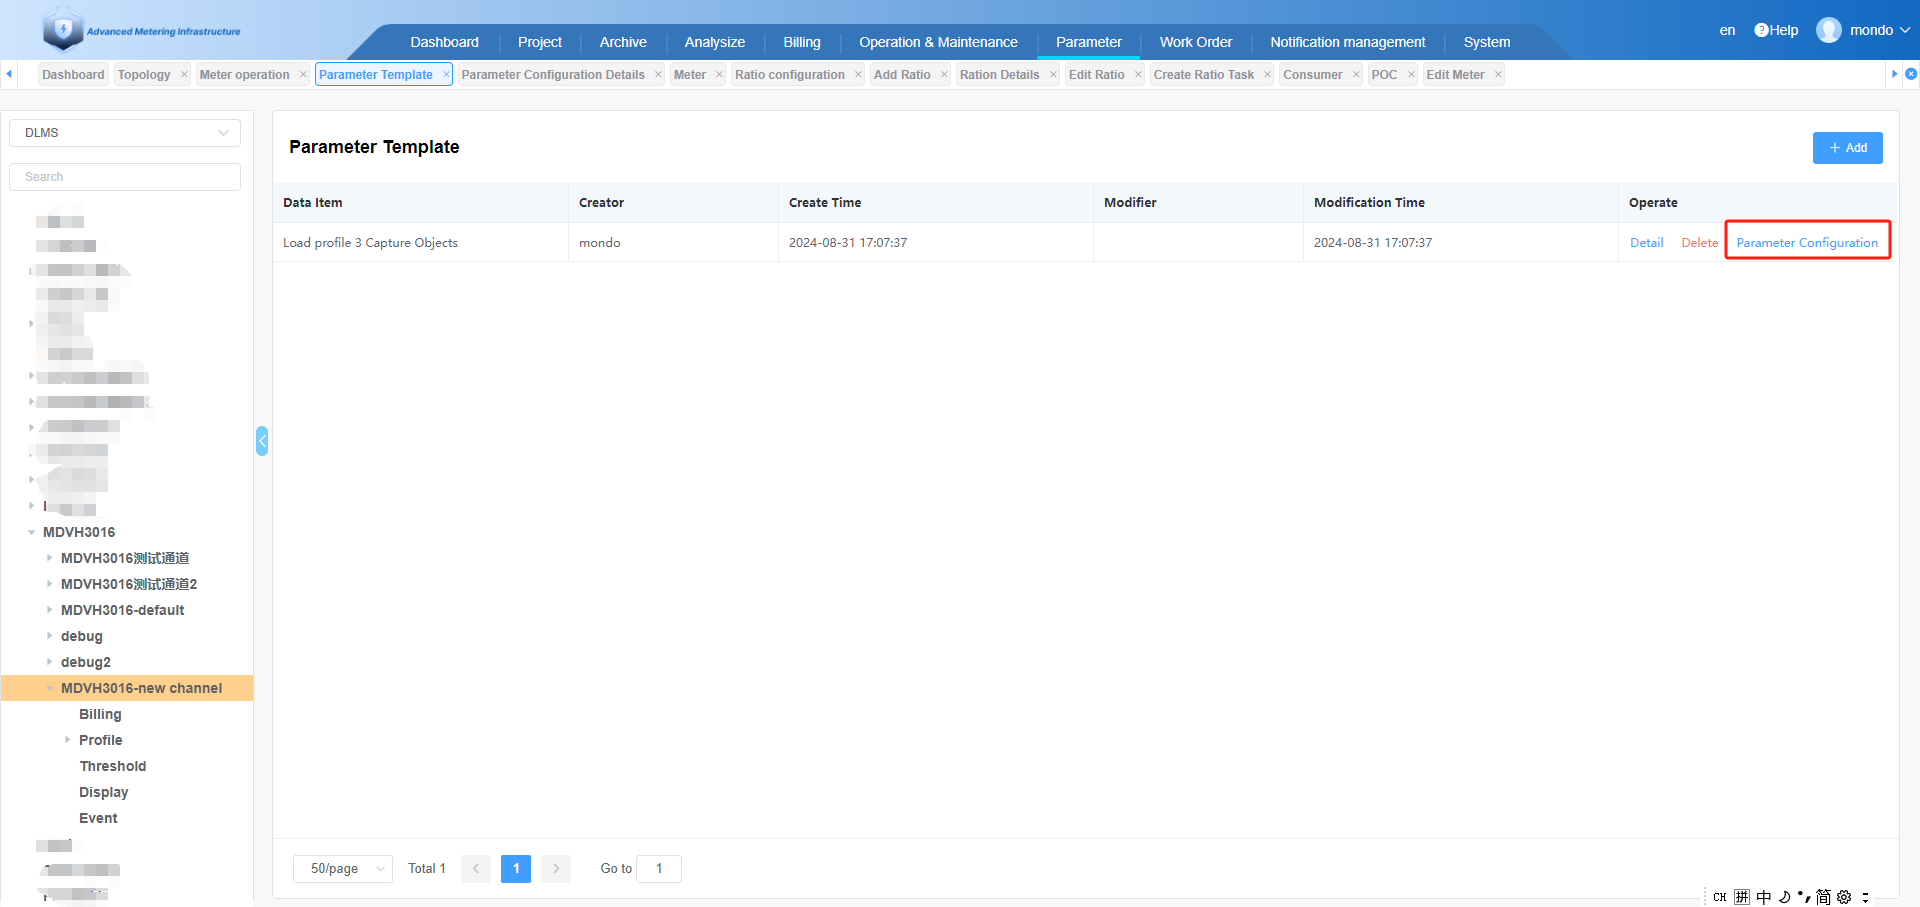
a. Click Parameter Template
b. select channel under the meter model
c. click "Parameter Configuration"
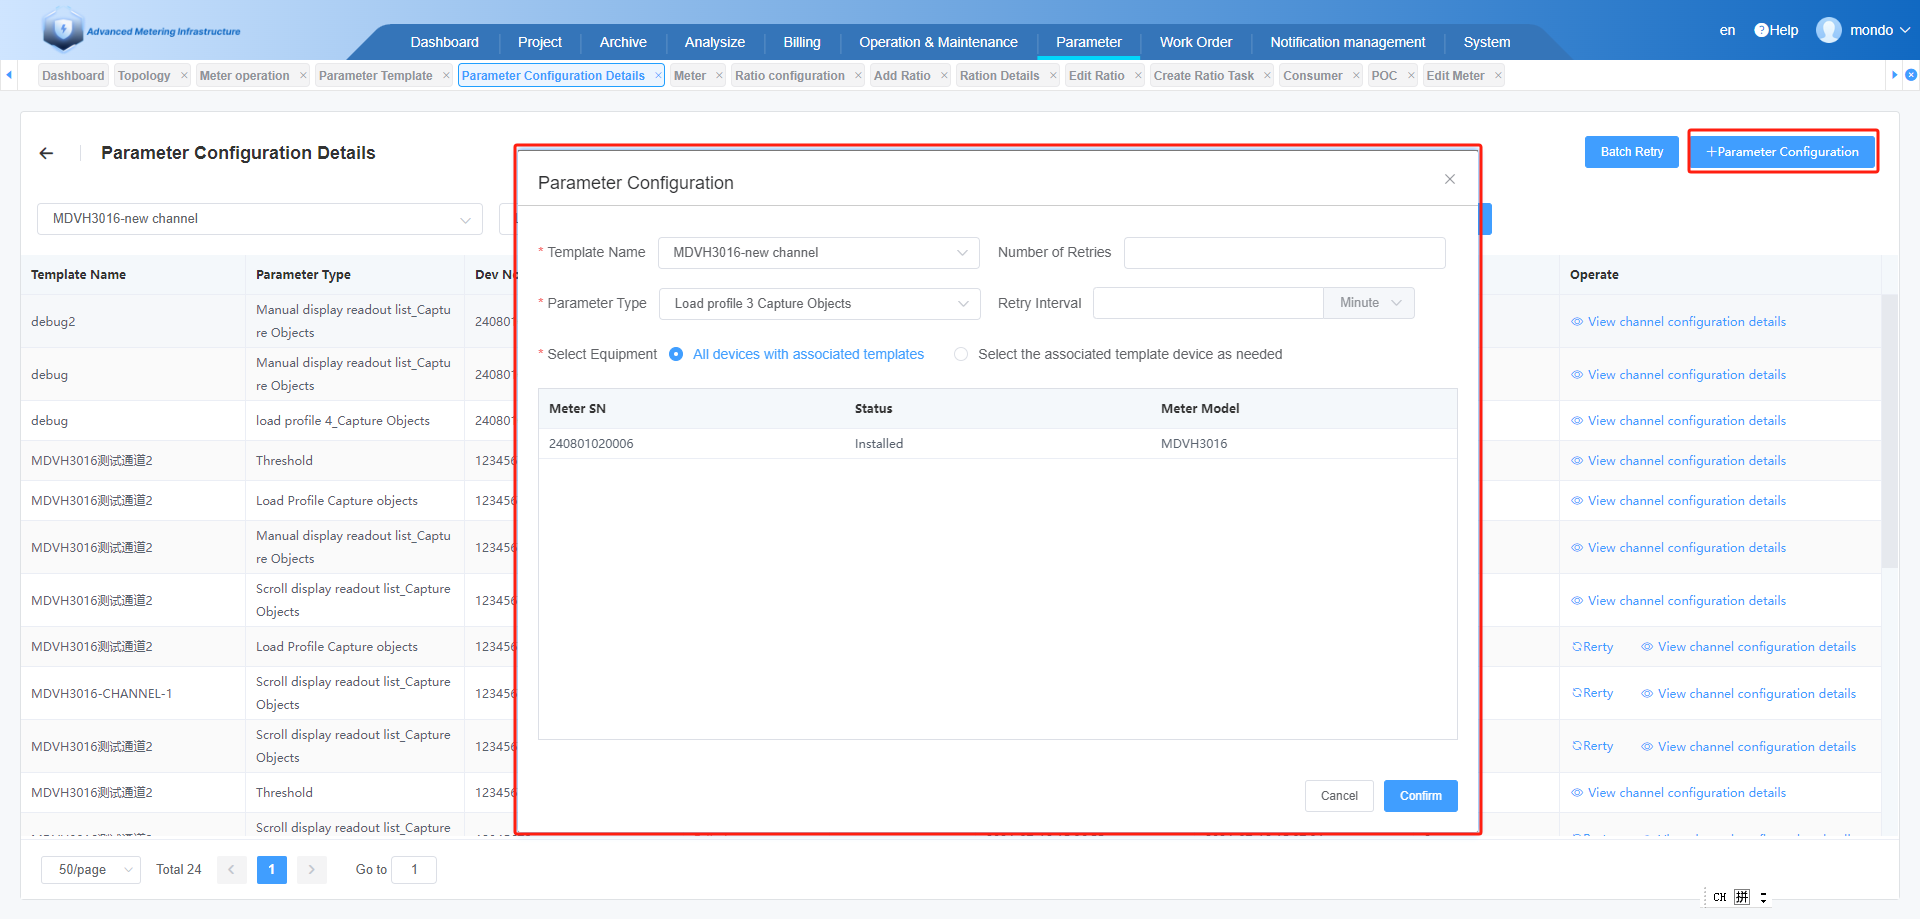
a. Click "+Parameter Configuration" .
b. select target meter and click Confirm .
# 11.Customer Management
This feature is limited to system administrators. The customer management function is designed to distinguish between the devices and electricity users of different customers, allowing customers to log into the system and manage their own devices and electricity users independently.

①.Click "System" - "Customer Account Creation"
②.Click " +Add "
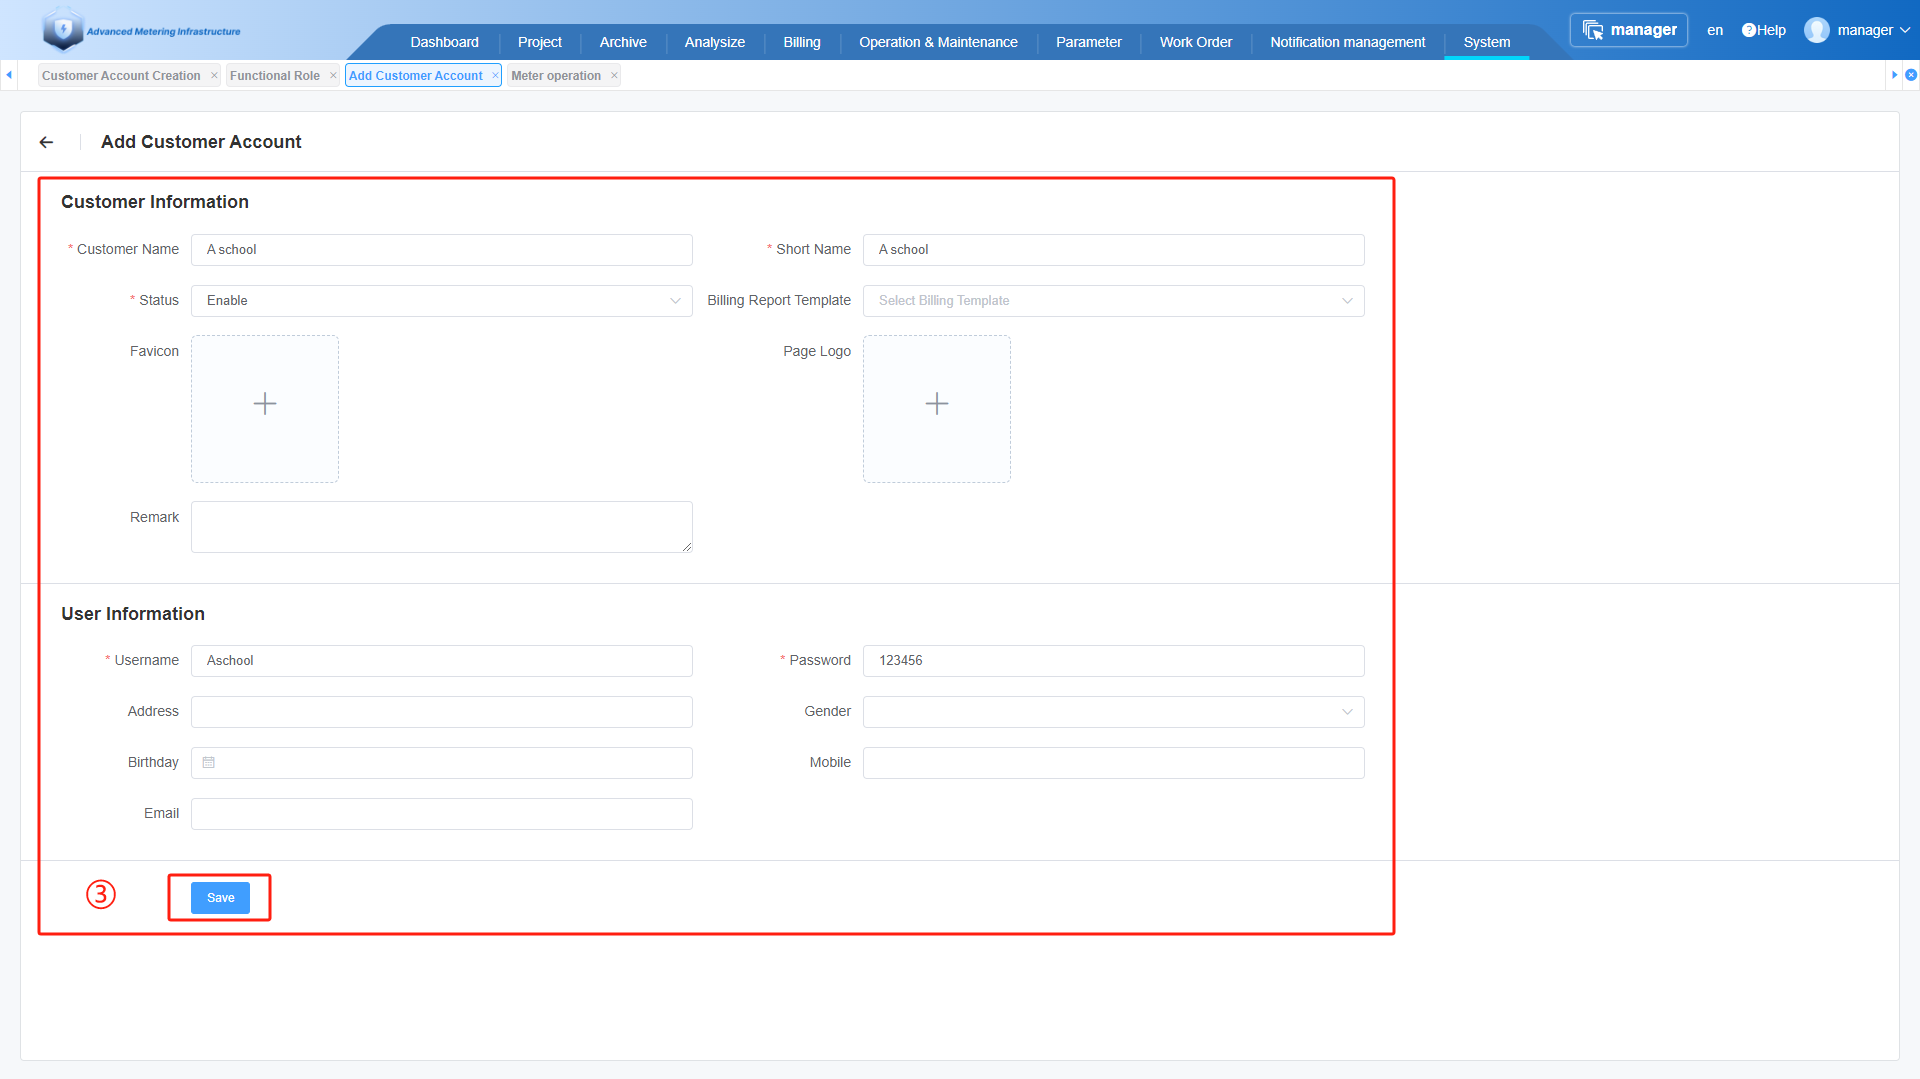
③.Enter the customer information and the user account information for logging into the system, then click Save.
Be sure to save the username and password information!
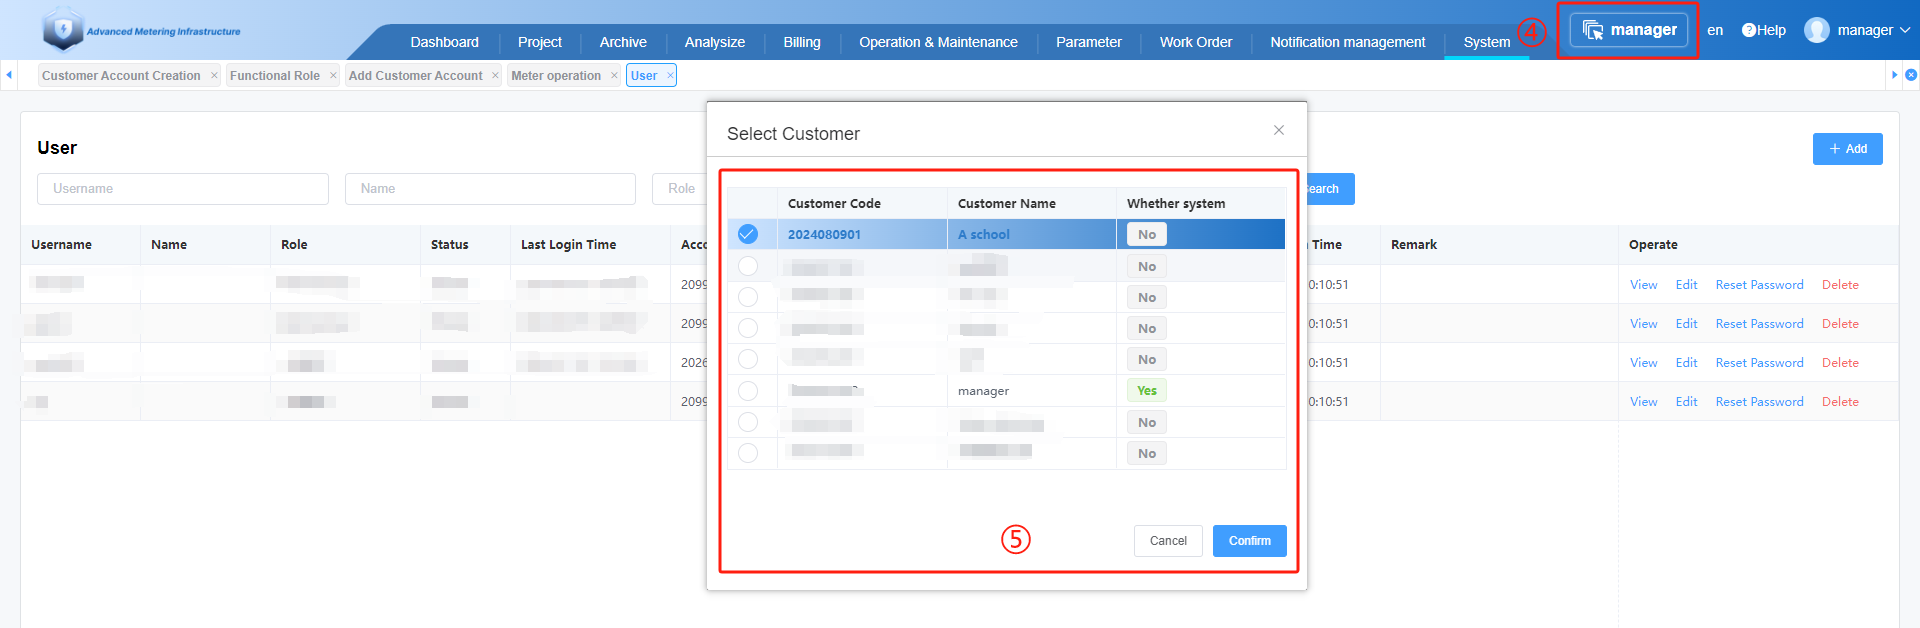
④.Click switch button.
⑤.Select new customer and click Confirm.

⑥.Click "System" - "User".
⑦.Click "Edit".
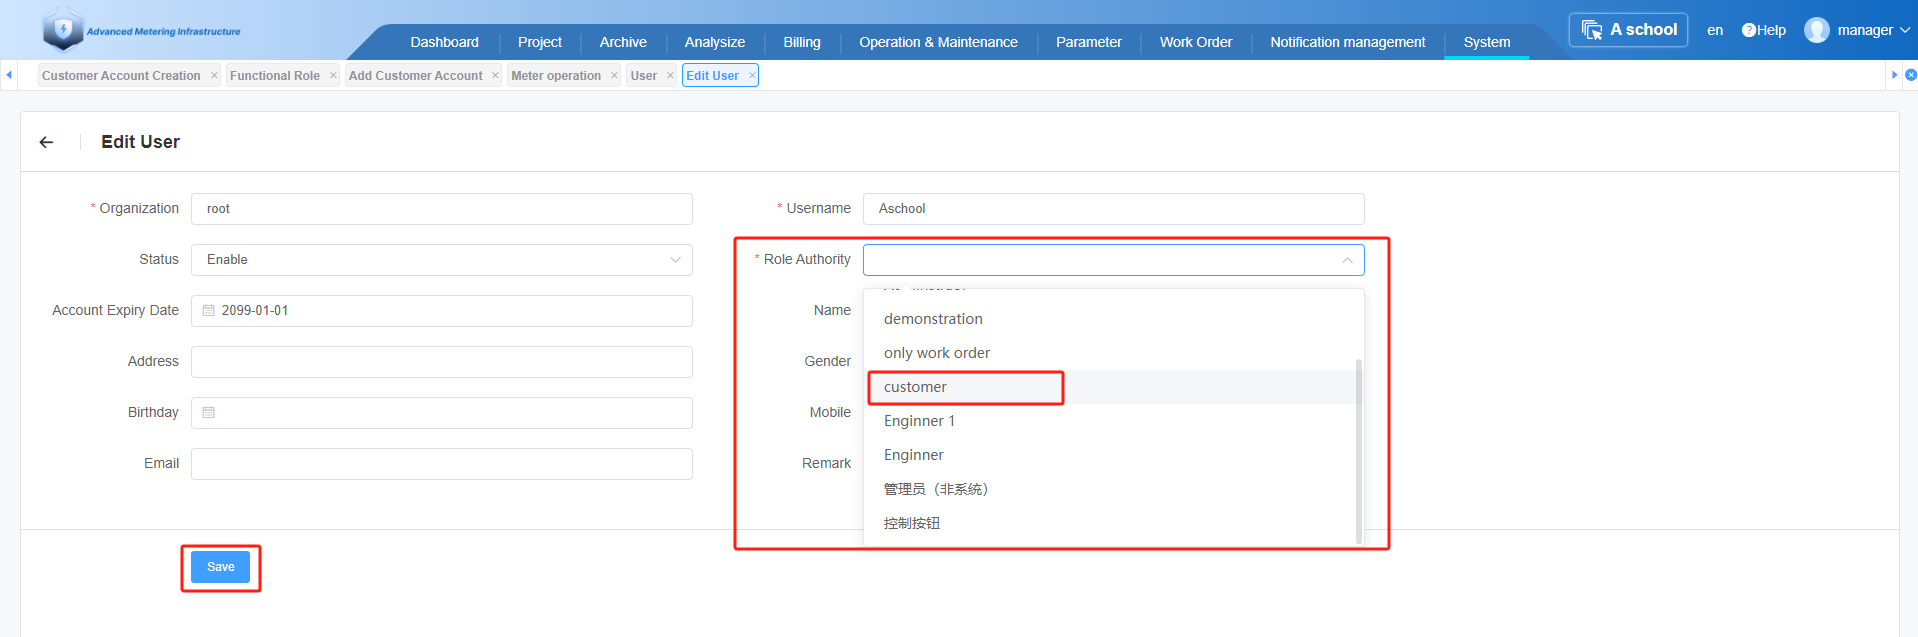
Select new customer Role Authority as "customer" ,and click "Save" button.
The user can now log in to the system with their account.